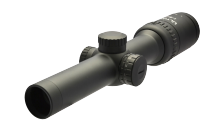
Products:
Congratulation on the purchase of your new UltimaX scope!
Introduction
These instructions are provided to guide you in the correct use of the riflescope.
Please read them carefully before attempting to use this riflescope with your chosen rifle. CAUTION: Ensure at all times the rifle is unloaded during the mounting and adjustment of the riflescope.
Only during final adjustment at an approved range should you load the firearm in accordance with safe shooting practices.
Fiber Optic Illumination System
This new technology is an important improvement of the common illumination systems.Used for all Ultimax scopes it offers an extreme bright and precisely illuminated sharp red dot at the same time.
Even in brightest conditions as on snow, sun or sand your Ultimax scope supports your hunt with a perfect illuminated precise red dot. Of course lowest settings of this illumination are optimized and field tested for lowest light conditions.
This helps your shooting and is a major difference to common illuminated reticles.
Good Sports!
| Specifications | ||||||
| 1-6×24 | 2.5-10×50 | 3-12×56 | ||||
| Low | High | Low | High | Low | High | |
| Magnification | 1X | 6X | 2,5X | 10X | 3X | 12X |
| Exit Pupil (mm) | 12,0 | 4,1 | 16,2 | 5,0 | 15,1 | 4,2 |
| FOV (feet @ 100 yard) | 120,0 | 21,0 | 41,4 | 11,4 | 37,0 | 9,3 |
| FOV (meter @ 100 meter) | 10,0 | 7,0 | 13,8 | 3,8 | 12,4 | 3,1 |
| Eye Relief (mm) | 95,0 | 95,0 | 90,0 | 90,0 | 90,0 | 90,0 |
| Dot Size (cm @ 100m) | 10,5 | 1,8 | 4,0 | 1,0 | 3,6 | 0,9 |
| Clicks MOA | 1/2 (1,5cm@100m) | 1/4 (0,7cm@100m) | 1/4 (0,7cm@100m) | |||
| Specifications | |||
| 1-6×24 | 2.5-10×50 | 3-12×56 | |
| Elev./Windage (m @ 100m) | 2,9 | 1,46 | 1,46 |
| Elevation/Windage (MOA) | +/- 50 | +/- 25 | +/- 25 |
| Tube Diameter (mm) | 30 | 30 | 30 |
| Objective Lens Diameter (mm) | 24 | 50 | 56 |
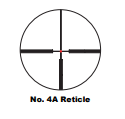
| Reticle | 4A | 4A | 4A |
| Illum. – 11 steps – fiber optics | yes | yes | yes |
| Shockproof | yes | yes | yes |
| Waterproof/Fogproof | yes | yes | yes |
| Exterior Finish | Black Matte | Black Matte | Black Matte |
Subject to change without notice
Mounting of your Riflescope
You should seek advice from a gunsmith regarding the correct mounts to select for your rifle. Please select 30mm rings.
We recommend low rings, however this will depend upon the rifle design you have chosen.
Once you have correctly placed the mounts base on the rifle you can attach the rings to the riflescope. At this stage leave the rings loosely tightened as you will need to adjust the riflescope for the correct eye relief and alignment of the reticle to the vertical axis or the rifles bore.
Caution: Please consult your gunsmith or the instructions supplied with your selected mounts to ensure you have correctly mounted this UltimaX riflescope on your rifle. We proceed with the adjustment of the riflescope assuming you have correctly mounted your riflescope.
Adjustment of the Eye Relief
The eye relief of the UltimaX is depending on model 90 to 95mm. Eye relief is the ideal distance from your eye pupil to the eyepiece on the riflescope for the optical design to work correctly. Eye relief is set at this distance to provide you with protection from the recoil causing the riflescope to hit your eye when firing the rifle. However personal physical differences and your shooting style require you to make a personal adjustment so the scope is mounted at the correct distance.
Set the magnification to 3x zoom. Hold your rifle in a normal shooting position and ask a colleague to move the riflescope forward or backward so there is app. 90-95mm distance from your eye to the rear of the eyepiece. The riflescope is the correct eye relief when aimed at an object 100 meters away you will see the full image without distortion or narrowing of the field of view. Should you require to you can adjust the diopter to suit your eyes. The diopter is located on the rear of the eyepiece and be adjusted.
Adjustment of the Reticle to the Vertical Axis or Bore
Place the rifle in a gun vice or cleaning centre so the rifle is upright in the normal shooting position. Remove the bolt and standing behind the riflescope look through the riflescope at the reticle cross. The vertical line should be in line with the centre of the bore of the rifle. Should you not be able to remove the bolt to see the bore of your rifle then you can align with the centre of the back of the receiver.
Alternatively if you are experienced then this can be achieved with the rifle held to the shoulder and using one hand to turn the riflescope so the lines run vertical and horizontal to the bore. Correct alignment is important to the firearms accuracy as the adjustments to windage and elevation to be discussed shortly require the reticle to be aligned to the bore. Once you have adjusted the reticle to the bore then tighten the mounts completely to secure the riflescope to the rifle.
Sighting in your Rifle and UltimaX Riflescope
We recommend you use an approved range for sighting in your rifle. We recommend you set up an initial target at 100 meters. Fire two shots at the centre. The two shots should impact the target within the expected group radius for your rifle. Note the impact point compared to the aiming point. Now you are ready to adjust the aiming point of your scope to match the impact point.
Remove the elevation and windage caps to expose the adjustment dials. The elevation dial is located on top of your scope and the windage is located on the right side when viewed from above. We recommend you adjust the windage first. Turn windage either to the left or the right in accordance with the direction you want the bullet to move on the target to get the centre line. Repeat this for the elevation. Remember to put on the elevation and windage caps again. Should you prefer, all the adjustments can be made at 50 meters. Please note at 50meters the adjustments will require half the movement required at 100 meters.
Illuminating your Reticle – Fiber Optic Illumination System
Your UltimaX riflescope features fiber optic illuminated reticle that aids the hunter during bright and dark shooting conditions. The adjustment switch is located on the left side of the riflescope opposite the windage turret. To operate the illumination you must insert into the switch a CR2032 battery with the plus (+) sign facing out. To do this carefully remove the battery cover using the plastic coin supplied with the riflescope. Please avoid using metal tools or objects to remove the battery cover to avoid marking the cover. The brightness illumination can be set at 11 positions providing a range of illumination options.
Battery life is not guaranteed. It will vary greatly upon the temperatures and the use. We recommend you only turn the battery on when in the hunting position or area. Additionally we recommend carrying a spare battery with you. However, it is important to remember that the reticle and the accuracy of the riflescope is unaffected by the illumination.
We recommend when storing the rifle that the battery is removed and stored separately.
Care and Maintenance of your Riflescope
Your riflescope is largely made of Aluminium and Glass. It has been designed to withstand recoil from large calibre rifles.
However care should be taken to ensure the riflescope is protected during transportation and during the hunt from damage.
The Glass of your riflescopes lenses should be cleaned carefully to avoid scratches. Even small scratches that are not seen when looking through the riflescope can cause a loss of light transmission affecting the clarity of the images. We recommend a lens brush, cloth and cleaning fluid only is used. Dust covers are recommended.
Lifetime Guarantee.
The Ultimax riflescope has a Lifetime Guarantee for the original purchaser covering the optical components. The electronic components are covered by a 2 year guarantee. Should you have a problem with your Ultimax riflescope please return it to the retailer that supplied it to you including the original invoice.