Introduction
In recent years, night vision attachments for eyepieces (rear night vision attachments) have become very popular. These devices have been in use for quite some time, but their popularity was limited to countries with a longer tradition of using night vision devices on riflescopes.
Check NV Clip-ons below:
In the UK, it is allowed to hunt foxes with all types of night hunting equipment. Historically, hunters have used powerful flashlights that emitted different colors in the visible spectrum (lamping) for this purpose. Some inventive and technically well-educated hunters have discovered that digital cameras can be modified to detect light emitted by the infrared illuminator. With a special attachment, the modified cameras were then attached to the eyepiece of the riflescope. On the LCD screen of the camera or a separate LCD screen connected to the device with a video cable, they could see the image of the reticle and the target.

Over time, some companies in the UK began to produce these devices on a small scale, in fact by hand. However, at that time, strict legal restrictions on the use of night hunting equipment were in place in most European countries, which prevented the spread of these devices beyond a narrow group of users in the UK.
Then two factors appeared that greatly increased the popularity of night vision attachments.
- Many European countries have started to ease laws regarding the use of night vision equipment because of the increasing cases of African swine fever.
- the company PARD introduced the PARD 007 “rear add-on” attachment in 2019.
Up to that point, front add-on had dominated the market of night vision attachments. Compared to them, PARD 007 was significantly cheaper, easier to use, and the point of impact did not change if the device was removed and reinstalled on the riflescope.
It would be wrong to think that PARD 007 and all its subsequent copies that soon came to the market are ideal and without limitations in use.
Therefore, in this article, we want to provide some suggestions on how to use a night vision attachment on an eyepiece so that the user can take full advantage of everything the device is capable of.
Before the purchase
As previously mentioned, the use of rear night vision attachments only became popular with the arrival of the PARD 007 model. Although the model is a Chinese copy of some products made in Europe, mentioned in the introduction, it quickly became popular and other Chinese providers began to copy it.
Today, there are several different models of night vision attachments on the market. PARD has updated its successful model 007 multiple times and there are at least five versions of it available (PARD 007, PARD 007A, PARD 007V, PARD 007S, and PARD 007SP).
Among the copies of the PARD 007 model, the SYTONG series of HT-66/77/88 has become the most popular in Slovenia (southern Europe). There are other manufacturers who mostly sell their products through online stores, but the customer support after purchase is questionable, so we will not write about them.
Therefore, we recommend choosing a manufacturer who offers at least basic support after purchase.
From a technical perspective, the devices differ in the following characteristics:
- the focal length,
- wavelength of the IR-illuminator,
- the resolution of the light sensor and
- integrated laser rangefinder (LRF).
The focal length
The focal length determines the magnification at which the device shows the image viewed through the rifle scope. Most attachments on the market have a focal length of 12 mm and 16 mm. The attachments with a focal length of 12 mm display the image with minimal or almost no magnification, while those with a focal length of 16 mm display the image with a magnification of about 1.4x.
With attachments that have a focal length of 12 mm, we will see the entire field of view of the scope and the magnification will remain about the same as that of the scope. With attachments of 16 mm, the outer part of the field of view is cut off and the magnification of the scope is increased by 1.4x.
When choosing between attachments with different focal lengths, take into account the kind of riflescope you will use and the primary hunting method you plan to employ with the attachment.
In theory, the model with a focal length of 12 mm should be more practical and universal when it is mounted on a scope with proper technical characteristics. When using riflescopes that feature an adjustable parallax and come with a low base magnification, we will benefit from the wide field of view at low magnification while being able to magnify the image of the target with the magnification ring on the riflescope.
Even when pairing a device with a focal length of 12 mm with a riflescope that has a slightly bigger base magnification, the image will not be additionally magnified, and the field of view will not be compromised.
In cases where we have a riflescope with low base magnification and without the ability to adjust parallax, we may benefit from choosing a model with a focal length of 16 mm – it will magnify the image a bit more compared to the models with a focal length of 12 mm.
If a rear night vision attachment is paired with a variable magnification riflescope that does not have an option of adjusting parallax, the adjustable magnification will not work effectively. Regardless of the choice between 12mm and 16mm focal lengths, it is important to note that the differences in usage are not as significant and obvious as they may seem when looking at the specifications of the devices. With some practice and adjustment of settings, it is possible to successfully use both types of attachments in most cases.
We should not confuse focal length and its effects on riflescope’s magnification with the manufacturer’s claims that their devices have a 4x or higher ZOOM ratio. Digitally zooming-in the image on the screen results in inevitable deterioration of image quality. If possible, we should avoid using digital ZOOM and instead use the variable magnification of the rifle scope, which we will describe later.
Wavelength of the IR-illuminator
The wavelength of an infrared (IR) illuminator can be either 850 nm or 940 nm. The IR illuminator with a wavelength of 850 nm illuminates the target more strongly and therefore allows observation at greater distances. While the 940 nm IR illuminator does not allow observation at the same distances as the 850 nm illuminator, it has the advantage of being less visible to living beings.
Despite the general belief that light in the IR spectrum is invisible to the human eye, a direct gaze at the IR illuminator will result in a red light that is seen by living beings. This light is significantly weaker in 940 nm IR illuminators compared to those with a wavelength of 850 nm.
WARNING Readers are warned that direct eye exposure to IR illuminators can cause eye damage, so it should be avoided!
The type of IR illuminator we choose depends mainly on the method of hunting and the type of game we will be hunting with it. If most of the hunting is done at feeding grounds for wild boars, where the distances are short and the targets are relatively large, the 940 nm IR illuminator will be sufficient in terms of power and provide additional concealment. It is widely recognized that wild boars are intelligent and cautious animals – supposably, they can link events that occur before the shot – next time they see red light from an IR-illuminator, they may flee the feeding grounds.
For hunting at longer distances, such as hunting wild boars from a raised hide in or predator hunting, it is better to choose the 850 nm illuminator, which will allow longer shots.
Warning: the use of all types of night vision attachments and riflescopes in Slovenia is allowed exclusively for hunting wild boars in accordance with the Law on Urgent Measures Due to African Swine Fever in Wild Boars (Zakon o nujnih ukrepih zaradi afriške prašičje kuge pri divjih prašičih).
In many countries, including our neighboring countries, night vision attachments and riflescopes can already be used for hunting foxes and jackals.
The way the IR illuminators operate is categorized into LED and laser types. Early LED illuminators were ideal for night vision devices with low-resolution sensors, which were more susceptible to light. With the advancements in high-resolution sensors, the demand for stronger IR illuminators using laser technology arose.
IR illuminators using Vertical Cavity Surface Emitting Laser (VCSEL) diode technology are particularly popular as they produce stronger illumination while using a smaller lens surface and distribute IR light evenly than older IR-illuminators. Many attachments, including ones made by PARD and Sytong, have built-in VCSEL IR illuminators.
The brightness and the width of the IR beam can be adjusted by moving the IR illuminator forwards and backwards. Keep in mind that with a wider IR beam, the brightness is lower. However, when the IR illuminator is fully extended, the brightness increases, the beam narrows, and the illuminated visible field decreases.
The resolution of the light sensor
The resolution of the light sensor affects the sharpness of the displayed image. The rule is that the more pixels in the sensor, the clearer and more detailed the image will be displayed. When using night vision devices, sensitivity to light must also be considered – there is not much of it at night.
As the resolution increases, the sensitivity of the sensor decreases. To fit more pixels onto the same surface area of the sensor, the pixels must be smaller. Smaller pixels are less sensitive to light. Most scopes have high-resolution sensors to meet customer demand for clear images. The lower sensitivity of these sensors can be overcome with the use of stronger VSCEL laser type IR illuminators mentioned above.
Integrated laser rangefinder (LRF)
Integrated laser rangefinder allows the user to measure the distance to the target. When hunting for wild boars in the feeding grounds, this function is not particularly useful because the distances are known in advance. Furthermore, one does not have to deal with bullet drop correction for wild boar hunting ammunition at such short distances.

The laser rangefinder technology is much more useful in an open field; even here, hunters choose calibers that do not require any bullet drop correction at ethnically righteous hunting distances. Basically, laser rangefinders were developed for hunting needs in Great Britain and Australia. In these two countries – and maybe somewhere else – it is allowed to hunt with air rifles. On top of that, hunting wild rabbit with small-caliber rifles is highly popular. The ballistic trajectory of the bullets shot from such firearms requires the user to know the distance to the target to do the necessary correction. Most manufacturers offer this function – it is up to the buyer to decide whether it is needed or not.
Choosing a suitable riflescope
Despite the differences between individual models, the basic physical-optical principles of riflescopes, suitable for the use of such clip-ons, are the same, and so is the method of clip-on adjustment.
Rifle scopes suitable for optimal use with night vision attachments on the eyepiece must have the following properties:
- ability to adjust parallax,
- low base magnification and
- lens coatings that do not block IR light.
Ability to adjust parallax
When changing the variable magnification on the rifle scope, the image of the target in the night vision attachment becomes blurred, and the only way to refocus it is to use the parallax adjustment function on the scope. Riflescopes that feature an adjustable parallax either come with a ring on the objective (AO-adjusted objective) or a specific compartment on the side turret (SF-side focus).

Both methods are equally efficient as far as the optics are concerned. The side focus (SF) is slightly more convenient as the turret is easier to reach, and there is no need to extend the hand all the way to the objective lens of the rifle scope, thus avoiding the risk of blocking the beam of the IR-illuminator with the hand. On the other hand, riflescopes with the AO parallax adjustment are slightly lighter and more compact.
When choosing a rifle scope, it is important that it has the ability to adjust parallax to 10 m or even closer. The IR-light refracts differently from visible light once it passes through the riflescope lens system. Therefore, in nighttime conditions, we cannot rely on distance markings on the parallax adjustment ring. We simply continue turning the ring until the image in the attachment becomes sharp.
Low base magnification
Increasing the magnification reduces the field of view of the riflescope. As a result, it is difficult to capture the target in the field of view at higher magnifications, even during the day. At night, when we cannot see the target with the naked eye, we must make use of the field of view of the riflescope/NV-attachment combination – the bigger, the better. Especially when hunting for foxes and jackals, it is difficult to keep the target in the field of view as it is constantly moving.
Riflescopes, most suitable to be used with NV-attachments, have a base magnification between 2x to 4x. Of course, magnifications lower than 2x are also a good solution, but rifle scopes that feature both a base magnification less than 2x and the ability to adjust parallax are more the exception than the rule.
Lens coatings that do not block IR light
Manufacturers of rifle scopes use different types of lens coatings that help improve the lens’ light transmission. Since the human eye can only detect light in the visible spectrum, lens coatings on rifle scopes are optimized to transmit as much light as possible in the “visible” wavelength, thus blocking IR light transmission.
The better the rifle scopes are for low light conditions, the worse their IR light transmission is. This leads to a paradox where the most expensive rifle scopes from world-renowned manufacturers in combination with a night vision attachment on the eyepiece do not perform the best. A significantly clearer image in the night vision attachment can be obtained by using mid-range priced rifle scopes, which would otherwise lag far behind the most expensive models of prestigious brands in low light or moonlight conditions.
We are forced to make a compromise when selecting a rifle scope at this point, which has a very positive effect on our wallet. When we know that we will use the rifle scope with a night vision attachment on the eyepiece, we do not need to go higher than the mid-range priced rifle scopes with a price range of 500 €–1000 €. We can also go lower on the price scale, especially when we will mount the rifle scope on a weaker caliber rifle. However, lowering the price raises questions about other qualities of the rifle scope, such as resistance to recoil, tracking (turrets), waterproofness, and other properties that have nothing to do with the use of a night vision attachment, but can cause problems when using the riflescope.
Through our previous use and testing of various rifle scopes, we have compiled a list of rifle scopes that work very well in combination with a night vision attachment on the eyepiece, taking into account the technical conditions mentioned above:
- Hawke (all models)
- Delta Optical (Titanium HD series, especially models 2.5-15×50 HD SF and 2.5-15×56 HD SF)
- Athlon (Midas HMR 2.5–15×50)
- Meopta (Optika 5 and Optika 6 series)
Naturally, the list is not exhaustive and the only way to determine if a rifle scope is suitable for use with a night vision attachment on the eyepiece is to directly test it in nighttime conditions.
In the event that we already have a rifle scope that does not meet all the required specifications for using a night vision attachment on the eyepiece, we can still utilize the combination in most cases, although we may have to accept some restrictions.
We use rifle scopes with fixed parallax adjustment by setting the variable magnification to the minimum and not changing it while using the night vision attachment. The target image will usually be sharp somewhere between 30 and 70 meters. Closer or farther than these distances, the target image will be slightly out of focus, but still entirely usable for a reliable shot.
Considering that the lower magnifications of variable rifle scopes usually range between 2x and 6x, this still allows us to shoot at normal distances for hunting in the nighttime. If the magnification is too low in given circumstances, we can use digital magnification on the night vision attachment, which slightly degrades image quality, but still enables us to take a reliable shot.
Using high-end rifle scopes in conjunction with rear night vision attachments is possible, but it requires an increased amount of IR light, or we must accept that the effective range may be reduced and the image in the night vision attachment may be more grainy in some situations.
The most challenging aspect is using a rear night vision attachment in combination with high-magnification rifle scopes. The extremely narrow field of view and reduced light transmission of the rifle scope are very limiting factors. In such cases, the user must evaluate whether the chosen combination allows them to perform their desired nighttime hunting method.
Additional equipment
As with all modern technology, the market offers some additional equipment for night vision attachments that increases their effectiveness or makes their use easier:
- external IR illuminators
- additional batteries
- rifle stock extension
External IR illuminators
This additional equipment is used in cases where the integrated IR illuminator is not powerful enough and we want to extend the usable range. In such cases, we can also combine two different wavelengths of IR illuminators. If we choose this option, a very useful combination is the integrated 940 nm wavelength IR illuminator and an external, more powerful 850 nm wavelength IR illuminator.
It is very useful if the external IR illuminator has the option to adjust the beam intensity. Some night vision attachments are sensitive to too much IR light, which causes the so-called “burnout” or completely white images, especially at short distances. Using an external illuminator also extends the life of the batteries of the night vision attachment, as integrated IR illuminators are large consumers of electrical energy.
A mount is required to attach the external IR illuminator to the riflescope. There are several types of mounts, from very simple to those that allow for fine adjustment of the beam in the center of the rifle scope’s field of view.
Additional batteries
Additional batteries are essential accessories to have in the pocket of a hunting jacket. Pard and SYTONG attachments are powered by unprotected 18650 lithium batteries with no button on the positive pole. However, protected 18650 batteries are too long for use in PARD and SYTONG attachments, which has caused a lot of frustration among users. It is recommended to choose 18650 batteries with a button on the positive pole for external IR illuminators. The recoil of the rifle when firing can cause the IR illuminator to vibrate and lose contact between the positive and negative poles of the battery, which turns off the illuminator – when we need to observe the behavior of game after the shot, we are left in the dark with an unlit target.
When purchasing batteries and chargers, always choose reputable manufacturers. 18650 batteries have a maximum capacity of around 3600 mAh, And any batteries with unusually high capacities that are sold by untrustworthy online vendors are (usually) a scam. VAPE shops offer the widest range of 18650 batteries. When purchasing batteries, it is also recommended to purchase appropriate storage boxes. There have been cases where contact between batteries in a jacket pocket has caused ignition, which can be dangerous.
Rifle stock extension
Rifle stock extension is a helpful tool for when the position of your head needs to be adjusted while using the rear night vision attachment. There are different models of extensions, from technically demanding adjustable ones that are installed by a gunsmith, to simple rubber inserts in a neoprene cover that can be easily attached and removed as needed.
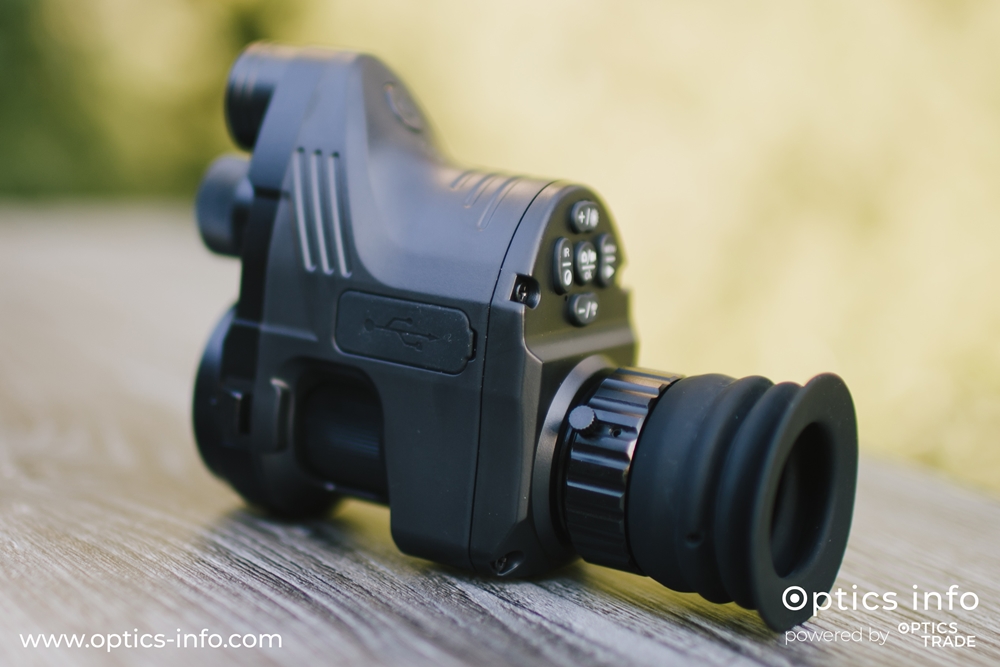
Preparation and Installation
Preparing and installing the rear night vision attachment on the eyepiece of a rifle scope is a critical step that can significantly affect the user’s experience and satisfaction with the product.

Installing the adapter
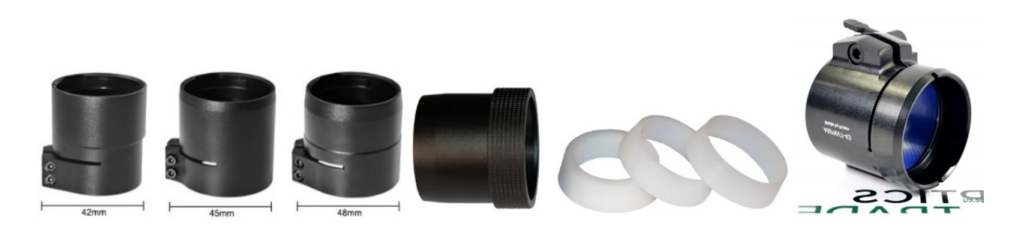
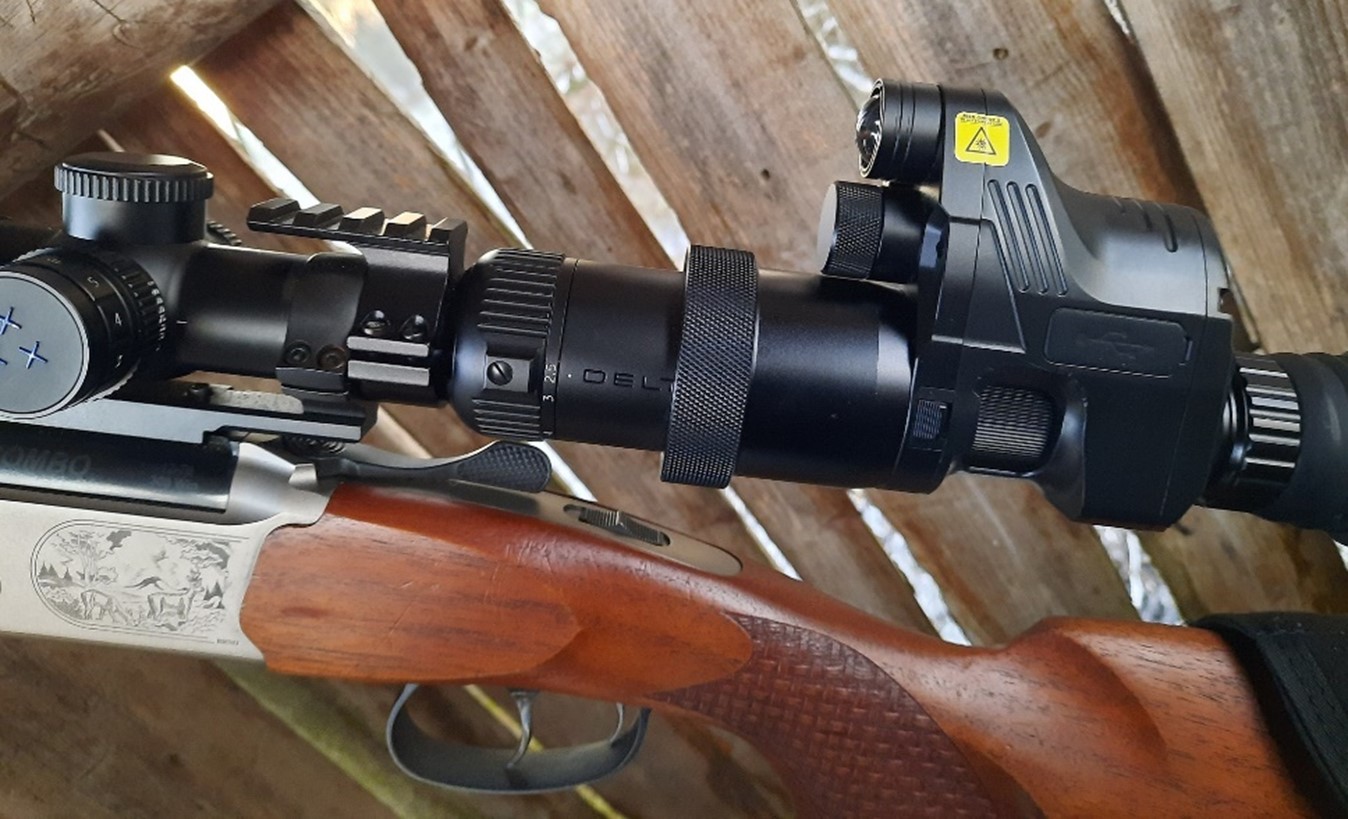
The process begins with the installation of the adapter on the rifle scope’s eyepiece. Since the external diameters of rifle scope eyepieces vary, manufacturers offer different, more or less universal attachment systems.
The simplest system was initially offered by PARD. They had adapters in three different sizes. The buyer had to choose one that was slightly larger than the objective diameter of their rifle scope, and the empty space between the adapter and the eyepiece had to be filled with the appropriate amount of insulation tape, which PARD provided with each device. Although this process may seem trivial at first glance, it is actually very easy to do, and it works. With a little effort, the adapter can be installed in such a way that the attachment does not move during use, even after installing and removing the adapter several times.
The downside of this solution is the time-consuming process that does not allow the same adapter to be quickly switched between different riflescopes. The insulation tape adhesive usually also leaves some marks on the eyepiece that indicate the use of an adapter on the rifle scope. With the development of the market, universal attachments have appeared that allow for faster adapter switching between different rifle scopes by using internal inserts of different dimensions.
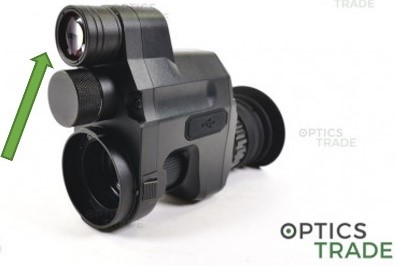
Setting the night vision attachment
We turn on the device and adjust it to our eyesight by rotating the diopter adjustment ring. The diopter is properly adjusted when the icons on the screen are sharp.
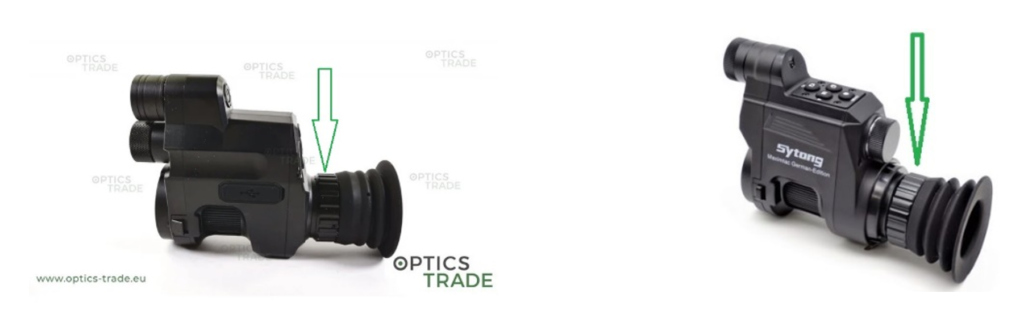
We attach the device to the adapter and use the focusing ring to ensure that the reticle in the riflescope is sharp. We should not worry about whether the target and background are blurry, only the reticle needs to be sharp. We only need to adjust this setting again when using the device on different rifle scopes or if the focusing ring has been accidentally moved.

By turning the parallax correction ring on the rifle scope, we focus the target. Every time we change the magnification on the rifle scope or the distance to the target changes, we need to adjust the focus. We will also need to adjust the focus of the target when we switch from daytime to nighttime mode using the IR illuminator.

Usage
Now that we have properly adjusted and installed the rear night vision attachment on the scope’s eyepiece, we will provide some tips for using it during hunting.
At the beginning of a hunting session, we adjust the sharpness of the image to the distance where we anticipate the presence of game. If hunting in a feeding area, this point would typically be where the feed is located. When hunting in open areas, it is advisable to set the distance to the nearest likely point of game arrival. If game is in close proximity, any unnecessary adjustments to the attachment or rifle scope may create unwanted noise and increase the likelihood of startling the game.
We should modify the brightness and size of the beam on the IR illuminator. This will result in a clear image and make it simpler to evaluate the game before taking a shot.
Turning on the rear night vision attachment usually takes 5-10 seconds, so we recommend using the “ready” mode. Getting from this mode to using the device is achieved with just a short press of the power button. However, we must not forget to completely turn off the device when we finish hunting, otherwise the battery will be completely drained by the next time we use it.

Do not wait until the battery is completely drained to replace it, as batteries behave differently in different weather conditions. The worst thing that can happen to us is a flashing red battery indicator just when we are getting ready to shoot. Replace the battery when the charge indicator shows the last of the three stages.
Shooting with the rear night vision attachment on the eyepiece can be quite a challenge for inexperienced shooters due to the different position of the head. We recommend practicing at the shooting range, where you can get used to it and gain the necessary confidence in the device and one’s shooting skills. PARD and SYTONG rear night vision attachments have a daytime, color mode of operation in addition to the night mode, which allows us to practice on the shooting range during the day without additional IR illumination.
Most rear night vision attachments have an option of recording videos and taking photos. Some hunters may find it inappropriate to record and share videos of the moment the game is harvested. Nevertheless, the recording function has a very useful value. After hunting, we can calmly review how we took the shot. Analyzing our mistakes can be particularly useful in case we missed our shot. Moreover, reviewing the recording can give us a relatively accurate understanding of where we hit the game and in which direction it went if it did not fall in place after the shot.
Conclusion
In conclusion, using a rear night vision attachment on a scope is an affordable and quality tool for nighttime hunting if used correctly. When combined with a suitable riflescope, we have a useful, all-round combination. We can benefit from high-quality daytime optics until the dusk falls. Once the lighting is insufficient for the use of such optics, we attach the night vision device in a couple of seconds. This way, we can continue hunting even after daylight hours instead of packing up and heading home.


Hi
I am looking for a rear night vision add on to my accushot day scope.
Is this possible? I noticed the illuminator switches are in the way .
Thank you
Cy
Certain adapters on the market are designed for riflescopes with the illumination compartment on the eyepiece, such as this one:
https://www.optics-trade.eu/en/rusan-q-r-adapter-for-pard-nv007-swarovski-z6i-z8i-zeiss-victory-v8-leica-magnus.html
Unfortunately, we’ve never had an opportunity to see if the mentioned adapter fits on the Accushot riflescope. Please contact Optics Trade’s sales department at [email protected] for more information.