Products:
- https://www.optics-trade.eu/en/zeiss-victory-ht-8×42.html
- https://www.optics-trade.eu/en/zeiss-victory-ht-8×54.html
- https://www.optics-trade.eu/en/zeiss-victory-ht-10×54.html
Instructions for use
Congratulations on purchasing your new ZEISS VICTORY ® HT binoculars. Enjoy the impressive experience of undistorted image reproduction which is distinguished by perfect brilliance and excellent colour accuracy.
Zeiss products are famous for outstanding optical performance, precision engineering and a long service life. Please observe the following instructions for use in order to obtain the best from your binoculars and to ensure that they remain your constant companion for many years to come.
Important safety information
CAUTION
Do not under any circumstances look through the binoculars at the sun or laser light sources! Serious eye injury may otherwise result.
Avoid touching the metal surface after exposure to sunlight or cold. Do not leave the removable exterior parts within reach of children (danger of swallowing).
Never leave the binoculars in the sun for extended periods of time without the protective lens cap. The objective lens and eyepiece can function as a burning glass and damage the interior components.
Do not drop the binoculars and avoid direct impact on the binoculars.
Repairs should only be conducted by authorised repair shops or employees of Carl Zeiss Sports Optics. Any repairs on the device conducted by unauthorised repair shops or improper opening of the device renders the warranty void.
Table of contents
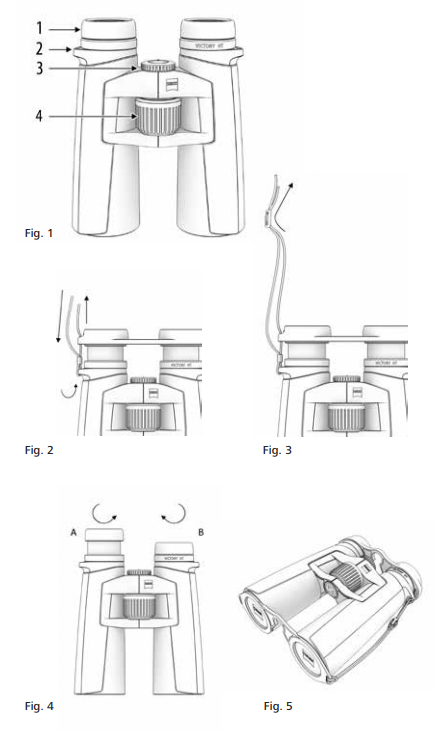
Description of the components
-
Eyecups
-
Carrying strap eyelets
-
Diopter compensation
-
Focusing wheel
Scope of supply
ZEISS VICTORY HT binoculars.
Aligning the eyecups, Viewing with and without glasses
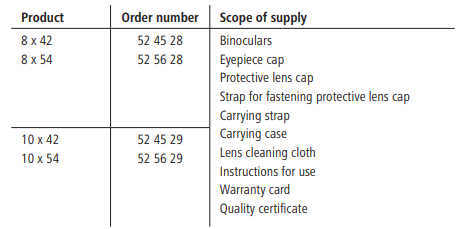
When viewing without glasses, use the binoculars with the eyecups extended. To do this, turn the eyecups (Fig. 4) to the left (anti-clockwise) and upwards to the top click stop position (Illustration A).
The eyecup can be locked in four positions – at the bottom and top and in two intermediate positions. These adjustment options allow the distance of the eye from the exit pupil (to eyepiece) to be varied according to the specific requirements of each user.
Note: If the eyecup is turned too far to the left when in the extended position, it can loosen. For more information, see “Cleaning the eyecup”. By turning to the right you get back to the various click stop positions.
When viewing with glasses, turn the eyecup down to the right (clockwise) until it locks in the lowest click stop position (Illustration B).
Cleaning and replacing the eyecups
To replace the eyecups or for cleaning, they can be completely screwed off of the binoculars. Turn the eyecups out as shown in Fig. 4 to the top click stop position and turn one more thread in the same direction until the eyecup is completely screwed out.
After cleaning, or replacing the eyecup, turn it to the right (clockwise) completely on the eyepiece. (Also refer to setting for those who wear glasses). Using a slight jerk to the right the thread of the eyepiece clicks into the lowest setting. Finally, you can again set your desired distance between the eye and eyepiece using the click stops.
Attention: When the eyecups are screwed off there are five screws visible on the eyepiece. Please do not open these screws. Doing so can void the warranty for your device.
Adjusting the interpupillary distance
Bend the two barrels toward each other around the central axis, until the distance of the two eyepieces corresponds to the distance between your eyes. This will provide the optimum image for your eyes. The optimum eye spacing is achieved when a circular image is seen when viewing through the binoculars with both eyes.
Focusing
The binoculars have a focusing wheel (Fig. 1/4) and a diopter adjustment wheel (Fig. 1/3). To adjust the diopter, close your right eye and focus the image in the left barrel using the centre focusing wheel (Fig. 1/4). Then close your left eye and, if necessary, adjust the focus in the right barrel using the diopter adjustment wheel (Fig. 1/3).
The diopter adjustment features a scale with the signs “+” and “–”, and has an index point as a reference point. Note your personal setting, then you can quickly set your own diopter setting on any binoculars.
Note: Always use the same object to focus the image on both sides of the binoculars. To focus other objects at varying distances, you then only need to use the focusing knob (Fig. 1/4).
Mounting the carrying strap and the protective covers
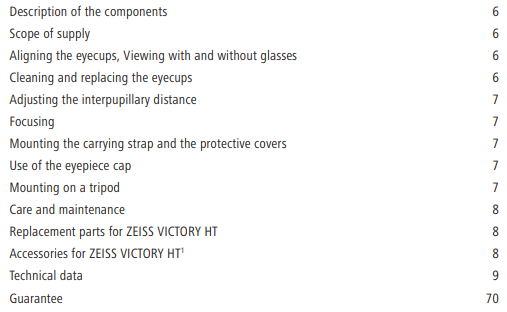
The carrying strap, the eyepiece cap and the protective lens cap are supplied with the binoculars. Attach the carrying strap to the eyelets provided on the binoculars as shown in Fig. 2 + 3.
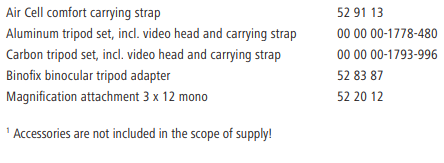
Note: Simply pass the carrying strap through the eyelets on the eyepiece cap. Before attaching the carrying strap, as shown in Fig. 5, the strap length should be set to the desired length by shortening or lengthening the strap. On the other side of the eyepiece cap follow the same sequence. The eyepiece cap can also be put on only one side, if preferred.
The strap for the protective lens cap must be attached directly (either right or left) to the protective lens cap. To fasten the strap of the protective lens cap on the binoculars, use the carrying strap or one of the two eyelets for the carrying strap connection.
Use of the eyepiece cap
The eyepiece cap is stuck on the eyecups. You can maintain your desired eye to eyepiece distance with this. Remove the cover before using the binoculars.
Mounting on a tripod
Binoculars from the ZEISS VICTORY HT series can be mounted on any commercial camera tripod using the Zeiss Binofix universal tripod adapter.
The order numbers for Zeiss tripods and the Zeiss Binofix universal tripod adapter can be found under Accessories for ZEISS VICTORY HT.
Care and maintenance
The binoculars feature the Zeiss LotuTec ® coating. The effective protective coating for the lens surfaces noticeably reduces contamination of the lenses through a special smooth surface and the strong beading effect connected with it. All types of contamination adhere less and can be quickly and easily removed, smear-free. The LotuTec ® coating is also durable and abrasion resistant.
Please do not wipe coarse particles (e. g. sand) from the lenses. Blow them off the lens, or use a soft brush! Over time, fingerprints can corrode the lens surface. Breathing on the lens and polishing with a clean optical cleansing cloth is the easiest method of cleaning the lens surface. Dry storage and keeping the outer lens surfaces well ventilated, especially in the tropics, helps to prevent a possible mould film forming on the optics. Your ZEISS VICTORY HT binoculars require no further special care.
Replacement parts for ZEISS VICTORY HT
If you need any replacement parts for your binoculars, e.g. protective lens caps, please contact your local dealer, your country’s Zeiss distributor or our customer service team.
Our customer service team is available from Monday to Friday from 8:00 am until 6:00 pm (CET) should you have any questions.
Tel.: +49 (0) 64 41-4 67 61
Fax: +49 (0) 64 41-4 83 69
Accessories for ZEISS VICTORY HT
Technical data


