Products:
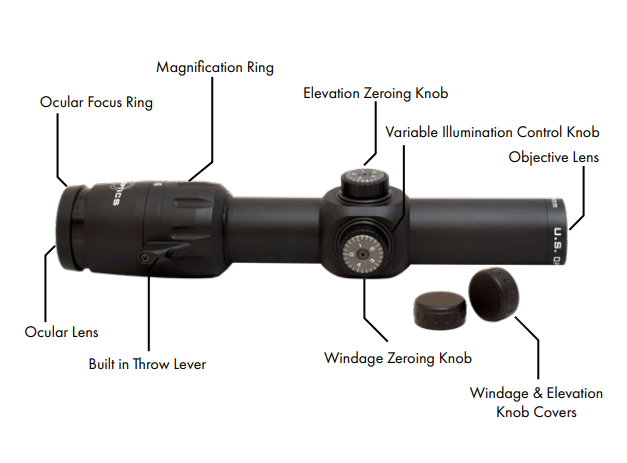
Initial Setup/Zero
1. The first step is to physically mount the scope to your rifle. For this, we suggest following the manufacturer’s published directions that came with the mount or standard rings that you’re choosing to use.
2. Next, boresight your new optic to your rifle by using a laser boresighter or a magnetic boresighter. This step will make it easier to zero your rifle once you get to the range.
3. Once your optic is boresighted, get out to the range and zero your new optic to your rifle. For most calibers and shooting styles, we suggest a 50 yard zero. You will need to adjust both your elevation and windage knobs, either up or down – and left or right, until your optic’s point of aim matches your rifle’s point of impact.
Setting Reticle Focus
The ocular focus ring is used to focus the reticle. Focus prescription ranges from +2 to -3. Do not use the ocular focus ring to adjust the sight picture or to adjust for parallax.
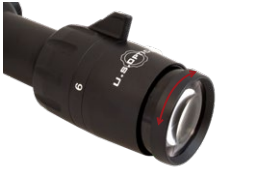
1. Set the scope magnification to the highest power.
2. Rotate the eyepiece counter clockwise until it stops. Do not over rotate the eyepiece.
3. With both eyes open, point the scope toward a white wall or a clear blue sky. Be sure that there are no objects in the sight picture.
4. Rotate the eyepiece clockwise until the reticle image is sharp and in focus.
5. When the reticle is in focus, close your eyes for 3 seconds, then reopen them. The reticle should still be clear and sharp. If it is not, repeat steps 1 through 4 until desired image clarity is achieved.
6. Set the magnification to the lowest power to confirm that the desired image clarity of the reticle is achieved.
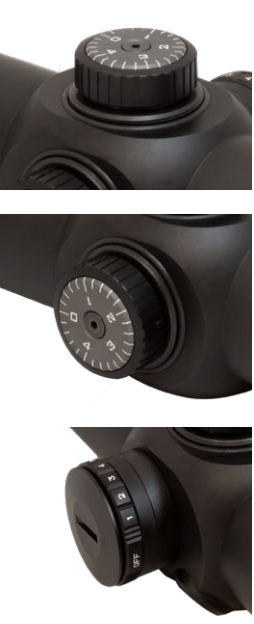
Knob Overview
The 6X Elevation Zeroing Knob is a capped 50 click, 2/10 MIL adjustment zeroing knob. Clockwise adjustments move your point of impact (POI) up. Counter Clockwise adjustments move your point of impact (POI) down.
The 6X Windage Zeroing Knob is a capped 50 Click, 2/10 MIL adjustment zeroing knob. Clockwise adjustments move your point of impact (POI) to the left. Counter Clockwise adjustments move your point of impact (POI) to the right.
The Variable Illumination Control Knob is a turn dial illumination control used to change the intensity of the 2 MOA red dot. The user can transition between 10 illumination settings using the turn dial control. Note: The first 5 settings are nightvision compatible.
Knob Adjustments
Once your scope is zeroed, both the Elevation Zeroing Knob reference cap and the Windage Zeroing Knob reference cap must be set back to read “0”. The following steps will walk you through this process for both caps.
1. Tightly hold your Zeroing Knob in place.
2. Use the supplied 1/16 hex key to loosen the screw 1/4 turn.
3. Move the reference cap to “0”.
4. Firmly hold the reference cap in place.
5. Tighten the screw with the supplied 1/16 hex key.
To prevent unwanted adjustments during use and/or transport, screw on the provided knob covers.

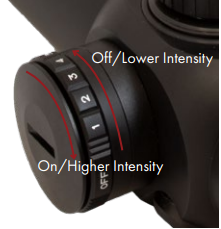
Variable Illumination Control Knob
The 6X Variable Illumination Control Knob is a battery powered turn dial control that allows the user to manually adjust the red dot’s level of intensity.
Turning the red dot on/off:
To turn on the red dot, simply turn the turn dial clockwise. You will hear an audible click when the dial is switched between the “on” and “off” position.
Adjusting the level of intensity:
The turn dial allows the user to increase or decrease the red dot’s level of intensity. To increase, simply turn the dial clockwise. To decrease, simply turn the turn dial counter clockwise.
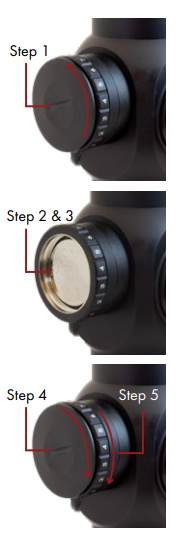
Battery Replacement
The Illumination control is powered by a Lithium Cell CR2032 battery. Ensure that you have the correct battery before beginning the replacement process.
1. Use a flathead screwdriver or a coin to loosen and remove the cover by rotating counter-clockwise.
2. Once the cover is removed, remove the drained battery cell.
3. Place the new battery cell (+ positive side facing out) in the knob.
4. Once the new battery is in place, screw the cover back on using your flathead screwdriver or coin.
5. Test the illumination immediately after battery replacement.
Warranty
U.S. Optics warrants that if any product we manufacture is defective in material and/or workmanship, we will repair or replace it at our election for free – no hassle! There are a few exceptions noted below.
Electronics are warranted for two years from the date of purchase. Our warranty does not cover consumables or normal wear-andtear, or structural and/or cosmetic damage resulting from abuse, alterations, unauthorized repairs, or use contrary to U.S. Optics owner’s manuals.
To help protect your investment or to accommodate repairs not covered by our warranty, U.S. Optics offers reasonable rates to repair certain damage to our products. To take advantage of our repair services please contact our customer service department for a return merchandise authorization (RMA) number before shipping your scope to us. Upon arrival, we will inspect your scope and provide a quote for your approval which includes shipping costs before work begins. Repairs will begin after we receive your approval of the repair quote provided. Once payment has cleared we will return your repaired scope to you.
Disclaimer
Except as specified above or prohibited by applicable law: all express or implied conditions and warranties, including, without limitation, any implied warranty of condition, of merchantability or fitness for a particular purpose, or accuracy of any informational content, are hereby excluded and disclaimed by U.S. Optics; and in no event will U.S. Optics be liable for any special, direct, indirect, consequential, incidental or punitive damages arising and regardless of the theory of liability, even if advised of the possibility of such damage. Products, prices, availability, specifications, and offers are subject to change or cancellation at any time without notice.
For problems with a U.S. Optics product, or to return a product for repair, replacement or refund, please call (406) 300-4090 for a return merchandise Authorization (RMA) number


