Products:
- US Optics B-25 5-25×52
- US Optics B-17 3.2-17×50
- US Optics B-10 1.8-10×42
- US Optics BFX-10 10×40
- US Optics FDN 10×42 FFP
Thank you for choosing U.S. Optics. The product you have purchased is manufactured by a dedicated team of skilled technicians who adhere to a system of precision manufacturing standards. Our pursuit of excellence in mechanical precision, optical clarity, and durability for each scope that is crafted in our factory is relentless. This level of dedication ensures your optic will live up to your highest expectations in the most demanding environments.
This operator’s manual will guide you through the steps to properly install, zero and maintain your optic for optimal performance. Should you have questions that have not been addressed in this manual please contact our Customer Service Department at (714) 582-1956. We will be happy to assist you.
Scope Overview
The B-Series of optics are the most feature packed optics on the market. While they retain the popular magnification range today’s professionals are asking for, the similarities stop there. These new optics now have locking elevation and windage knobs, ek2 stop, revolution counter, tool-less elevation zero and a single button illumination control which has been integrated into the parallax adjustment knob. All this and still the same durability, reliability and performance we’re known for.
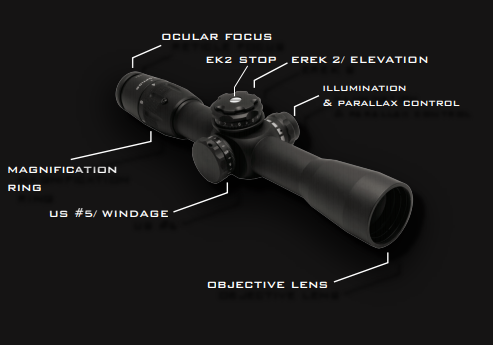
The ocular focus ring is used to focus the reticle. Diopter adjustment is from +2 to -3. Do not use the eyepiece to adjust the sight picture or to adjust parallax.

Setting Reticle Focus
1. Set the scope magnification to the highest value.
2. Rotate the eyepiece counter clockwise until it stops. Do not over rotate the eyepiece.
3. With both eyes open, point the scope toward a white wall or a clear blue sky. Be sure that there are no objects in the sight picture.
4. Rotate the eyepiece clockwise until the reticle image is sharp and in focus.
5. When the reticle is in focus close your eyes for 3 seconds, then reopen them. The reticle should still be clear and sharp. If not, repeat steps 1 through 4 until the desired image clarity is achieved.
6. Set the magnification to the lowest value to confirm that the desired image clarity of the reticle is achieved.
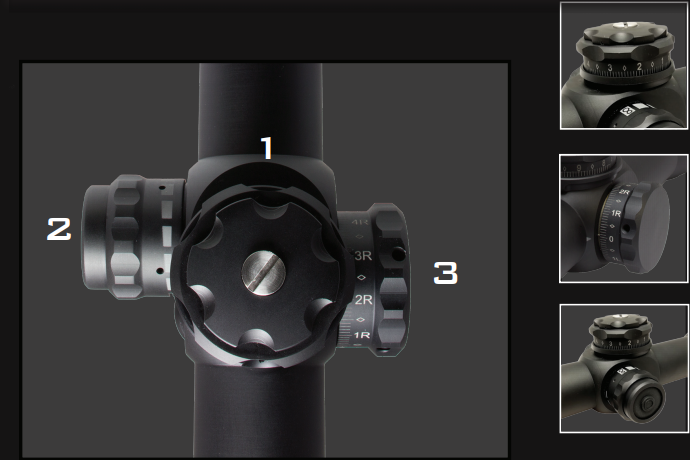
Knob Overview
1. erek 2
the erek 2 knob is an all new design that incorporates a tool free adjustment system for zeroing your optic, an ek2 stop, locking mechanism, a revolution counter. This knob is available in 1/10th mil and 1/4 iphy.
2. us #5
The ergonomic US #5 windage knob is a locking turret available in 1/10 mil and 1/4 iphy. Zeroing the us#5 requires a single 1/16” allen key. windage stop option is available at the time of purchase.
3. Illumination & parallax control
The single push button illumination system will turn on at a Nightvision compatible level with a single click. To increase brightness, press the button to cycle through all 10 levels of intensity. cycle does not shut it off. To turn off, simply hold down the button for 4 seconds. auto shut off
system will take effect after 4 hours. The side parallax adjustment is used to quickly and accurately adjust your target resolution in order to ensure a clear target image at any given range.
Initial set up and zero
1. The first step is to be physically mount the scope to your rifle. For this, we suggest following the manufactures published directions that came with the mount or standard rings that you’re choosing to run.
2. Next, boresight your new optic to your rifle by using a laser boresighter or a magnetic boresighter. This step will make it easier to zero your rifle once you get to the range.
3. Once your new B-Series optic is boresighted, get out to the range and zero your new optic to your rifle. For most calibers and shooting suggest a 100 yard zero. You will need to adjust both your elevation knobs, either up or down – and until your optic’s point of aim matches yourrifle’s point of impact.
Knob Adjustment
The next steps will walk you through the knob adjustment. Both the elevation knob and the windage knob must be set back to read “0”, once your rifle has been zeroes.
Note:
b-10 and b-17 scopes are factory set to 20 moa down
b – 25 scopes are factory set to 30 moa down
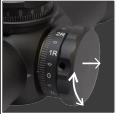
1. To float your elevation knob to “0”, the first thing you will need to do is to pull UP on your elevation lock.
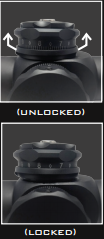
2. Once this elevation lock is in the locked position, use the palm of your hand to loosen the top cap 1/4 of a revolution.
3. Push the elevation lock back down into the Unlocked position, and while pulling upwards on the knob, rotate the knob back to read ‘0’. Do not be alarmed by the audible clicks. The loosening of the top cap combined with pulling up on the knob itself, will release contact from the knob internals and will not affect your zero. As you make adjustments, watch your reticle to ensure that your zero is not being adjusted or moved.
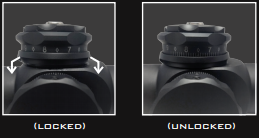
4. Pull the elevation knob lock back up into the Locked position to lock the knob in place.
5. Tighten the top cap again by using the palm of your hand. Ensure that the top cap is as tight as possible. The erek 2 elevation knob is now set to “0”.
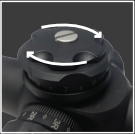
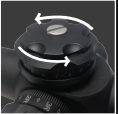
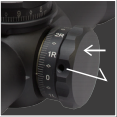
7. to float your windage knob to read “O”, the first thing you will need to do is to push the into the locked position.
8. While knob is locked, loosen the two set screws roughly one full rotation by using the 1/16” hex key that is included in the tool kit of your optic.
9. With the two set screws loosened, pull the knob outboard and float it to read zero. Do not be alarmed with the audible clicks. The loosening of the screws combined with pulling outboard on the knob itself, will release contact from the knob internals and will not affect your zero. As you make your adjustments watch your reticle to ensure your zero is being adjusted or moved.
10. Place the knob back into the locked position and tighten the two set screws until they are finger tight. There is no need to place an excess amount of force on these screws.
Setting your EK2 Stop
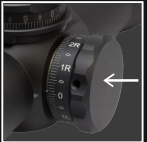
Once the EREK 2 elevation knob is zeroed to your rifle and the knob has been slipped to the “0” position; if desired, you can now set the EK2 stop to the preferred stop positon (recommended 3-5 clicks below “0”). *The images used in the following instructions demonstrate the EK2 Stop being set to 3 clicks below “0”. Your knob position will vary depending on your desired stop position.
1. Adjust EREK 2 elevation knob to the desired stop position.

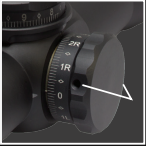
2. Turn the EK2 stop screw clockwise until the screw bottoms out (do not use excessive torque). Be advised that once you’ve bottomed out the EK2 stop screw, the knob may become stiff.
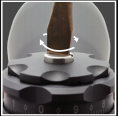
3. In order to verify that your desired stop position is set, turn the EK2 stop screw counter-clockwise 1/8 of a turn.
4. Dial up on your elevation knob (counter-clockwise), then dial down (clockwise) until your knob stops. if the knob stops on your desired stop position, then the ek2 stop is set. if the knob stops below or above your desired stop, then continue on to step 5
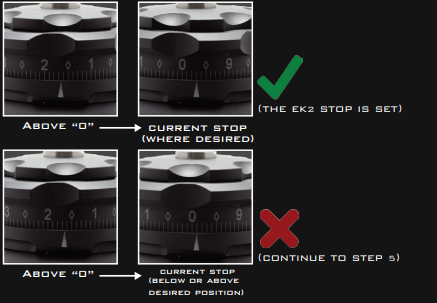
5. Fine tune your stop by adjusting the EK2 stop screw, (clockwise or counter-clockwise) using small increments until you achieve your desired stop position. Be sure to dial up and down on your knob between each adjustment to verify the current stop position and determine your next move.

Scope Care & Maintenance
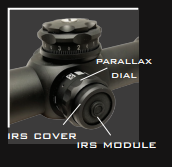
The illuminated reticle system (IRS) is powered by one CR2032 lithium coin battery. To replace the battery:
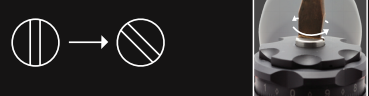
1. While holding the parallax dial in place, turn the irs cover counter clockwise to remove the rheostat cover.
2. separate the irs module from the irs cover to access the CR2032 battery.
3. Remove the depleted battery. Insert a new CR2032 battery leaving the positive surface visible and exposed.
4. to reassemble, align the irs module pins with the detents inside the parallax body. While holding it firmly in place, slip the irs cover over the module and tighten the irs cover (clockwise)until you feel it stop.
5. test your illumination setting to confirm proper assembly and alignment


Much easier to read and follow than the manual one included with the B-25.