The AX Visio 10×32 are AI-supported binoculars and combine outstanding SWAROVISION quality with digital intelligence. The identification function helps you to identify birds and other animal species at the touch of a button. Thanks to the revolutionary “share discoveries” function, you can immediately show your companion where you have seen an animal.
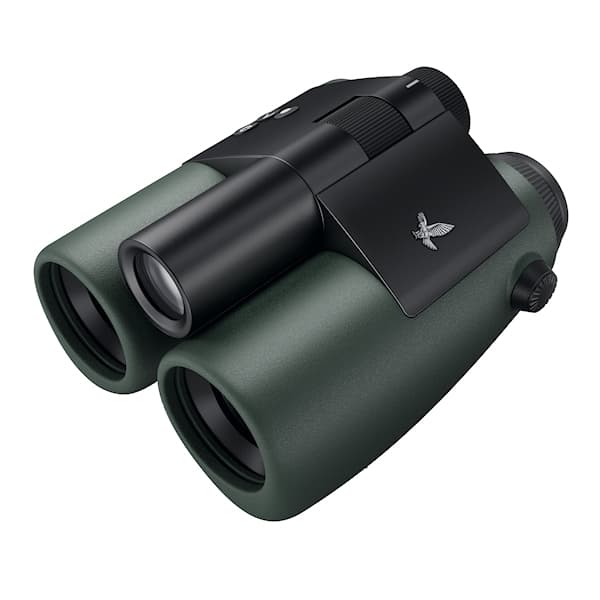
1. OVERVIEW

1 Objective lens cover
2 Focusing wheel
3 Mode selection wheel
4 Diopter adjusting ring
5 Twist-in eyecup
6 Carrying strap
7 Eyepiece cover
8 ON/OFF button![]()
9 Arrow button ![]()
10 Release button![]()
11 LED status indicator
12 Strap connector cover
13 Battery compartment
14 Strap connector
15 RB rechargeable battery
16 RBC battery charger
17 USB charger cable
Also supplied with: lens-cleaning cloth, FSB functional sidebag, soap & brush.
PREPARING TO USE THE DEVICE
2.1 CHARGING THE BATTERY

The AX VISIO is supplied with the RB battery installed. Please charge the battery fully before using the device for the first time (see 4.2). The block adapter 3 is not supplied.
2.2 INSTALLING AND REMOVING THE BATTERY

To insert the battery in the device, you first need to open the battery compartment. This is located on the bottom of the device. To open the battery compartment, flip the bayonet closure up to a vertical position (1), turn it 90° counterclockwise to the left (2), and open the battery compartment cover (3).
You can now insert the battery (4). Please make sure that the contacts on the battery are correctly aligned with the contacts in the device. To close the battery compartment, hook the cover of the battery compartment into the opening (5), and close the cover (6). Turn the bayonet closure 90° clockwise and flip the bayonet closure down.

2.3 FITTING THE CARRYING STRAP AND EYEPIECE COVER

Press on the knob and rotate it counterclockwise (90°).

Pull the knob out.

Remove the pin from the ring

If you want to fit an eyepiece cover or other accessory, pull the strap through the eyelet of the cover.

Then press the pin into the strap until it clicks.

Insert the knob in the designated place on the binoculars.

Push the knob in firmly and rotate slightly clockwise.

Release the pressure from the pin and continue to turn it clockwise until it clicks
Note:
The pin is securely in place once you can no longer turn it without pressure.

Adjust the length of the carrying strap to your individual needs as shown.

Note:
Before you start using the instrument, please adjust the following settings:
2.4 ADJUSTING THE TWIST-IN EYECUP
There are seven different setting positions to choose from. These allow you to adjust the distance from your eye to the eyepiece lens.

Pos. 1 Starting position without glasses:
Turn the eyecups counterclockwise to the full extent.

Pos. 2 Starting position with glasses: Turn the eyecups clockwise as far as they will go.

Pos. 3–7 Five alternative positions: Alternative positions or intermediate stages for observing with and without glasses.
2.5 ADJUSTING THE DISTANCE BETWEEN THE EYEPIECES.
To see a single round image, adjust the two halves of the binoculars until no irritating shadows can be seen.


2.6 HOW TO ADJUST IF BOTH EYES HAVE EQUAL VISION
Turn the left and right diopter adjustment rings until the long bar on the diopter scale matches the bar on the diopter adjustment ring. If the vision in one or both eyes is impaired, adjust the binoculars as described in 2.7.

The display needs to be in sharp focus to show the information in the field of view as clearly as possible and achieve ideal photo quality.
2.7 DIOPTER ADJUSTMENT
To ensure optimum image quality, adjust the focus to compensate for any differences between your left and right eye. To do this, switch on the AX VISIO (point 3.2) and turn the mode selection wheel to the compass position (point 3.3).

- Close the objective lens cover and leave the left cover open.

- Turn both diopter adjustment rings counterclockwise as far as they will go.
Note:
The twist-in eyecup (point 2.4) needs to have been adjusted. Switching on the device (point 3.2) activates the display.

- Now look through the right eyepiece with your right eye and turn the diopter adjustment ring clockwise until the display is sharp. Then completely remove the objective lens cover.

- Use the focusing wheel to focus the right channel on a distant object (keep the left eye closed).

- Now look at the same object through the left eyepiece with your left eye and slowly turn the diopter adjustment ring clockwise until the closed).
Note:
Adjust the twist-in eyecups and eye relief precisely so that the display is more comfortable to view (point 2.4 and 2.5). You can adjust the brightness of the display to your personal preference under “Settings ª Display” in the SWAROVSKI OPTIK Outdoor app.
2.8 ADJUSTING THE FOCUS

Turning the focusing wheel allows you to focus on any object from the shortest focusing distance (see technical data sheet) to infinity
OPERATION
3.1 EXPLANATION OF THE BUTTONS

The release button is used to operate the main functionality in each application. This button has two press points. Pressing the button halfway focuses the camera in the selected functionality, similar to a photo. camera. Details of the functionality can be found in the description of each app function.

The arrow button allows you to move between different functionalities in each app.

Pressing and holding the ON/OFF button will switch the device on or off. If the device is switched on, pressing briefly on this button will deactivate or reactivate the display.
3.2 SWITCHING THE DEVICE ON

SWITCHING ON: Press and hold the ON/OFF button for at least three seconds until the LED status indicator changes from yellow to green. The AX VISIO is now switched on and is starting up. The LED status indicator flashes for around 30 seconds. After this, the LED status indicator turns permanently green. The AX VISIO is now ready to use and the display is active. SWITCHING OFF: To switch off the AX VISIO, press and hold the ON/OFF button for at least five seconds until the LED status indicator briefly turns yellow and then switches off.
3.3 THE MODE SELECTION WHEEL

The mode selection wheel allows you to switch between the individual functions. The following applications are available with the AX VISIO.
– MERLIN BIRD ID
– MAMMAL ID
– CAMERA (PHOTO/VIDEO)
– SHARE DISCOVERIES
– COMPASS
– FAVORITE 1+2
– OPEN API
More information on how to connect your AX VISIO to your smartphone can be found online at swarop.tk/ax_visio_manual.
3.4 STATUS AND ERROR INDICATORS IN THE DEVICE

The status bar shows information about the current status of the AX VISIO. On the left, you can see whether there is currently an active Bluetooth or Wi-Fi connection with a smartphone. In the middle, the app currently selected on the mode selection wheel is shown. On the right, you can see the five seconds after starting up the AX VISIO, changing the app on the mode selection wheel, or reactivating the display.
Battery status indicators

Error indicator – Restart

In the event of an unforeseen error that requires the device to be restarted, the graphic shown here will appear on the display. To restart the device, press and hold the ON/OFF button for five seconds. The device will then automatically restart.
Factory reset
To perform a factory reset on the AX VISIO, press and hold the release button and arrow button simultaneously for at least 10 seconds. A prompt will then appear on the display asking if you are sure you want to reset the device. Press the release button to confirm the reset. To stop the process, press the arrow button.


Note:
Before carrying out a factory reset, please save your photos and videos on your smartphone. The reset ill delete all data from the device.
LED status indicators
| LED indicator | What it means |
| Flashing green | The AX VISIO has been switched on and is starting up |
| Permanently green | The AX VISIO is ready to use |
| Permanently yellow | The AX VISIO is in standby mode |
| Alternating green/yellow | Storage space on the AX VISIO is full – open the SWAROVSKI OPTIK Outdoor app to transfer files |
| Flashing blue | Operating system update is in progress |
| Flashing red | Battery status low (<10%) – please charge the battery |
LED error indicators
| LED indicator | What it means |
| Permanently red | Critical operating system error – please restart the device. |
| Alternating red/yellow | Operating temperature too high (>50°C/122°F) or device overheating (battery, system |
| Alternating red/blue | Operating temperature too low (< –10°C/14°F) |
USING THE BATTERY CHARGER
4.1 BATTERY STATUS INDICATORS
The 4 LED indicators on the charger light up for 30 seconds depending on the level of charging.
1st LED red = 0%
1st LED white = 1% – 24%
2nd LED white = 25% – 49%
3rd LED white = 50% – 74%
4th LED white = 75% – 100%
Note:
You can check the battery charge level by inserting the battery in the charger when the charger is not connected to an electric socket.
4.2 CHARGING THE BATTERY FOR THE FIRST TIME
For safety and transportation reasons, the battery is not supplied fully charged. Please charge the battery fully using the
RBC battery charger supplied before using the device for the
first time (point 2.1).
- Connect the plug of the USB charging cable to the USB port on the charger.
- Connect the other end of the USB charging cable to a suitable USB block adapter.
- Insert the battery in the charger.
4.3 CHARGING TIME
90 % battery level after 3.5 hours
100 % battery level after 5 hours
Note:
The power supply used (not provided) should have an output of at least 2.1 A to allow two batteries to be charged simultaneously. In the case of lower output, charge each battery individually.
4.4 BATTERY CHARGER ERROR INDICATORS
1st LED flashing red for the second inserted battery ª Output current of the USB charging power supply is too low to charge two batteries simultaneously. 1st and 2nd LEDs flashing red ª Battery temperature too low (< 0°C/32°F). 3rd and 4th LEDs flashing red ª Battery temperature too high (> 45°C/113°F) All 4 LEDs flashing red ª Battery is faulty. Stop using the battery immediately. All 8 LEDs are illuminated red ª Charger is faulty. Stop using the charger immediately. 1st LED flashing red ª Battery is discharged.
4.5 GENERAL INFORMATION FOR USE OF THE RBC BATTERY CHARGER IN THE UNITED STATES
This product is validated according to UL62368-1. This product should be fitted with a ITE-listed “Class 2” or LPS block adapter with a USB output of 5 V DC min. 2100 mA. This product is designed only for charging the SWAROVSKI OPTIK RB rechargeable battery, RB AFL+ rechargeable battery, and RB tM 35 rechargeable battery.
GENERAL INFORMATION
5.1 SERIAL NUMBER

You can find the serial number of your product on the bottom of the device between the mode selection wheel and the focusing wheel. To see the serial number clearly, open the device out fully.
5.2 ADDITIONAL INFORMATION
Do you need help with setting up, operating, or looking after our products? Check out our FAQs online. Visit us at MYSERVICE.SWAROVSKIOPTIK.COM.
6. CARE AND MAINTENANCE
6.1 LENS-CLEANING CLOTH
With the included microfiber lens-cleaning cloth you can clean even the most sensitive glass surfaces. It is ideal for objective lenses, eyepieces, and eyeglasses. Please keep the cloth clean, as dirt can damage the lens surface. If the cloth is dirty, you can wash it in lukewarm soapy water and let it air dry. Please use it only for cleaning glass surfaces.
6.2 CLEANING
Cleaning the optics. To ensure the long-lasting optical brilliance of your binoculars, you should keep the glass surfaces free from dirt, oil, and grease. First brush off any larger particles of dirt using an optical lens brush. Then breathe gently on the lens and polish it with the cleaning cloth to remove
any remaining dirt. If it is very dirty (e.g. with sand), the twist-in eyecups can be completely unscrewed, making it very easy to clean.


Cleaning the protective housing. Use the soap & brush kit (supplied). Close the covers on the eyepiece and objective lenses. Remove the battery and close the battery compartment before cleaning. Moisten the brush and apply the soap using circular movements to gently clean the housing. Then rinse the device with clean water and dry it with care. If the optics become wet, dab them dry with a clean cloth to prevent scratching. Rinse the brush thoroughly and leave the
soap & brush kit to dry.


Note:
If you clean your binoculars outdoors, please ensure the soapy water does not contaminate the natural water cycle.
7. COMPLIANCE
7.1 AX VISIO COMPLIANCE
For more information on compliance, see: https://swarop.tk/ax_visio_compliance
WEEE/ElektroG

7.2 RB RECHARGEABLE BATTERY COMPLIANCE
For more information on compliance, see: https://swarop.tk/rb_compliance
WEEE/ElektroG battery

Declaration on legal requirements in Canada This device complies with the RSS standard(s) as issued by Innovation, Science, and Economic Development Canada, or its license-exempt standards. Its peration is subject to the following two conditions: (1) this device may not cause interference, and (2) this device must accept any interference, including interference that may cause undesired operation of the device.
8. SAFETY RECOMMENDATIONS
GENERAL INFORMATION


Repairs and servicing must only be carried out by SWAROVSKI OPTIK Absam (Austria) or SWAROVSKI
OPTIK North America, otherwise your warranty will be void.
- Only SWAROVSKI OPTIK batteries should be used in the product. Use of any other battery may result in damage to the device.
- The AX VISIO is waterproof and dustproof and received the rating IP67 in a test under controlled laboratory conditions according to the IEC standard 60529.
- For safety reasons (battery), the AX VISIO switches off automatically in temperatures below –10°C (+14°F) or above +50°C (+122°F).
WARNINGS FOR THE RB RECHARGEABLE BATTERY![]() WARNING!
WARNING!
Risk of fire and burns. Never open, damage, or heat the battery to above 80°C (176°F). Observe the safety information. Only the charger supplied by SWAROVSKI OPTIK should be used.

Possible risks:
- Risk of fire and explosion
- Risk of emission of toxic or corrosive substances
- Risk of burns
This product has a replaceable and rechargeable lithium-ion battery. When using the product, please note the following:
- Do not continue to use the battery if the outer casing is damaged or if you suspect the battery is damaged. In this case, contact our customer service immediately as there is a risk of explosion and/or accident. Clear warnings of a defective battery include, for example, deformations (bulges), melting of areas on the plastic casing (signs of singeing), discoloration, odor, high heat generation.
- Do not use the battery incorrectly as this can lead to damage to the battery and an associated risk of fire and explosions.
– Do not attempt to open the battery or take it apart.
– Do not short-circuit the battery. Never store the battery in a hazardous location in a cardboard box or a drawer, where the battery contacts could short-circuit each other or where they could be short- circuited by other conductive materials.
– Avoid mechanical stresses (pressure, deformations, impacts).
– Keep the battery dry and clean. If the battery becomes dirty, dry and clean the contacts using a lean, dry cloth.
– Do not use any electrically conductive materials for cleaning.
- If the battery leaks, make sure that the fluid does not come into contact with your skin or eyes, and do not inhale the fumes emitted. If this is the case, seek medical assistance.
- Do not expose products with batteries to excessive heat (e.g. direct sunlight, fire, or proximity to heat sources such as radiators or appliances that produce heat).
INFORMATION ON CHARGING THE LI-ION BATTERY
- Only charge the battery using the RBC battery charger (supplied with the AX VISIO) and a suitable power supply that complies with local regulations or has FCC/CE/IC approval.
- Using damaged cables or chargers or charging in humid environments may cause electric shocks, fire, injury, or damage to the equipment or other property.
- The optimum charging temperature is between 15°C and 25°C (59°F and 77°F) ambient temperature. The permitted charging temperature is between 0°C and 37°C (32°F and 99°F). Do not go below or exceed this temperature range during charging.
- Do not leave the battery unattended while it is charging.
- Do not leave the battery in the charger for longer than necessary.
- Make sure that the battery is not covered during charging
- Pay particular attention to any unusual increase in temperature. The battery should not be hot to the touch during charging.
GENERAL INFORMATION AND STORAGE
- The battery life depends on the ambient temperature.
- Under no circumstances should batteries be stored for longer periods (days) in a discharged state as this can lead to irreparable damage. Charge the battery to 60 – 80% before storage. If the battery is stored at room temperature, it must be recharged after 6 months.
- A battery has a limited life, and its performance decreases with duration of use. We advise a usage period of no longer than 5 years.
FAULTY BATTERIES
In the event of a faulty battery or deformed battery housing, under no circumstances should you return the device including the battery. For safety reasons, faulty batteries must be disposed of at local hazardous goods collection points. In this case, remove the faulty battery from the device. If it is not possible to remove the battery, please contact our Customer Service team. In the event of any damage to the AX VISIO, please return the device without the battery. Please note that international legislation on hazardous goods (IATA, ADR, etc.) applies to any shipment of lithium-ion cells (batteries).
WARRANTY

This product from SWAROVSKI OPTIK is a high- quality instrument that comes with worldwide warranty and goodwill services. For more information, please visit: https://swarop.tk/ax_visio_warranty
TECHNICAL DATA

You can find all technical data for your product at: https://swarop.tk/ax_visio_technicaldata


Still getting my head around it worth every penny a little bit heavy
Otherwise brilliant Pair of binoculars
Good pair of binoculars