Products:
IMPORTANT!
PLEASE ENSURE ALL FIREARMS ARE CLEAR AND SAFE BEFORE CONTINUING
- Inserting battery
- Removing battery
- Windage Adjustment:
Clockwise rotation = Group Right/Dot Left
ENSURE THAT YOU KEEP TOOLS SAFE FOR FUTURE USE
Accessories:
- Minidial
- CR2032 Battery
- RMS Cover
- 1° shim
- 2 x Button head M4x8mm screws
- 2 x Button head M4x10mm screws
- 2 x Hex Wrench tools
General Care:
The lens has an anti-reflective coating. The lens may show some minor distortion if examined under intense scrutiny such as holding the sight up to a light and focusing on the lens. When you are actually shooting, the eye never focuses on the lens, so this distortion is not noticeable under live fire conditions. Be sure to blow away any debris before initiating the cleaning process and, when not in use, protect with sight cover.
Products designed and manufactured by Shield carry a Limited Lifetime warranty on materials and workmanship. For more details on SHIELD’s warranty please see our website www.shieldsights.com/warranty
IMPORTANT NOTICE TO PURCHASER
The following is made in lieu-of all warranties, expressed or implied, including the implied warranties of merchantability and fitness for purpose: Seller’s and manufacturers only obligation shall be to replace such elements of the product proved to be defective. Before using, user shall determine the suitability of the product for its intended use, and user assumes all risk and liability whatsoever in connection there with.
NEITHER SELLER NOR MANUFACTURER SHALL BE LIABLE EITHER IN TORT OR IN CONTRACT FOR ANY LOSS OR DAMAGE, DIRECT, INCIDENTAL, OR CONSEQUENTIAL, ARISING OUT OF THE USE OR THE INABILITY TO USE THE PRODUCT.
For instructional videos on mounting, lens cleaning and changing the battery please visit our YouTube channel or our website.
www.youtube.com/c/ShieldSights
IMPORTANT!
PLEASE ENSURE ALL FIREARMS ARE CLEAR AND SAFE BEFORE CONTINUING RMS INSTRUCTIONS
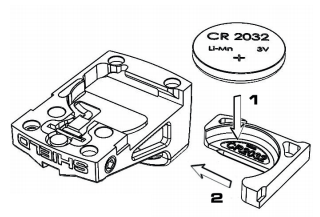
Fitting and removal of the battery:
The Reflex Mini Sight uses a 3V Lithium battery type CR2032 which under average use can last 2 to 3 years. Replacement is required when the intensity of the dot appears greatly diminished against a bright background.
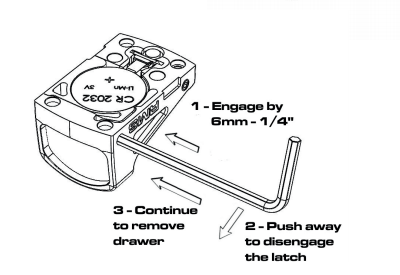
To change the battery whilst mounted on the gun. Remove magazine and ensure that the gun is clear and safe before proceeding and keep the gun pointed away from you whilst performing the following procedure.
Take the 2.5mm hex wrench and push the long end of the wrench into the hole on the front right of the sight. The key should meet resistance about 1/4 of the way in, this is the locking latch. Whilst pushing the hex wrench towards the front of the sight push it through until you see the drawer exit the left hand side of the body.
At this point it is recommended that you turn the gun upside down to avoid the battery from dropping on the floor. To fully remove the drawer you can use the short end of the hex wrench and place in the hole on the underside of the drawer and pull. To insert a new battery, make sure the weapon is upside down and place the battery into the removable drawer. The battery is inserted into the drawer with the (+) visible and the (-) facing the base of the sight. Push the drawer into the sight until it is flush with the sight and the LED is visibly on.
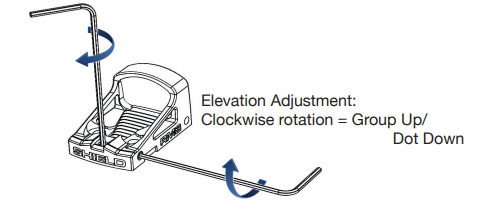
Zeroing the RMS:
When zeroing the RMS attention and care must be paid to the feel of the mechanism. The RMS is a small, precision built piece of equipment and could be damaged if not handled correctly.
There is no need to use anything other than our provided tool. If a screwdriver with a handle is used the torque that can be applied could cause damage without the user noticing. The mechanism is designed to perform the exact job of allowing movement in only the elevation & windage and to stop any unwanted movement throughout its life that would result in zero shift.
DO NOT FORCE ADJUSTMENT, in either direction, once resistance is felt as this will damage the sight and void the warranty. Push the wrench though the mini dial to measure your adjustment.
Elevation: Turning the elevation screw Clockwise will move the dot DOWN, this will move the shot (group) UP. Turning the elevation screw AntiClockwise will move the dot UP, this will move the shot (group) DOWN
The 1degree shim is provided to give extra range of elevation across a wide range of firearms (such as the 1911). Should you feel any resistance from the mechanism whilst zeroing the elevation please fit the shim between the sight and the mount with the thickest part at the rear.
Windage:
Turning the windage screw Clockwise will move the dot to the RIGHT, this will move the shot (group) to the LEFT. Turning the windage screw AntiClockwise will move the dot to the LEFT, this will move the shot (group) to the RIGHT.


