Products:
- Pulsar Helion 2 XP50 Thermal Imaging Monocula: https://www.optics-trade.eu/en/pulsar-helion-2-xp50-thermal-imaging-monocular.html
This text is a transcription of the file in PDF format.
SPECIFICATIONS
| MODEL | HELION 2 XP50 |
| SKU | 77402 |
| MICROBOLOMETER | |
| Type | uncooled |
| Resolution, pixels | 640х480 |
| Frame rate, Hz | 50 |
| Pixel size, microns | 17 |
| OPTICAL SPECIFICATIONS | |
| Magnification ratio, x | 2.5 |
| Smooth digital zoom, x | 2.5 – 20 |
| Digital zoom | x2/ x4/ x8 |
| Lens | F50 mm, F/1.2 |
| Field of view angle (horizontal), deg | 12.4 |
| Eyepiece focusing range, diopters | ±5 |
| Detection distance for deer-sized objects, m (y) | 1800 (1970) |
| DISPLAY | |
| Type | AMOLED |
| Resolution (pixels) | 640х480 |
| OPERATIONAL CHARACTERISTICS | |
| Power supply, V | 3 – 4.2 |
| Battery Type/Capacity/Nominal output voltage | Li-ion Battery Pack IPS7/ 6400 mAh/ DC 3.7 V |
| External power supply | 5 V (USB) |
| Battery run time (at t=22 °C)*, h | 10 |
| Protection degree, IP code (IEC60529), with battery installed | IPX7 |
| Operating temperature range, °C (°F) | -25…+50 (-13…+122) |
| Dimensions, mm/ inch | 234х55х58 / 9.21×2.17×2.28 |
| Weight without battery, kg / oz | 0.5 / 17.64 |
| VIDEO RECORDER | |
| Video/photo resolution, pixels | 640х480 |
| Video/photo formats | .avi / .jpg |
| Built-in memory | 16 GB |
| Built-in memory capacity | About 8 hours of video or more than 100 000 photos |
| WI-FI CHANNEL | |
| Frequency | 2.4 GHz |
| Standard | 802.11 b/g |
| Reception range in direct line of sight, m | 15 |
* Actual battery life may vary depending on the use of Wi-Fi and the built-in video recorder.
The product design improvements are possible to make it more appealing for the consumer.
PACKAGE CONTENTS
- Helion 2 Thermal Imaging
- Scope
- IPS7 Battery Pack
- Battery charger with mains
- charger
- USB cable
- Carrying case
- Hand strap
- Quick start guide
- Lens cloth
- Warranty card
This product is subject to change in line with improvements to its design.
The latest edition of this user manual is available online at www.pulsar-vision.com
DESCRIPTION
HELION 2 thermal imaging scopes are based on an IR sensor (uncooled microbolometer) and designed for the use both in the night-time and during the day in adverse weather conditions (fog, smog, rain) to see through obstacles hindering detection of targets (branches, tallgrass, thick bushes etc.).
HELION 2 thermal imaging scopes do not require an external source of light and are not affected by bright light exposure.
HELION 2 thermal imaging scopes are designed for various areas of application including night hunting, observation, trail orienteering, rescue operations etc. night hunting, observation, trail orienteering, rescue operations etc.
FEATURES
- User-friendly interface
- Four operating modes: forest, rocks, identification, user
- Three calibration modes – Manual, Semi-automatic, Automatic
- Eight colour palettes for observation
- Defective pixel repair function
- Stadiametric rangefinder
- Image Detail Boost function
- Display off option
- Functional and ergonomic design
- Updatable features
- Wide range of operating temperatures (-25 °С …+50 °С)
VIDEO RECORDING
- Built-in video and sound recorder
- Integration with macOS and Android based mobile devices
- Wi-Fi. Remote control and viewing using smartphone
- YouTube. Direct video streaming and recording to the Internet via smartphone using the Stream Vision application
BATTERY PACK:
- Quick-release Li-Ion battery packs IPS7/IPS14
- Operating time in Wi-Fi mode up to 20 hours*
- Operation on АА batteries **
- Charging IPS7/IPS14 batteries via USB
* on Battery Pack IPS14 (sold separately).
** using special battery container (sold separately).
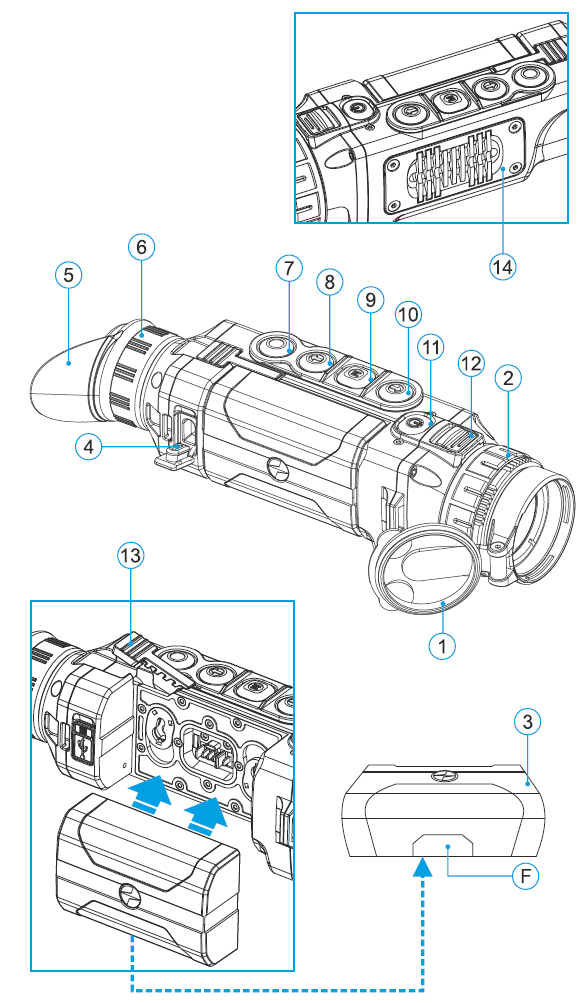
EXTERNAL VIEW AND CONTROLS
- Lens cover
- Lens focusing ring
- Battery Pack
- Micro-USB port
- Eyeshade
- Dioptre adjustment ring
- Recording button REC
- Navigation button DOWN
- Button MENU
- Navigation button UP
- Power on/off button ON
- Latch for lens change
- Lever for battery pack
- Radiator cooling system
DESCRIPTION OF CONTROLS
| BUTTON | OPERATING MODE | FIRST SHORT PRESS | OTHER SHORT PRESSES | LONG PRESS |
| ON (11)
|
Device is off | Power device on | Calibrate the sensor | Turn display off/ Power device off |
| Device OFF mode | Turn display on | Calibrate the sensor | ||
| Device is on | Calibrate the sensor | |||
| UP (10)
|
Regular (viewing) | Operating modes | Color palettes | |
| Main menu | Navigation upwards/rightwards | —- | ||
| Quick menu | Changes parameters | —- | ||
| MENU (9)
M |
Regular (viewing) | Enter quick menu | —- | Enter main menu |
| Main menu | Confirm selection | Exit submenu without confirming selection / Exit menu (switch to viewing mode) | ||
| Quick menu | Switch between quick menu options | |||
| DOWN (8)
|
Regular (viewing) | Control step-up digital zoom | PiP on/off | |
| Main menu | Navigation downwards/leftwards | —- | ||
| Quick menu | Changes parameters | —- | ||
| REC (7)
|
Video mode | Start video recording | Pause / resume video recording | Stop video recording / Switch to photo mode |
| Photo mode | Take a photograph | Switch to video mode | ||
USING THE BATTERY PACK
Helion 2 thermal imaging scopes are supplied with a rechargeable Li-Ion Battery Pack IPS7 which allows operation for up to 10 hours. Please remember to charge the Battery Pack before first use.
Charging:
- Lift the lever (C) of the charging base.
- Remove the protective cover from the Battery Pack.
- Install the Battery Pack into the charging base as shown in Pic.3; click the lever (C).
- Upon installation, a green LED indicator (D) on the charging base will start to glow and begin flashing:
- once if the battery charge ranges from 0% to 50%;
- twice if the battery charge ranges from 51% to 75%;
- three times if the battery charge ranges from 76% to 100%;
- If the indicator lights green continuously, the battery is fully charged.
- You can remove the battery from the charger by lifting the lever (C).
- If the indicator of the charger lights red continuously upon battery installation, probably the battery’s charge level is lower than acceptable (the battery has been long in deep discharge). Keep the battery in the charger for a long time (up to several hours), remove and re-insert it. If the indicator starts blinking green, the battery is good; if it keeps lighting red it’s defective. Do not use the battery!
- Connect the Micro-USB plug of the USB cable to the port (E) of the charger.
- Connect the Micro-USB plug to the charger.
- Insert the plug of the charger to the 110-240V socket.

INSTALLATION:
- Remove the protective cover from the Battery Pack.
- Lift the lever (13).
- Install the battery into the dedicated slot on the device housing so that element F (Pic.2 on the flyleaf) appears from below.
- Fix the battery by clicking the lever.
SAFETY MEASURES:
- Only use the charger supplied with the Battery Pack. The use of any other charger may irreparably damage the Battery Pack or the charger and may cause fire.
- When keeping the battery for a long period, the battery should not be fully charged or fully discharged.
- Do not charge the battery immediately after bringing the battery from cold environment to a warm one. Wait for 30-40 minutes for the battery to get warm.
- Do not leave a battery unattended while charging. Never use a modified or damaged charger.
- Charge the Battery Pack at a temperature from 0 °C to +45 °C. Otherwise batter’s life will decrease significantly.
- Do not leave the Battery Pack with a charger connected to the mains longer than 24 hours after full charge.
- Do not expose the battery pack to high temperature or to a naked flame.
- Do not submerge the battery in water.
- Do not connect external device with a current consumption that exceeds permitted levels.
- The Battery Pack is short circuit protected. However, any situation that may cause short-circuiting should be avoided.
- Do not dismantle or deform the Battery Pack.
- Do not drop or hit the battery.
- When using the battery at negative temperatures, battery’s capacity decreases, this is normal and is not a defect.
- Do not use the battery at the temperatures above those shown in the table – this may decrease battery’s life.
- Keep the battery out of the reach of children.
EXTERNAL POWER SUPPLY
The device can be powered with an external power supply such as Power Bank (5V).
- Connect the external power supply to the USB port (4) of the device (Pic. 1 on the flyleaf).
- The device switches to operation from external power supply, and the IPS7 Battery Pack will begin slowly charging.
- The display will show the battery icon
 with charge level as a percentage.
 - If the device operates on external power supply but the IPS7 battery is not connected, the icon is shown.
- When the external power supply is disconnected, the device switches to the internal battery pack without powering off.
Attention! Charging IPS7/IPS14 batteries at air temperatures below 0 °C can result in reduced battery life. When using external power, connect Power Bank to the switched-on device, which have worked for several minutes.
OPERATION
WARNING! Do not point the objective lens of the unit at intensive sources of light such device emitting laser radiation or the sun. This may render the electronic components inoperative. The warranty does not cover damage caused by improper operation.
WARNING! The radiator cooling system (14) becomes warm during operation: this is normal and allows an increase in the sensitivity of the device.
Powering on and image setup
- Open the lens cover (1).
- Turn the unit on with a short press of the ON (11) button .
- To obtain a crisp image of the icons on the display, rotate the dioptre adjustment ring (6). After this there is no need to rotate the dioptre adjustment ring for distance or any other conditions.
- To focus on the object being observed rotate the lens focusing ring (2).
- To set up display brightness and contrast and continuous zoom, please refer to the QUICK MENU FUNCTIONS section.
- After use, hold down the ON button to turn the unit off.
SENSOR CALIBRATION
Calibration allows levelling of the background temperature of the microbolometer and eliminates image flaws (such as frozen image, vertical stripes etc.).
There are three calibration modes: manual (M), semi-automatic (SA) and automatic (А).
Select the desired mode in the menu option “CALIBRATION” ![]() .
.
- Mode М (manual). Close the lens cover, turn the device on with a short press of the ON button (11). Having finished calibration, open the lens cover.
- Mode SA (semi-automatic). Calibration is activated with a short press of the ON button. You do not have to close the lens cover (the sensor is closed with the internal shutter automatically).
- Mode А (automatic). The device calibrates by itself according to the software algorithm. You do not have to close the lens cover (the sensor is closed with the internal shutter automatically). User assisted calibration with the ON button is allowed in this mode (in semi-automatic mode).
STEP-UP DIGITAL ZOOM
The device allows you to quickly increase the basic magnification (please refer to the “Digital zoom” line in the specifications table) by two times or four times or eight times, as well as to return to the basic magnification. To operate the step-up digital zoom, press successively the DOWN (8) button.
QUICK MENU FUNCTIONS
The Quick menu allows change of basic settings (display brightness and contrast, continuous digital zoom and stadiametric rangefinder).
- Enter the menu with a short press of the М (9) button.
- To toggle between the functions below, press successively the M button.
- Brightness – press the UP (10)/ DOWN (8) buttons to change display brightness from 0 to 20.
- Contrast – press the UP/ DOWN buttons to change display contrast from 0 to 20.
- Digital zoom – press the UP/ DOWN buttons to change zoom from 2.5x to 20x. Continuous digital zoom is in 0.1x increments. The initial value of the continuous digital zoom is x1.0 if the step-up digital zoom is not active.
- The stadiametric rangefinder – press the UP/DOWN buttons to change the distance between the special mark points to determine the distance to the observed object.
- Basic mode – it allows you to select one of the three modes as the basic one for the user mode.
Notes. Display brightness and contrast settings are saved in the memory when the unit is turned off. - Exit the quick menu with a long press of the M button or wait 10 seconds to exit automatically.
MENU CONTENTS:

Menu contents and description
| Wi-Fi | Wi-Fi ON/OFF |
| Turn Wi-Fi on with a short press of the M (9) button.
Turn Wi-Fi off with a short press of the M (9) button. |
|
Image Detail boost |
The “Image Detail boost” function increases the sharpness of the contours of heated objects, which increases their detail. The result of the function depends on the selected mode and observation conditions: the higher the contrast of objects, the more noticeable the effect. This option is enabled by default, but can be disabled in the main menu.
Turn on/off Image Detail Boost
|
Mode |
The devices have four operating modes of the thermal imager: Forest (observation mode of objects within low thermal contrast conditions), Rocks (observation mode of objects within high thermal contrast conditions), Identification (high detalization mode), User (individual brightness and contrast settings).
Note: Quick activation of the operating modes is possible by using the UP button. Short press of the UP button activates the switching of the operating |
Graphics brightness |
Graphics brightness
|
Color palettes |
Selection of colour palettes
Basic image mode is “White Hot”. Menu option “Colour palettes” allows you to select an alternative palette. Enter the main menu with a long press of the M (9) button. Enter the submenu with a short press of the M button. Select one of the palettes below with a short press of the UP (10)/ DOWN (8) buttons. Confirm selection with a short press of the M button. Black Hot – white colour corresponds to low temperature, black colour – to high temperature; Hot Red; Red Monochrome; Rainbow; Ultramarine; Violet; Sepia. Note: a long press of the UP button (10) also activates the change between the Hot White palette and the pallet chosen in the main menu. |
Calibration |
Selection of calibration mode.
There are three calibration modes: manual (M), semi-automatic (SA) and automatic (А).
A In automatic mode the need for calibration is based on software algorithm. Calibration starts automatically. SA The user determines for himself the need for calibration based on the actual image status. M Manual (silent) calibration. Close the lens cover before calibration. |
WiFi settings Password setup
Access level setup
Owner |
Wi-Fi setup
This menu option allows you to set up your device for operation in a Wi-Fi network. This menu option allows you to set a password to access your thermal imager from an external device. The password is used to connect an external device (i.e. smartphone) to your thermal imager.
Access level setup This menu option allows you to set required access level of the Stream Vision application to your device.
|
| The following settings are available: | |
| Language
|
Language selection
Enter the submenu “Language” with a short press of the M button. Select one of the available interface languages with a short press of the UP/ DOWN buttons: English, French, German, Spanish, Russian. Switch between languages with a short press of the M button. Save selection and exit the submenu with a long press of the M button. |
Date |
Date setup
|
Time |
Time setup
|
| Units of measure
|
Selection of units of measurement
|
Format |
Formatting
This menu option allows you to format your device’s Flash card or memory card (erase all files from its memory).
|
Reset |
Restore default settings
The following settings will be restored to their original values before changes made by the user:
Warning: date and time settings, default pixel map and remote control activation are saved. |
| Lens selection is used when replacing objective lenses.
Selection of the lens type is important for the correct display of the optical magnification and adequate operation of the Stadiametric rangefinder.
|
|
| Remote control (bought separately)
Before operating the remote control (RC), remember to activate it as follows:
|
|
| Microphone
|
|
| Defective pixel repair
When operating a thermal imager, defective (dead) pixels (bright or dark dots with constant brightness) may become visible on the sensor. The defective pixels on the sensor may proportionally increase in size when digital zoom is activated. Helion 2 thermal imagers allow the user to repair defective pixels on the detector using a software-based method or to abort deletion.
Return to default defective pixel pattern
Attention! The display of a thermal imager may have 1-2 pixels represented as bright white or color (blue, red) dots which cannot be deleted and are not a defect. |
|
This option allows the user to view the following information about the device:
Select menu option Device information with a short press of the M button to review information. |

STATUS BAR
The status bar is located in the lower part of the display and shows information on the actual operating status of the device, including:

- Colour palette (shown only if the “Black Hot” palette is selected)
- Operating mode
- Calibration mode (in the automatic calibration mode, three seconds before automatic calibration a countdown timer 00:01 is shown in place of the calibration mode icon).
- Current full magnification (for example, 16x)
- Wi-Fi connection status
- Running time
- Battery charge level (if the device is powered by the Battery Pack) or External battery power indicator (if the device is powered by an external power supply)
VIDEO RECORDING AND PHOTOGRAPHY
Helion 2 thermal imagers feature video recording and photography of the image being ranged to the internal memory card.
Before using this feature please read the menu options “Date setup”, “Time setup” of the section “Main menu functions”.
The built-in recorder operates in two modes – VIDEO and PHOTO
VIDEO mode. Video recording
- The device in the VIDEO mode upon turning on.
- In the top left corner you will see icon and remaining recording time in the format HH:MM (hours: minutes) 5:12.
- Start video recording with a short press of the REC (7) button.
- Upon start of video recording icon disappears, and icon REC and recording timer in the format MM:SS (minutes : seconds) appear instead:
- Pause and resume recording video with a short press of the REC button.
- Stop recording video with a long press of the REC button.
- Video files are saved to the memory card after stopping video.
- Switch between modes (Video-> Photo-> Video) with a long press of the REC button.
Photo mode. Photography
- Switch to the Photo mode with a long press of the REC button.
- Take a picture with a short press of the REC button. The image freezes for 0.5 sec and a photo is saved to the internal memory. In the top left corner of the display you can see: photography icon .
- , “>100” means that you can take more than 100 pictures. If the number of available pictures is less than 100, actual amount of available pictures (for example 98) is shown next to the icon .
Notes:
- you can enter and operate the menu during video recording;
- recorded videos and photos are saved to the built-in memory card in the format img_xxx.jpg (photos); video_xxx.avi (videos). xxx – three-digit counter for videos and photos;
- counter for multimedia files cannot be reset;
Attention!
- Maximum duration of a recorded file is seven minutes. After this time expires a video is recorded into a new file. The number of recorded files is limited by the capacity of unit’s internal memory.
- Regularly check the free capacity of the internal memory, move recorded footage to other storage media to free up space on the internal memory card.
IMPORTANT!
To playback video files recorded by thermal imaging devices on macOS-based computers, we recommend that you use VLC video player or Elmedia player.
Download links and QR codes are shown below:

WI-FI FUNCTION
Your thermal imager features wireless connection option (Wi-Fi) which links it with external appliances (smartphone, tablet PC).
- Activate the Wi-Fi module in the main menu. Activate the menu by long pressing the M button (9). Wi-Fi operation is shown in the status bar as follows:
| Connection status | Status bar indication |
| Wi-Fi is off | icon |
| Wi-Fi activated by the user, Wi-Fi in the device is being activated | icon |
| Wi-Fi is on, no connection with device | icon |
| Wi-Fi is on, device connected | icon |
- Your device is detected by an external device as «Helion_XXXX», where XXXX – is the last four digits of device’s serial number».
- After a password is generated on an external appliance (please refer to the menu option “Wi-Fi setup” of the section “Main menu functions” of this user manual) and connection is established, the icon in the status bar changes to .
STADIAMETRIC RANGEFINDER
Thermal imagers are equipped with a stadiametric rangefinder which allows the user to estimate approximate distance to an object of known size.
- Select the “Stadiametric rangefinder” function with a short press of the M (9) and select the icon by briefly pressing M button.
- You will see on the display: measurement bars, icons of three reference objects and respective distances for the three objects.
- There are three pre-set reference objects:
– Hare – height 0.3 m
– Wild boar – height 0.7 m
– Deer – height 1.7 m
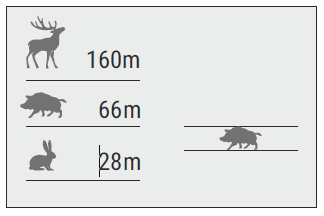
- Move the lower fixed bar under the object being ranged and, while pressing the UP/ DOWN buttons, move the upper horizontal bar relative to the lower fixed bar until the object fits entirely between the two cursors. The distance to the object is automatically recalculated as you move the upper line.
- If ranging does not take place within 10 seconds, the information disappears from the display.
- To select the unit of measurement (metres or yards), go to the respective menu option.
- Before it appears on the display, a measured distance value is rounded up to 5 m for larger values, and rounded down to 1 m for smaller values.
Exit rangefinder mode with a long press of the M button or wait 10 seconds to exit automatically.
FUNCTION DISPLAY OFF
The Display off function deactivates transmission of image to the display by minimizing its brightness. This prevents accidental disclosure.
The device keeps running.
- When the device is on, hold down the ON (11) button. Display goes out, message “Display off”.
- To activate the display, press briefly the ON button.
- When holding down the ON button, the display shows “Display off” message with countdown, the device will turn off.

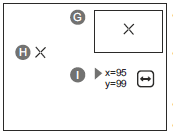
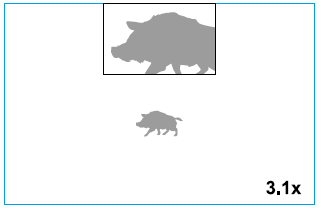
FUNCTION PiP
PiP (“Picture in Picture”) allows you to see a zoomed image simultaneously with the main image in a dedicated window.
- Turn on/off the PiP function with a long press of the DOWN (8) button.
- Change zoom ratio in the PiP window with a short press of the DOWN button.
- The zoomed image is displayed in a dedicated window, with the full optical magnification being shown.
- The main image is shown with optical magnification ratio which corresponds to ratio x1.0.
- When PiP is turned on, you can operate the step-up and continuous digital zoom. The full optical magnification will take place only in the dedicated window.
- When PiP is turned off, the image is shown with the optical magnification set for the PiP function.
STREAM VISION
Helion 2 thermal imagers support Stream Vision technology which allows you to stream image from the display of your thermal imager to a smartphone or tablet PC via Wi-Fi in real time mode. You can find further guidelines on Stream Vision online at www.pulsar-vision.com
Note: the Stream Vision application allows you to update the firmware features of your thermal imager.
How to update instructions are as below:
1. Download free of charge Stream Vision App on Google Play or App Store. Scan the QR codes to download Stream Vision free of charge:

2. Connect your Pulsar device to your mobile device (smartphone or tablet).
3. Launch Stream Vision and go to section “My Devices”.
4. Select your Pulsar device and press “Check Updates”.
Important:
– if your Pulsar device is connected to phone, please turn on mobile data (GPRS/3G/4G) on your phone to download update;
– if your Pulsar device is not connected to your phone but it’s already in the “My Devices” section, you may use Wi-Fi to download update.
5. Wait for the update to download and install. Pulsar device will reboot and will be ready to operate.
USB CONNECTION
- Connect one end of the USB cable to the Micro-USB (4) port of your device, and the other end to the USB port of your PC/laptop.
- Turn the device on with a short press of the ON (11) button (device that has been turned off cannot be detected by your computer).
- Your device will be detected by the computer automatically; no drivers need to be installed.
- Two connection modes will appear on the display:
- Memory card (external memory) and Power.
- Select connection mode with UP and DOWN buttons.
- Confirm selection with a short press of the M button.

Connection modes:
- Memory card (external memory). In this mode the device is detected by the computer as a flash card. This mode is designed for work with the files saved in device’s memory. The device’s functions are not available in this mode; the device turns off automatically.
– If video recording was in progress when connection was made, recording stops and video is saved. - When USB is disconnected from the device where connection is in the USB Mass storage device mode, the device remains on the OFF state. Turn the device ON for further operation.
Power.
- In this mode PC/laptop is used as an external power supply. The status bar shows icon . The device continues operating and all functions are available.
- Note: The Battery pack installed in the device is not being charged!
- When USB is disconnected from the device when in the Power mode, the device keeps operating with Battery Pack, if available, and it has sufficient charge.
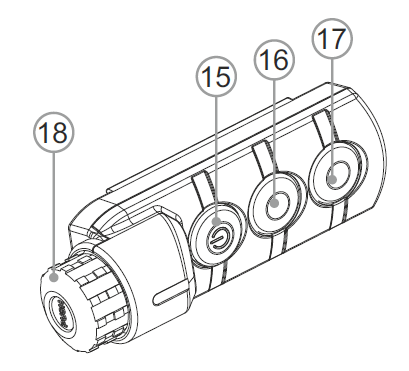
WIRELESS REMOTE CONTROL
(bought separately)
Wireless remote control (RC) duplicates the POWER ON function, digital zoom, video start/stop and menu navigation.
RC controls are as follows:
- ON Button (15): duplicates the functions of the ON (11) button.
- Button (16): digital zoom activation. Function PiP.
- Button (17): duplicates the functions of the REC (7) button.
- Controller (18): duplicates the functions of the М (9) button when pressed; duplicates the functions of the UP (10)/ DOWN (8) upon rotation (in quick menu/main menu).
TECHNICAL INSPECTION
Check:
- External view (there should be no cracks on the housing).
- The state of the objective and eyepiece lenses (there should be no cracks, spot, dust, deposits etc. ).
- The state of the Battery Pack (should be charged) and electric terminals (there should be no oxidation).
- Correct functioning of the controls.
MAINTENANCE AND STORAGE
Maintenance should be carried out no less frequently than twice a year, and should consist of the following measures:
- Wipe external plastic and metal surfaces clean of dust and dirt with a soft cloth moistened with a synthetic cleaning agent.
- Clean the electric terminals of the Battery Pack and device’s battery slot using a grease-free organic solvent.
- Check the objective and eyepiece lenses. If required, remove dust and sand (preferably by a noncontact method). Clean the external surfaces of the lenses with products expressly designed for this purpose.
- Store the device in a carrying case. Remove the Battery Pack for long-term storage.
TROUBLESHOOTING
| Problem | Check | Corrective action |
| The thermal imager will not turn on. | Battery Pack is discharged. | Charge the battery. |
| The unit does not operate on externa power supply. | USB cable is damaged. | Replace USB cable. |
| External power supply is discharged. | Charge the external power supply (if necessary). | |
| The image is blurry, with vertical stripes and uneven background. | Calibration is required. | Carry out calibration according to Section “SENSOR CALIBRATION”. |
| The image is too dark. | Brightness or contrast level is too low. | Adjust brightness/contrast with the UP/DOWN buttons. |
| Poor image quality / Detection range reduced. | Problems described may arise in adverse weather conditions (snow, rain, fog etc.). | |
| Smartphone or tablet PC cannot be connected to the device. | Password in the unit was changed. | Delete network and connect again inserting the password saved in the device. |
| No Wi-Fi signal or erratic signal. | The unit is beyond reliable Wi-Fi range. | Place the device in line-of-sight of the Wi-Fi signal. |
| There are obstacles between the device and the signal receiver (i.e. concrete walls). | ||
| There are too many Wi-Fi networks in the area where the scope is located which ma | To ensure stable Wi-Fi performance, move the riflescope to an area with few or no Wi-Fi networks. | |
| Smartphone or tablet PC cannot be connected to the device. | Password in the unit was changed. | Delete network and connect again inserting the password saved in the device. |
| The device cannot be powered on with wireless remote control. | Remote control is not activated. Low battery. | Activate the remote control according to instructions. Install a new CR2032 battery. |
| Color stripes appear on the display or images disappears. | The device has accumulated static charge during operation. | As soon as the impact of the static charge is over, the device may reboot automatically; alternatively please turn off and restart the device. |
| When using the scope at below zero temperatures the image quality is worse than at positive temperatures. | Because of variations in thermal conductivity, objects (surrounding environment, background) under observation become warm more quickly at above-zero temperatures, which allows higher temperature contrast and, thus, the quality of the image produced by a thermal imager will be better.
At low operating temperatures, objects under observation (background) normally cool down to roughly identical temperatures, which leads to lower temperature contrast, and to image quality (precision) degradation. This is normal for thermal imaging device. |
|
The term of possible repair of the device is five years.


