Product:
1.Switch On
The camera will be switched on by pressing the power button for 3 seconds in the condition of camera is off, the indicator light will be turned on, the startup screen will be shown on the internal ocular.
2. Switch Off
The camera will be switched off by depressing the power button for 3 seconds in the condition of camera is on.
The camera will be switched off automatically if there is no operation when in standby mode.
3. Standby
Short Press the power button when the camera is on, it will enter into standby mode with indicator light flickering. Short press again to resume from standby mode to normal mode.
4. Laser On/Off
The laser pointer can be switch On/Off by long pressing the Image Mode button. A reticle will be presented in the center of the image.

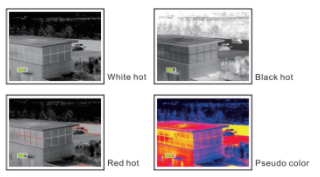
5. Switch the Image Mode
Short click the Image Mode button to switch the image mode when the camera is on. The image mode will be switched from White hot-Black Hot Red Hot-Pseudo color circularly.
6. LED Torch
The camera can be used as a torch, the LED can be turned on by long pressing the Image Mode button in the condition of camera is off.
7. E-Zoom
Short click the E-zoom button when the camera is on. The image will be electrical zoomed from 1x-2x-4x circularly.
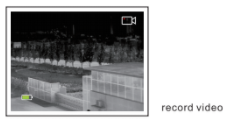
8. Storage
Short click the photo capture button can enter into storage mode when the camera is on. A camera symbol will be displayed at the right-up corner.

When in the storage mode, short click to take picture and long press to record video with a recording icon flickering on the right-up corner of the image.
Long press again to quit from recording. It will quit from the storage mode automatically when the standby mode is activated.
9. Diopter Adjustment
The Diopter knob can help user getting the most clear image for different eye conditions.
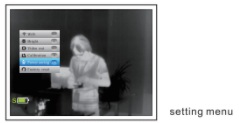
10. Setting Menu
Press the E-zoom key to enter the menu, the menu option can be moved up and down with the Image Mode and Photo Capture button.
Short press the key to adjust the current zoom option settings, such as the WiFi switch, the brightness of the screen, analog video switch, calibration mode selection, power saving mode switch, restore factory settings, etc..
Long press the E-zoom button to quit the menu after the settings are finished.
11. Video Out
Open the analog video through the menu, the down-right corner of the image will have a video output icon displayed, then the analog video can be output to the monitor with the specific video cable through the USB port.
12. NUC (non-uniformity correction)
Image degradation can be improved by manual correction. There are two correction options available-B and S, it can be changed through the menu. Press the E-zoom and picture button at the same time to make the manual correction.
If the correction mode B is selected, the lens cover is needed to be covered when the correction is performed.
Remove the lens cover after the correction is done.
13. Power Saving Mode
User can extend the battery operation time to 7 hours if the power saving mode is activated in the menu. At the same time, symbol “S” will be displayed on the left side of battery icon.
WiFi module,photo and video recording functions are completely disabled in power saving mode.
14. Charge
When the indicator is red, it indicates that the battery is insufficient, please charge in time.
Open the USB cover, plug the USB cable to charge.
When charging, the indicator light is yellow and it will turn into green when it is fully charged.
15. Data Catching
The photo and video in the internal SD card can be read through the APP which is specifically designed.
If the camera is connected by PC through the WiFi connection, the data in the SD card can be read with browser or FTP clients. The camera IP is ftp://192.168.11.123.


This infiray E3 v2 max the is 😉