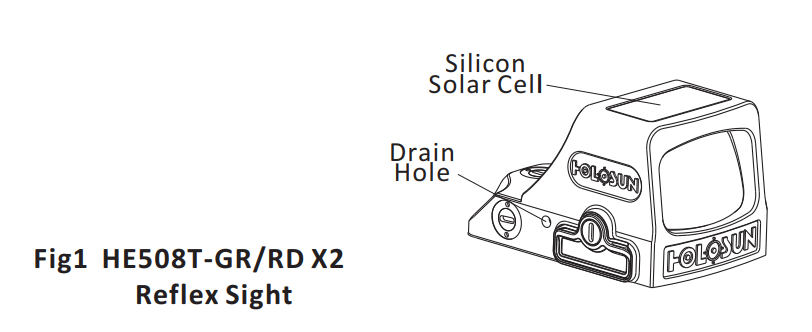
HE508T-GR/D X2: The X2 features a new ruggedized design, a side mounted battery, Lock Mode and Holosun’s Multi-Reticle System (MRS). MRS employs new LED technology for a Circle-Dot, Dot only, or Circle only reticle options and battery life with a CR1632 of up to 50,000 hours. This sight can be installed on pistols, rifles, shotguns, air rifles, and crossbows.

1. Ensure the firearm is unloaded and safe by removing all ammunition and magazines from the firearm and verifying an empty chamber before installation and or battery replacement.
2. Please keep the packaging should you need to submit a warranty claim.
Thank you for purchasing the HOLOSUN HE508T-GR/RD X2 Open Reflex sight. This open reflex optical sight is sized for use on either a pistol or rifle. The stream lined design, ¨Shake Awake¨ technology and our Solar Fail Safe™ dual power system combine to make it the ideal sight for small arms. Before operation, please read the User’s Manual carefully.
Model
Objective Lens
A canted objective lens is part of the design of reflex/reflective optical sights. In order to create a proper reflection of the reticle/dot the objective lens must be perpendicular to the LED.
Because the LED is mounted to the base of the optic the objective lens will be canted back, towards the LED.

Features
1) Automatic reticle intensity adjustment in Auto Mode.
2) 32MOA circle and dot, 2MOA dot only and 32MOA circle only.
3) Shake AwakeTM – Motion on with last setting recall.
4) Parallax free, unlimited eye relief.
5) Drain holes on both sides of the optic allow for excess water to escape during wet conditions.
6) Solid Titanium Body.
7) 12 Brightness Settings: 10DL & 2NV.
8) Window Size 0.63 x 0.91 inches.
9) Waterproof: IP67
Multi Reticle
The default reticle for this sight is a 2MOA dot centered in a 32MOA circle with four positioning points. The diameter of the circle reticle represents approximately 32″ at 100 yards (81cm at 100 meters). Hold the “-” button down for 3 seconds to switch between the three reticle options, Circle+Dot, Dot-only and Circle-only, in that order.

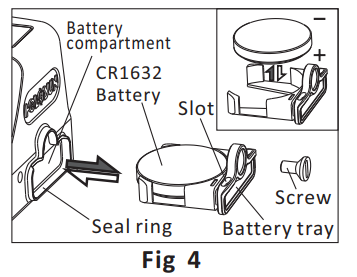
Battery
The 508T operates with our Solar Fail Safe™ dual power system (solar cell and internal battery). One high quality CR1632 Lithium battery is included with purchase.
A high quality battery can power this device for up to 20,000 hours (circle dot), or 50,000 hours (dot-only) at setting 6. Caution: Do not use a rechargeable battery.
Missing the CR1632 battery?

Battery Replacement( FigA):
a) Remove the battery
i. Remove the battery tray screw.
ii. Use the included tool as a lever in the top slots of the battery tray to remove the battery tray and battery.
b) Batterv installation:
i. Insert the battery into the battery tray with the POSITIVE side facing DOWN.
ii. Insert and press the tray into the battery compartment.
iii. Tighten the battery tray screw.
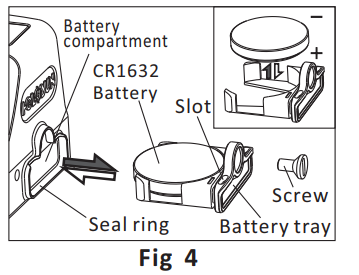
Caution: The loss or damage of the seal ring may cause water to leak into the compartment which could damage the product.
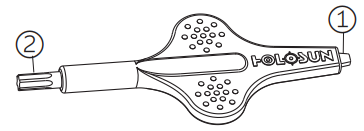
Tools: wrench
- Flat tip is used for Windage & Elevation adjustment, and for battery tray and tray screw.
- T10 Torx wrench for screws.
Need more information about footprint on Holosun 508T X2?

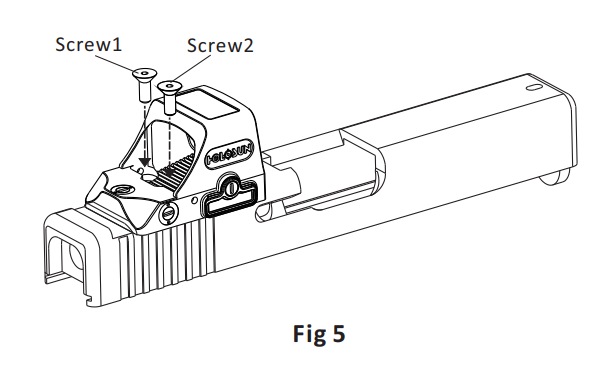
Installation on a Slide
NOTE: HE508T is compatible with some standard mounting interfaces currentiv available. For a footprint drawing, contact Holosun.
- Place the HE508T on a compatible slide cut or adapter plate.
- Use either the included screws or screws supplied with your slide or from your gunsmith and tighten to 15 INCH/lbs using a non-permanent (medium/blue) thread locker. (Fig5)
- Verify proper clearances and firearm function prior to use.
Looking for suitable mounting solutions?
Are you missing proper tools?

Sight Operation
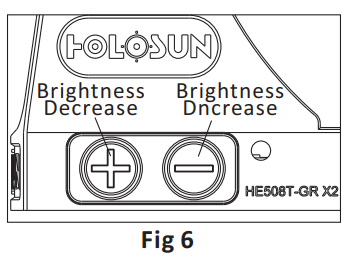
Three operation modes are available: Auto mode, Manual mode and Lock mode, (See Fig 6).
1. Power ON; Momentarily press either button (“+” or “-“) to turn on the sight.
2. Power OFF: Press the “+” and “-” buttons simultaneously to turn the power and motion sensor off, Shake Awake is disabled when OFF.
3.Operation Mode: Three modes are available in the following order Auto Mode -> Manual Mode -> Lock Mode.
1) Auto mode: In Auto mode, the solar cell and internal battery (two way power supply) powers the sight. The reticle brightness is automatically adjusted based upon ambient lighting conditions. Switch between battery and solar cell power automatically. Auto mode accommodates operation in all lighting conditions. Auto mode is the default setting.
a) In auto mode, the brightness of the reticle is automatically adjusted to match ambient lighting.
b) The battery will compensate for power if the solar cell cannot drive the reticle alone.
c) RED: If lighting is low enough, the sight will automatically switch to battery power. While running on battery power, you can adjust the reticle brightness using the “+” and “-” buttons to switch between higher and lower brightness levels.
d) GREEN: There are 8 settings from 3-10 under auto modes which have same brightness of manual modes. Press “+” or “-” to adjust the brightness and you are at setting X, the brightness will vary from X to 12 according to ambient lighting.
2) Manual mode:
a) Switch to Manual mode from Auto mode by holding the “+” button for about 3 seconds, until the reticle blinks once.
b) Brightness adjustment: There are 12 reticle brightness setting levels in manual mode. Settings 1 and 2 are NV compatible and setting 12 is the brightest. Press “+” or”-” to increase or decrease the brightness.
3) Lock Mode: Switch to Lock mode from Manual mode by holding the “+” button for about 3 seconds, until the LED blinks once. In Lock mode, momentary presses of the “+” or “-” button will not change settings. To exit the Lock mode, press and hold the “+” button again for 3 seconds, the LED will blink once then switch to Auto Mode.
4. Sleep Timer setting:
1) Please note that your red dot will automatically enter into sleep mode after 10 minutes of no movement.
2) The sight will instantaneously wake up and turn on with any motion detected and return to the last saved settings.
3) The default sleep timer setting is 10 min, but there 4 user selectable sleep timer options.
i. Press and hold the “+” button for 10 seconds to access sleep timer settings. There are 4 setting options: 10 min, 1h, 12h or the sleep mode is disabled.
ii. Press and release the “+” or “-” button to select a sleep timer setting. The LED will blink to show which setting is selected: 1=10 min, 2-1h, 3-12h or 4-sleep mode disabled.
iii. Press the “+” and “-” buttons simultaneously to save the sleep timer setting (this will power off the sight).
5. Special operation:
1) Solar cell power: If the battery voltage is below 2.2V, please replace it. The sight will still operate if there is sufficient ambient light for the solar cell.
2) To reduce power consumption when you have low battery and/or low ambient light, you can toggle the 32MOA circle OFF by holding the “-” button for about 3 seconds.
6. Note:
1) Memory function: The sight will remember the last saved brightness setting when powered on and off.
2) Low battery Warning: If the battery voltage is below 2.2V, the reticle will blink siowly.
Zero Setting
1) This sight has been factory adjusted to an approximate 25 yard zero and should require minimal adjustment to achieve zero.
2) The Elevation adjustment is located on top of the tail section of the housing and the Windage adjustment is located on the right side of the housing. Adjustment can be performed by inserting the flat-tipped end of the included tool into the turret slot and rotating, (See Fig 7).
3) Windage and Elevation adjustments are approximately 1 MOA per click.
4) Each adjustment click has a value of approximately 1 MOA or 1 inch at 100 yards (1/2″ at 50y; 1/4″ at 25y). When zeroing at 25 yard, if your impacts are 2 inches low and 1 inch right, you will need to adjust Elevation 8 clicks UP (counterclockwise) and 4 clicks LEFT (clockwise)
5) The maximum adjustment range is +50MOA from center. Caution: If you feel the knobs can Elevation no longer be rotated, you may have reached the mechanical limit of the adjustment turret.
Do not try to rotate the knobs further, if you feel a bind or you may cause damage.
Maintenance & Care
This device is a precision instrument that deserves reasonably cautious care. The following tips are provided to ensure a long product life. The optical lenses are multicoated optical glass. When cleaning the lenses, blow away the dust on the surface, wet the lens with lens cleaner or clean water, then wipe away smudges with lens tissue, soft cotton or a microfiber cloth. Avoid touching the glass surface with dry cloth or tissue paper. Do not use organic solvents such as alcohol or acetone. No special maintenance is needed for the housing surface. Do not try to dismantle the device as the internal parts are specially cleaned and sealed and with an anti-fog treatment. Any such attempt will void the warranty.
Want to clean your red dot sight?

Limited Warranty
We provide a limited lifetime warranty from the date of purchase on parts and workmanship to the original purchaser. At our sole discretion, we will repair or replace products found to be defective under normal use without charge, excluding any delivery costs, which will be born by purchaser. We will not be liable for incidental, consequential, or special damages arising out of or in any connection with the use or performance of this product. This warranty is void if the product has been misused, modified, neglected, or disassembled prior to its return. Please refer to www.holosun.com for current and complete warranty information and other conditions.


