Products:
- Bushnell Engage EDX 8×42
- Bushnell Engage EDX 12×50
- Bushnell Engage DX 12×50
- Bushnell Engage EDX 10×50
- Bushnell Engage EDX 10×42
- Bushnell Engage DX 10×42
- Bushnell Engage X 10×42
An Engaging New View of the Outdoors
The new Engage™ line of binoculars from Bushnell® deliver an unmatched price/performance ratio, with a wide range of outstanding features :
• EXO™ Barrier – Bushnell’s patented, exclusive hydrophobic lens coating provides a consistently clear view even in the worst conditions.
• BaK-4 Prisms, PC3 Phase Coating, Fully Multi-coated Optics with Lead Free Glass – using the finest available lead free glass and multiple layers of anti-reflective coatings ensures that the image you view will be as bright and sharp as possible, while helping to preserve the outdoor environment we all cherish.
• Precise, Rugged Construction and Mechanical Details – diopter rings with fine click adjustments, an improved eyecup design and tethered objective lens covers accommodate a wide range of users while increasing convenience.
• High Density ED Prime Glass – for superior reproduction of fine detail and true color.
• Dielectric Prism Coatings – delivering 92% total light transmission.
• Locking Diopter – maintains your adjustment for your personal vision during any active outing.
ED Prime Glass. ED Prime Extra-Low Dispersion fluorite glass delivers amazing color resolution and contrast, and virtually eliminates chromatic aberration and color-fringing to bring out the most distinct details possible in low-light conditions.
Dielectric Prism Coating. A highly reflective back coating utilized to maximize light transmission across the full visible range of the spectrum through the binocular’s roof prism array.
EXO™ Barrier. This patented*, permanent, coating protects optics from water, fog, fingerprints and debris. Result: a clear, bright view when other optics would be rendered useless.
Ultra Wide Band Coating. An anti-reflection coating process that is customized for every lens element in the optical path, maximizing light transmission and color accuracy. The result? Optimum brightness and true color viewing across the full light spectrum
Thank you for purchasing your new Bushnell® Engage binoculars.
This manual will help you optimize your viewing experience by explaining how you can adjust the binocular to your eyes, and how to care for this instrument. Read the instructions carefully before using your binocular.
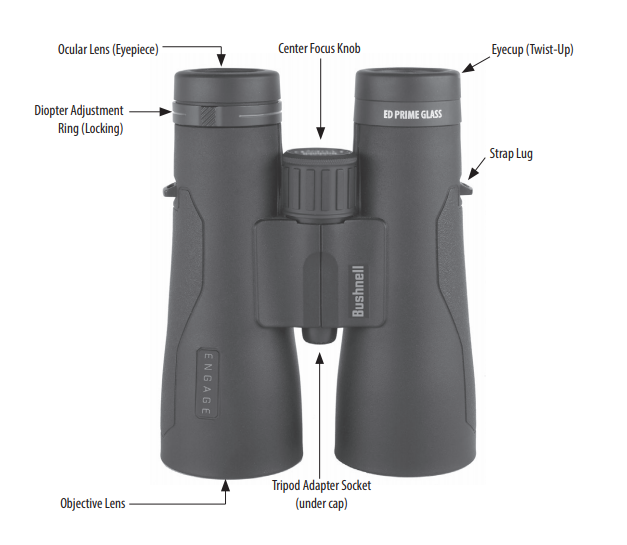
Eyecup Adjustment
Your Bushnell Engagebinocular is fitted with twist-up eyecups that provide a comfortable view of the full image and help to exclude extraneous light. For use without eyeglasses or sunglasses, twist the eyecups up, rotating the eyecups counter-clockwise until they lock into the fully “up” position (Fig. 1).
If you are wearing glasses, start with the eyecups in the “down” position- this will bring your eyes closer to the binocular’s ocular lenses, allowing you to see the full field of view. To lower the eyecups from the full “up” position, rotate them clockwise (Fig. 2). The eyecups may also be set to a position midway between fully up and fully down, which may suit some individuals better.
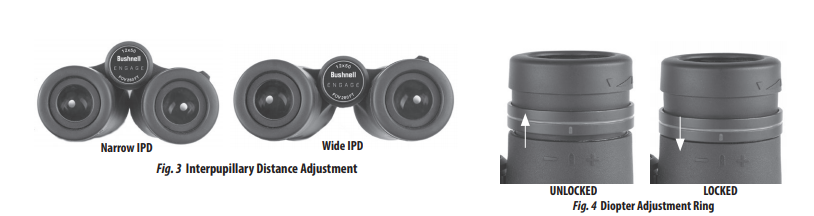
IPD (Interpupillary Distance) Adjustment
The spacing between the pupils of your eyes, called “interpupillary distance,” varies from person to person.
To match your binoculars to your IPD:
1. Point them at a white wall or blank area of the sky. Hold the binoculars and view through them as you normally would. Don’t worry about focus yet.
2. Grasp each side of the binocular firmly. Move the left and right sides closer together or farther apart (Fig. 3, next page) until you see a single image with no shaded areas.

Focus and Diopter Adjustment
1. First, adjust the eyecups and IPD as described in the previous sections.
2. Using the attached lens cap or your hand, cover the objective lens on the right side of the binocular.
3. Using the center focus knob, focus on a distant object with fine detail (e.g., brick wall, tree branches, etc) until it appears as sharp as possible when viewed through the left side of the binocular.
4. Uncover the objective lens on the right side, and cover the left objective lens while continuing to view the same object.
5. Unlock the diopter adjustment ring (located directly below the right eyecup), by pulling it straight up (Fig. 4, “UNLOCKED”). This may be easier if you twist the right eyecup up first (if you wear glasses, you can return the eyecup to the down position after unlocking the diopter ring).
6. Rotate the diopter adjustment ring (NOT the center focus knob) to bring the object into focus in the right side of the binocular. Avoid over-turning or forcing the diopter mechanism. If you are unable to bring the object into focus for your right eye by adjusting the diopter ring, make sure the left side is still in focus (repeat steps #3-6 if necessary). The diopter adjustment essentially provides “fine focus” on one side of the binocular (right only) to allow for slight differences in the vision of your left and right eyes.
7. Once the diopter adjustment ring is set for your eyesight, push the ring back down to lock it in place (Fig. 4, “LOCKED”).
8. Your binocular should now be adjusted for your eyes. Focusing for any distance can now be done simply by turning the center focus knob. Make a note of your diopter setting (position of red index mark on diopter ring relative to plus and minus marks below the ring) for future reference.
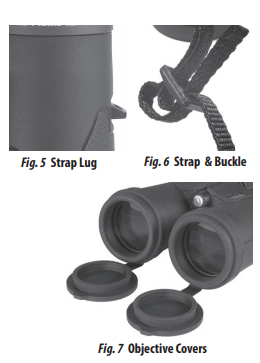
Neckstrap Attachment
To attach the neckstrap, thread the ends of the neckstrap through the strap lug (Fig. 5) on each side of the binocular (start at the bottom of the channel and push the strap up through the top as shown), then back through the plastic buckle on the strap (Fig. 6). Adjust the position of the binoculars on your chest as they hang around your neck to your preference, by changing the length of the strap section which passes through the strap channel and buckle by an equal amount on each side. If you prefer to use an aftermarket strap that has metal O-rings, attach them to a plastic zip tie placed on the strap lugs rather than installing them directly on the lug, to avoid damaging the finish on the binocular via contact with the rings.
Objective Lens Covers
When using your Engage binoculars, flip open the objective lens covers (Fig. 7). To prevent accidental loss, the covers are tethered to (removable) rubber security rings. When you are finished using the binoculars, put the covers back in place to protect the binocular’s lenses.
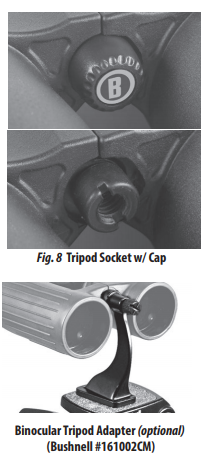
Tripod Mounting
To attach the binocular to a tripod or monopod, unscrew (counter-clockwise) the “B” logo cap which covers the threaded socket at the far end of the center hinge (Fig. 8), and set it aside in a safe place. Use a compatible binocular tripod adapter accessory, such as the Bushnell model #161001CM, to attach your Engage binocularto any standard tripod in a horizontal position to provide a stable image during prolonged viewing.
Waterproof/Fogproof
Your Bushnell Engage binocular has been designed and built utilizing the latest waterproof and fogproof technology. The binoculars are O-ring sealed for complete moisture protection. Fogproof protection is achieved from dry nitrogen purging that removes all internal moisture. Bushnell’s patented EXO™ Barrier lens coating prevents external fogging, for a clear view even in poor weather.
Care of the Optics
Your Bushnell Engage binocular will provide years of trouble-free service if it receives the normal care you would give any fine optical instrument.
1. Avoid sharp impacts. Set the binocular down gently on hard surfaces.
2. Tug on the strap after attaching it to make sure it is securely fastened to the binocular before placing it around your neck.
3. Store your binocular in a cool, dry place whenever possible.
Cleaning
1. First, blow or brush away any dust or debris on the lens (using “canned air” or a soft lens brush).
2. To remove dirt or finger prints, clean with the supplied soft storage bag (made of washable micro-fiber cloth), rubbing in a circular motion. Use of a coarse cloth (including paper towels) or unnecessary rubbing may scratch the lens surface and eventually cause permanent damage. The included storage bag/micro-fiber cloth is ideal for the routine cleaning of your optics. Simply breathe lightly on the lens to provide a slight amount of moisture, then gently rub the lens with the micro-fiber cloth.
3. For a more thorough cleaning, photographic lens tissue and photographic lens cleaning fluid or isopropyl alcohol may be used. Always apply the fluid to the cleaning cloth – never directly on the lens.
4. To prevent potential damage to the optical coatings on the binocular’s lens surfaces, never use household window cleaning liquids, and avoid using facial tissue or clothing that may have fibers which can be abrasive and hold oils or dirt.
Tehnical Specifications
| SKU | Magnification | Objective Diameter | Prism System | Prism Glass | ED Prime Glass | PC-3 Phase Coating | Lens Coating | EXO™ Barrier Lens Coating | Field of view ft@1000yds / m@1000m | Close Focus (ft/m) | Exit Pupil (mm) | Eye Relief (mm) | Weight (oz /g) | Length (in) | IPD Range (mm) |
| BEN842 | 8x | 42 MM | Roof | BaK-4 | Yes | Yes | Fully Multi | Yes | 426 / 142 | 6.5 / 1.9 | 5.3 | 19 | 23.5 / 666 | 5.5′ | 53-72 |
| BEN1042 | 10x | 42 MM | Roof | BaK-4 | Yes | Yes | Fully Multi | Yes | 340 / 113 | 8 / 2.4 | 4.2 | 18 | 23.5 / 666 | 5.5′ | 53-72 |
| BEN1050 | 10x | 50 MM | Roof | BaK-4 | Yes | Yes | Fully Multi | Yes | 341 / 114 | 10 / 3.0 | 5 | 15 | 29.2 / 830 | 6.5′ | 53-72 |
| BEN1250 | 12x | 50 MM | Roof | BaK-4 | Yes | Yes | Fully Multi | Yes | 280 / 93 | 10 / 3.0 | 4.1 | 15 |
29.2 / 83 |
6.5′ | 53-72 |


