Products:
Thank you for purchasing your new Bushnell® AR Optics® Red Dot Sight (illuminated optical sight). This manual will help you optimize your viewing experience by explaining how to utilize the sight’s features and how to care for it. Read the instructions carefully before using your sight.
WARNING! : DO NOT LOOK AT THE SUN THROUGH THE OPTICS, AS PERMANENT EYE DAMAGE OR EVEN BLINDNESS MAY RESULT.
ABOUT THE BUSHNELL® AR OPTICS® TACTICAL RED DOT SIGHTS
All the AR Optics models described in this manual are state-of-the-art sights, engineered especially for competitive shooting and target shooting or plinking with handguns, rifles, shotguns and bows, as well as hunting at shorter ranges. Your sight’s illuminated reticle has been pre-focused so the aiming point always appears in focus on the target. By comparison, open sights force you to focus on the rear sight, front sight and target at the same time and bring the target into focus.
AR Optics Red Dot Sights can be easily used with both eyes open (eye relief is unlimited), increasing the shooter’s awareness of the surrounding environment and providing faster target acquisition due to the parallax free design, as the dot follows the movement of the user’s eye while remaining fixed on the target. Engineered for greater speed and accuracy, these sights allow you to focus on the target rather than a reticle, thus increasing accuracy. Here’s a more detailed look at each model in the AR Optics line of red dot sights:
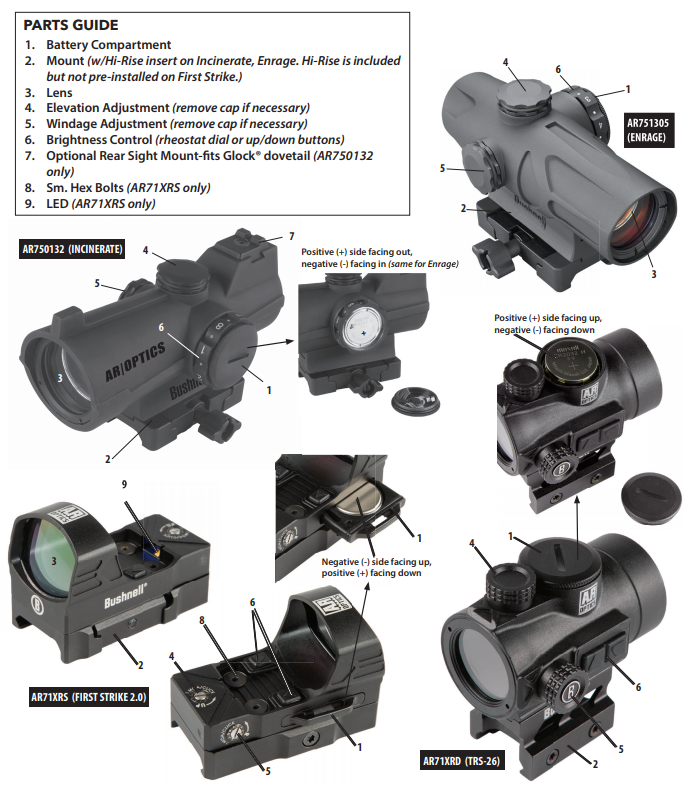
• The ENRAGE (AR751305) is rugged and built to last. Multi-coated optics deliver bright, crisp images for easy target acquisition. The 2 MOA dot has eight brightness settings, with an off setting between each. The included hi-rise mount gives you everything you need, right out of the box. Battery life is approx. 7000 hours at a brightness setting of “4”.
• The INCINERATE (AR750132) makes target acquisition second nature. The circle-dot reticle features a 25 MOA circle that naturally draws the eye to the 2-MOA center dot, making it ideal for both tactical rifles and shotguns. It has an included hi-rise mount, and eight brightness settings with an off setting between each. The rear sight on Incinerate is compatible with Glock® dovetail sights. Battery life is approx. 6500 hours at a brightness setting of “4”.
• The TRS-26 (AR71XRD) goes beyond its historic predecessor with improvements in several key areas. The TRS-26 is powered by a long-lasting battery that sets the industry standard with more than 30,000 hours of battery life (at a brightness level of “6”). It delivers a brighter, crisper 3 MOA dot with 11 brightness levels and push-button operation in a compact package. The Bushnell AR Optics TRS-26 is the standard for multipurpose red dots.
• The FIRST STRIKE 2.0 (AR71XRS) is two times the red dot its older brother was. The First Strike 2.0 is just as versatile – it includes a hi-rise mount and is at home on both shotguns and flat top MSRs. It features an industry-leading battery life of more than 110,000 hours (at a typical brightness level of “5”), with tool-less side compartment battery removal and a brighter 4 MOA dot with 10 brightness settings. The Bushnell AR Optics First Strike 2.0 improves upon a classic.
Note: battery life as listed will vary depending on the brightness settings used (stated life estimates are based on a typical, medium brightness setting), freshness and quality of the battery, ambient temperature, and other factors.
About Red Dot Lens Positioning
All red dot sights have an objective lens at the front of the unit that is spherical in shape. However, unlike a conventional riflescope with all lenses mounted perpendicular (at a 90 degree angle) to the axis of the tube, the objective lens in a red dot sight is positioned off axis and appears to be tilted when looking at the sight (right). This angle of the front lens allows the light generated by the battery powered LED light source inside the unit to be reflected back into the sight. The reflected light becomes the “dot” or aiming reference that the shooter sees when a red dot sight is switched on. This engineered “bending” of light is
what makes today’s red-dot sights so popular and easy to use.
MOUNTING YOUR AR OPTICS® SIGHT
WARNING! : BEFORE MOUNTING YOUR SIGHT, REPLACING ITS BATTERY, OR REMOVING OR PERFORMIN MAINTENANCE ON THE SIGHT, BE SURE ACTION IS OPEN, CLIP OR MAGAZINE IS REMOVED AND A ROUND IS NOT IN THE CHAMBER. DO NOT ATTEMPT ANY WORK UNTIL THE GUN HAS BEEN CLEARED AND DETERMINED TO BE SAFE.
Your AR Optics Sight includes a riser block (Enrage, Incinerate, First Strike 2.0) or high rise mount (TRS-26) that fits Picatinny
or Weaver style rails
The base or bases you use with your sight should be manufactured specifically for your pistol, rifle or shotgun and should create a uniform horizontal and vertical mounting platform. Be sure they are properly installed and securely fastened according to the manufacturer’s instructions for your safety. There is no set eye relief for your AR Optics sight; therefore, you should provide at least three inches of clearance between the viewing lens and your eye when in the shooting position. Note that fi rearms with adjustable length-of-pull (“LOP”) buttstocks can affect or limit the amount of usable eye relief.
Set the mount onto the base or bases so that it aligns with the crosscut grooves. Work the mount into the base until the crossbolt seats into the groove. Forward load the mount, so that the crossbolt engages the forward groove and clearance is removed. While holding the unit in position, securely tighten the locking nut or mounting plate. The following notes (next page) provide some specifi c mounting details for the various models of AR Optics red dot sights.
MOUNTING DETAILS BY MODEL
Enrage/Incinerate
1. Set the mount onto the base rail or bases so that they align with the crosscut grooves.
2. Work the mount into the base until the crossbolt seats into the groove.
3. Securely tighten the locking nut with a coin or screwdriver. CAUTION: Do not overtighten.
TRS-26
1. Loosen the shaft by means of the provided multi-tool, so that the locking bar can clamp around the Picatinny/ Weaver rail.
2. Install the sight to the weapon rail by tightening the shaft. First, ensure that the sight is correctly positioned and that the shaft fits into a groove on the Picatinny/Weaver rail. To make sure that the shaft is firmly tightened, screw the shaft clockwise until a light resistance can be encountered. CAUTION: Do not overtighten.
3. Finally, make sure that the shaft with locking bar is firmly tightened around the base rail.
First Strike 2.0
1. Any Weaver or Picatinny style base is suitable for mounting the First Strike 2.0. Make sure the base you use is manufactured specifically for your pistol, rifle or shotgun. Be sure the base is properly installed and securely fastened according to the manufacturer’s instructions for your safety.
2. Loosen the hex bolt on the mount of the sight using the provided tool. Position the mount on your base rail so that the crossbolt engages a slot. Tighten the hex bolt. CAUTION: Do not overtighten
ACTIVATING THE BATTERY
Before powering on your sight for the first time, you will need to open the battery compartment and remove the protective sticker or plastic disc from the battery. See the Parts Guide for the location of the battery compartment on your model.
REPLACING THE BATTERY
Should your reticle grow dim or not light at all, replace the battery. To install a new battery, unscrew the round battery compartment cover (Enrage/Incinerate/TRS-26) using a coin, or pull out the battery tray* (First Strike 2.0). Insert a new CR2032 lithium battery, noting the position of the positive and negative sides, which varies by model (see Parts Guide). Replace battery cover. *(if necessary, insert a small screwdriver in the open slot of the First Strike’s battery tray to leverage the tray out slightly first)
CAUTION: When replacing the battery cover, be sure that the O-ring is present and not damaged. Failure to do so could result in water leakage into the battery compartment.
Verify that red dot is present by switching the power on and increasing the brightness if necessary (see next section).
SWITCHING POWER ON/OFF
To turn the sight’s power on and off:
(Enrage/Incinerate): Activate the illuminated dot by turning the rheostat knob to any numbered position. To switch off the sight, select a dot mark between any two numbers.
(TRS-26/First Strike 2.0): Press and release the “Up” arrow button to power on the sight. To switch power off, press and hold the “Down” arrow button.
ADJUSTING DOT BRIGHTNESS
To adjust the brightness level of the dot reticle:
(Enrage/Incinerate): Turn the rheostat knob clockwise to increase brightness and counterclockwise to decrease brightness. With the “1” lined up with the index mark, the dot will be the dimmest, and with a setting of “8”, the dot is at the brightest illumination level.
(TRS-26/First Strike 2.0): Press and release the “Up” arrow button to increase brightness. Press and release the “Down” arrow button to decrease brightness.
ENRAGE/INCINERATE/TRS-26
1. With the sight mounted, rest the gun on a solid support. Switch on the sight’s power and adjust brightness as needed until dot is easily visible.
2. Remove the windage and elevation adjustment caps.
3. Sight along the barrel and aim at a target 50 to 100 yards away. Sight through your AR Optics Red Dot and turn the windage and/or elevation adjustments by hand to align the center dot with the target as seen along the barrel. Each click of adjustment moves the point of impact by the amount written on the adjustments. Once the scope is zeroed, replace the adjustment caps.
FIRST STRIKE 2.0
1. With the sight mounted, rest the gun on a solid support. Switch on the sight’s power and adjust brightness as needed until dot is easily visible.
2. Start by sighting along the barrel and aim at a target 25 to 50 yards away. View through your First Strike sight and gently rotate the windage and/or elevation adjustments, using the supplied tool to align the red dot with the target as seen along the barrel.
3. You should then fire a test shot to determine the point of impact of your weapon. If you are not hitting your aiming point (the center of the target) make an adjustment by turning the windage or elevation screw(s) in the direction you want the bullet to move. The chart on the right will aid you in determining the proper amount of adjustment necessary to change the point of impact, depending upon the range at which you are shooting.
Point of Impact Chart (First Strike 2.0)
| SKU | Mag x Obj. Diam. | Reticle | Click Value | Adjustmen Range | MOA per Rev | Parralax (Yds) | # of brightness Settings | Eye relief & Field of View | Lenght (inches) | Weight (oz) |
| ET71X32 | 1×31 | Dot, Circle Dot. Crosshair Dot, Circle+Crosshair Dot | .25 MOA | >140 MOA | 40 | 50 | 12 | Unlimited | 4,8 | 10 |
OPERATION UNDER EXTREME CONDITIONS
• Extreme heat (moist or dry): no special procedures required. Avoid prolonged exposure if possible.
• Extreme cold: extreme low temperature may shorten battery life. It could also make the rotary dial (brightness control) on the Incinerate/Enrage a little harder to turn than at normal temperatures.
• Salt air: no special procedures required.
• Sea spray, water, mud and snow: ensure that battery cap and the two adjustment caps (if present) are tightened before exposing the sight to sea spray, mud, snow or before immersing the sight in water. Hand tighten only. Keep lens covers closed when sight is not being used. Clean lenses with lens paper/cloth (see caution note below) and wipe the sight dry as soon as possible after exposure to water, sea spray, mud or snow.
• Dust storms and sand storms: keep lens covers closed when sight is not being used.
CAUTION: The lenses shall never be cleaned with fingers but with lens paper/cloth, to avoid scratching the glass. Use a soft brush or “canned air” to remove any loose debris (sand, grass, etc.) prior to using the lens paper or soft clean cloth.
TROUBLE SHOOTING
Problem: Red Dot Does Not Appear
Possible Causes/Solutions:
• Discharged battery: Replace battery with a new CR2032 lithium cell.
• Battery installed incorrectly: Remove and reinstall battery, referring to the Parts Guide battery compartment image.
• Battery not making good contact: Clean contact surfaces and reinstall battery.
• Defective Rotary Switch: Contact Bushnell customer service.
Problem: Impossible To Zero
Possible Causes/Solutions:
• Adjustment screw is at its limit: Check alignment of mount to barrel.
• Impact point is moving: Check mount and weapon rail (or carry handle) stability.


Red dot is always fuzzy or distorted.