Products:
SPECIFICATIONS
Magnification …………………………………1X (3X,5X, 8X optional)
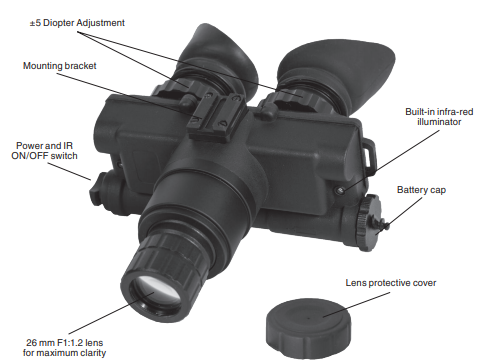
Lens System………………………………….26 mm; F1:1.2
Field of view…………………………………..40°
Range of Focus ……………………………..0.25 m to infinity
Power Supply…………………………………3 V Lithium (CR123A)
Battery Life ……………………………………50-60 hours w/o IR illuminator (CR123A type)
Operating Temperature ………………….-40°C to +50°C
Storage Temperature ……………………..-50°C to +70°C
Dimensions……………………………………160 x 150 x 75 mm (6.3” x 6” x 3”)
Weight ………………………………………….0.5 kg (1.1 lb)
* ATN reserves the right to change the above specifications at any time without notice.
CAUTION: THIS PRODUCT CONTAINS NATURAL RUBBER LATEX WHICH MAY CAUSE ALLERGIC REACTIONS.
FEATURES
- Lightweight, compact rugged Goggle system
- Multi-purpose: hand-held, head-mounted or helmet-mounted
- Comfortable, flip-up headgear
- Multi-coated all-glass optics
- Wide angle infrared illuminator
- Adjustable Interpupillary Distance
- Optional 3x, 5x and 8x lenses available
- Water and fog resistant
- Limited Two-Year Warranty
APPLICATION
Compact and lightweight, rugged, and a top-notch performer the NVG-7 is an exceptional choice for hands free usage.
The NVG-7 goggles have a built in IR for total darkness with indicator “ON” light within the FOV and a flip-up headset.
The NVG-7 is available with a wide range of image intensifier options to meet a wide array of specification requirements.
The NVG-7 night vision goggles is a complex opticoelectronic system for individual use. The device consists of the objective lens assembly, eyepiece and the body. The body contains a image intensifier tube assembly with an integrated high voltage power source and the battery housing.
Objective lens protective cover is intended to protect the objective lens from dust and scratches. It also will act as a daylight filter, allowing you to test the scope in daylight or other bright light situations. The pinhole in the center of the protective cover allows the user to check the operation ability of the device in daylight conditions.
NOTE: Do not test the scope in daylight conditions even with the daylight filter/lens cap on for more than ten (10) minutes.
BATTERY INSTALLATION
Install standard CR123A batteries as follows:
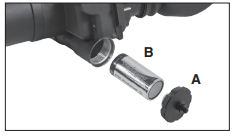
- Unscrew the battery cap (A).
- Insert CR123 battery (B), observing the polarity as indicated.
- Replace the battery cap and screw cap hand tight.
OPERATION
- Take the NVG7 out of the case.
- Install the battery into the housing with the polarity order as shown on the scope. Battery Type: 3 V, Lithium, CR123A.
- To turn on the device rotate switch clockwise in first position. Turn the unit on by the protective lens cover still attached to the lens. Do not turn the unit on in the daytime without the protective lens cap on. You should see green glow in the eyepiece.
- Observe the scene and adjust the diopter for optimal image clarity.
- You may now enter a dark environment or simply shut the lights off in order to darken the room.
- Next, remove the lens cap/daylight filter. Adjust the front lens for the distance of the focus. You should not have to readjust the diopter.
- To turn the unit off, rotate switch counter clockwise to initial position.
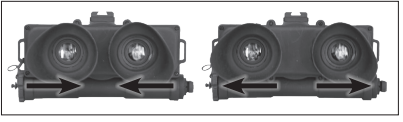
INTERPUPILLARY DISTANCE
Adjusts for distance between eyes by sliding the eyepieces either together or apart so each eye can observe the entire field at the same time.
FOCUSING
To focus the NVG-7, first you will need to adjust the diopter. Simply turn the diopter clockwise until it stops. Then, while looking through the diopter at an object, slowly turn the diopter back counter clockwise until the grain in the image is sharp.
NOTE: We suggest that you focus the diopter during daylight with the filter on. Next focus the front lens until the image and the grain are both sharp. When you are in low-light conditions and the daylight filter is off, you may focus the front lens to receive sharp image, the diopter should not be adjusted.
NOTE: The front lens should be readjusted as you view objects at different distances.
INFRA-RED ILLUMINATOR
Infra-red illuminators, or IR illuminators, are common to night vision. The IR light greatly enhances the performance of the NVG-7 while remaining almost totally invisible to the naked eye.
The NVG-7 goggles have a built in IR with indicator “ON” light within the FOV. To turn the IR on, rotate power swith clockwise in first position . It is important to remember that the IR illuminator is simply an infra-red light source, and like any light source, it may loose its effectiveness over a great distance.
To turn the IR off, push the button again by long press (more than 1.5 sec.).
NOTE: The IR will automatically turn off when the unit’s power is turned off.
FLIP-UP HEADSET
FITTING THE HEADGEAR
- Fit the headgear to your head size. Adjust the headgear first before attaching the NVG-7 to it.
- Loosen all the straps and place the headgear on your head.
- Tighten the straps until the headgear fits firmly.
GOGGLES INSTALLATION AND ADJUSTMENT
Now you are ready to mount the NVG-7 on to your headgear.
- Remove the already adjusted headgear from your head.
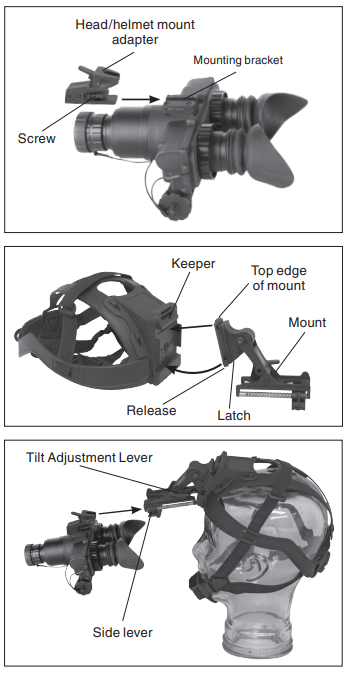
- Insert the head/helmet mount adapter to mounting bracket of NVG7, then tighten adapter screw firmly.
- Insert the top edge of the mount under the keeper on the head/helmet mount bracket and rotate downward until the latch engages. To release the mount from the helmet bracket, press the release and pull forward and down.
- Align the adapter and the head/helmet mount as shown on the figure. Slide the goggles rearwards until the alignment boss aligns with the alignment groove on the head/helmet mount. Push until the goggles locks into the head/helmet mount.
- Place the head/helmet mount with NVG-7 onto your head.
- Adjust the eye relief distance by press down on side lever and sliding NVG7 fore or aft to obtain a full fieldof-view of the image. Reset the diopter adjustment for best image.
The NVG-7 headset has a flip-up mechanism. Rotate the tilt adgustment lever and lift the unit up.
INTERCHANGEABLE LENS (OPTIONAL)
The NVG-7 with 3X, 5X or 8X front lens can be used as a powerful night vision bi-ocular. To install 3X Afocal Lens screw it into the front lens of NVG-7.
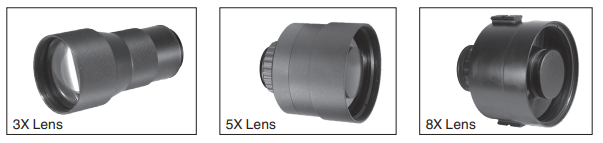
To install 5X/8X lens unscrew the objective lens of NVG-7 from the body. Please note to hold the ridged edge of the lens with one hand and then grasp the neck of the unit with the other and twist
in opposite directions. It is very important not to grasp the eyepieces but grasp the neck of unit. To install lenses screw 5X/8X lens to the free place (make sure that the unit is turned off.
STORAGE AND CARE
- If the device is not to be used for extended period of time (more than 10 days) remove the battery.
- Avoid touching lenses. If fingerprints or traces of dirt or dust appear, clean their surface with a Photographic lens cleaning tissue.
- Keep lens cap/daylight filter on when not in use.
- The NVG-7 is not harmful to the user or the environment.
- Do not disassemble except to clean the front lens and eyepiece: it will void your warranty.
- Evaluate the scope function by looking through it in a lit environment with the daylight filter lens cap on. Never use in daylight without the daylight filter lens cap on.
- Never point the NVG-7 at a bright light source.
- Adverse atmospheric conditions such as fog, smog, or haze and a lack of ambient light (moon or starlight) may diminish the effective viewing distance.
- If you use the rubber eyecaps for a long period of time, you may suffer skin inflammation. If you develop any symptoms, consult a doctor immediately.
TROUBLESHOOTING
Q: Flashes, flickers, or clicking occur while operating
S: If it occurs within the first five minutes of inserting new batteries, it is normal and the device will resume normal operation soon thereafter. If it occurs for more than 10 minutes, contact for service instructions.
Q: Dark spots on screen.
S: These are either cosmetic blemishes in the intensifier tube or dust particles.
Q: Screen becomes darker than at previous use.
S: Replace batteries. If problem persists, contact your dealer or other authorized service representative for service instructions.
Q: Image not clear.
S: Adjust objective lens, and/or the eyepiece.


