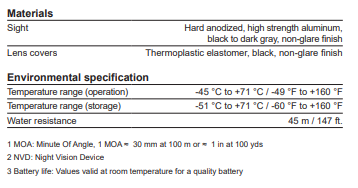
Product: Aimpoint PRO
1 PRESENTATION
Aimpoint® red dot sights are designed for the ”two eyes open” method which greatly enhances situational awareness and target acquisition. The red dot follows the movement of the user’s eye while remaining fixed on target, eliminating any need for centering.
Technical specification1.1

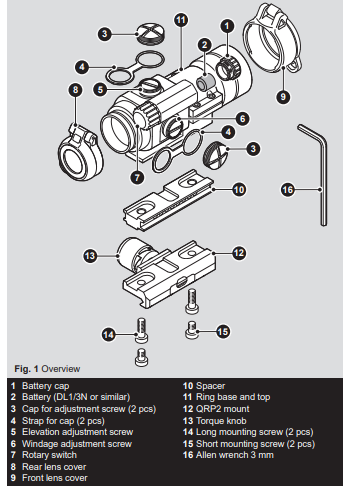
1.2 Overview
2 OPERATION
WARNING: Ensure the weapon is not loaded and the safety selector is in the ”safe” position before attempting to install, remove or perform maintenance.
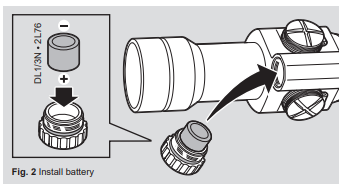
2.1 Install battery
a.) Remove battery cap (1).
b.) Insert battery (2) with positive end (+) toward battery cap. See Fig 2.
CAUTION: Check that the O-ring is in good condition and in position to ensure that there will be no water leakage into the battery compartment.
c.) Install battery cap. Hand tighten only. Using tools could damage the sight.
d.) Verify that the red dot is present by turning the rotary switch (7).
NOTE: Remove battery before putting the sight in storage for extended periods.
2.2 Install Aimpoint® PRO on a weapon
a.) Select a groove on the Picatinny rail for a comfortable position in regards to eye relief. Ensure the groove is undamaged and free from dirt and /or sand.
b.) Loosen the torque knob (13) of the QRP2 mount (12).
c.) Install the sight with the recoil stop in the selected groove of the Picatinny rail.
d.) Push the sight forward (toward muzzle) and tighten the torque knob (13) until it snaps twice. This ensures that the mount is secured and the recoil stop is in contact with the side of the groove of the Picatinny rail.
2.3 Zeroing
CAUTION: Do not continue to adjust windage and elevation mechanisms if you encounter resistance.
a.) Open front and rear lens cover (8) (9).
b.) Turn the rotary switch (7) clockwise until the red dot has a sufficient intensity to contrast against the target.
c.) Remove the windage and elevation adjustment caps (3).
d.) Insert adjustment tool (coin, screwdriver, knife) or cartridge casing in adjustment screw slot.
NOTE: Each click of the adjustment screw corresponds to a 16 mm movement of point of impact at 100 meters or 0.6 in at 100 yds.
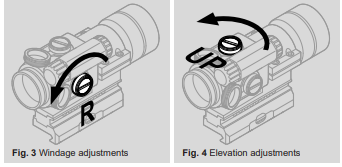
e.) Windage adjustment (see Fig. 3)
- Turn windage adjustment screw (6) counterclockwise to move point of impact to the right.
- Turn windage adjustment screw (6) clockwise to move point of impact to the left
f.) Elevation adjustment (see Fig. 4)
- Turn elevation adjustment screw (5) counterclockwise to move the point of impact up.
- Turn elevation adjustment screw (5) clockwise to move the point of impact down.
g.) Confirm zeroing by firing at least three shots at a zeroing target. Check impact points on a zeroing target to confirm accuracy and repeat above procedure if required.
h.) After initial firing, ensure that the mount and sight are secured to the weapon.
3 OPERATION UNDER EXTREME CONDITIONS
- Extreme heat (moist or dry). No special procedures required.
- Extreme cold. Extreme cold might shorten battery life.
- Salt air. No special procedures required.
- Sea spray, water, mud and snow. Ensure that battery cap and adjustment caps are tightened before exposing the sight to sea spray, mud, snow or before immersing the sight in water. Hand tighten only.
- Keep lens covers closed when sight is not being used. Clean lenses with lens paper/cloth and wipe the sight dry as soon as possible after exposure to water, sea spray, mud or snow.
- Dust storms and sand storms. Keep lens covers closed when the sight is not being used.
- High altitudes. No special procedures required.
CAUTION: The lenses shall never be cleaned with fingers but with lens paper/ cloth. If no lens paper/cloth available:
- To clear away debris (sand, grass etc): blow away the dirt or rinse with clear water.
- To clean lenses: mist up the lenses or rinse with clear water and clean them with a soft piece of cloth.
4 TROUBLE SHOOTING
4.1 The red dot does not appear or has disappeared
Clean contact surfaces in the battery compartment and verify that the battery (2) is working and that it is installed correctly. Verify that the battery cap (1) is firmly tightened.
4.2 The sight is impossible to zero
If an adjustment screw (5) (6) is at its limit, check the alignment of mount and barrel. If point of impact is moving, check the stability of mount.
4.3 The red dot does not appear to be round
Most likely the result of how your eye perceives the red dot. Look at the red dot and slowly rotate the sight. If the aberration in the shape of the red dot does not rotate with the sight, the irregularity is caused by how your eyes percieves the red dot. Minimize this effect by always setting the intensity of the red dot to the lowest setting where the red dot is clearly visible against the target in relation to ambient light.
Aimpoint AB
Jägershillgatan 15
SE- 213 75 Malmö, Sweden
Phone: +46 (0)40 671 50 20
Fax: +46 (0)40 21 92 38
e-mail: [email protected]
Aimpoint Inc.
7309 Gateway Court
Manassas, VA 20109, USA
Phone: +1 703-263-9795
Fax: +1 703-263-9463
e-mail: [email protected]


