
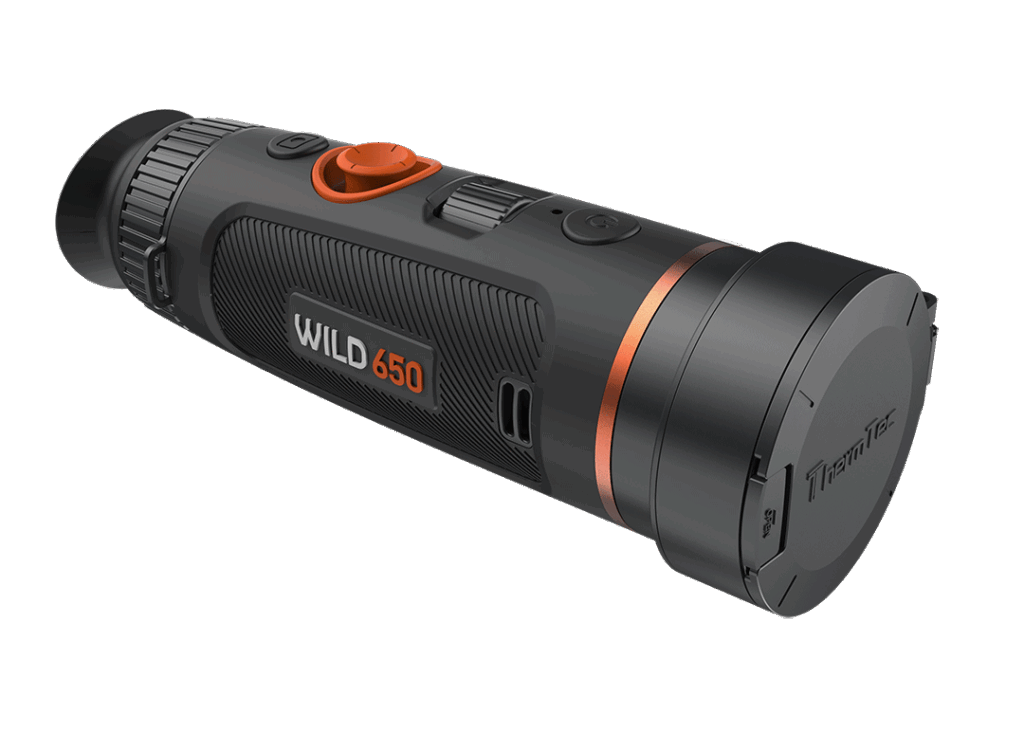
ThermTec Wild series is a line of compact handheld monoculars with stunning thermal sensitivity of NETD less than 18mK and advanced functionalities
- ThermTec Wild 325
- ThermTec Wild 335
- ThermTec Wild 635
- ThermTec Wild 650
- ThermTec Wild 335L
- ThermTec Wild 635L
- ThermTec Wild 650L
- ThermTec Wild 350D
- ThermTec Wild 650D
About This Manual
COPYRIGHT © 2024 ThermTec Technology Co., Ltd. ALL RIGHTS RESERVED. Any and all information, including, among others, wordings, pictures, graphs are the properties of ThermTec Technology Co., Ltd. or its subsidiaries (hereinafter referred to as “ThermTec”). This user manual (hereinafter referred to be “the Manual”) cannot be reproduced, changed, translated, or distributed, partially or wholly, by any means, without the prior written permission of ThermTec. Unless otherwise stipulated, ThermTec does not make any warranties, guarantees or representations, express or implied, regarding to the Manual. This Manual is applicable to Thermal Imaging Monocular. The Manual includes instructions for using and managing the product. Pictures, charts, images and all other information hereinafter are for description and explanation only. The information contained in the Manual is subject to change, without notice, due to firmware updates or other reasons.

Regulatory Information
 This product and, if applicable, the supplied accessories are marked with “CE”and comply therefore with the applicable harmonized European standards listed under the Radio Equipment Directive 2014/53/EU, the EMC Directive 2014/30/EU, the RoHS Directive 2011/65/EU
 This product and – if applicable – the supplied accessories too are marked with “UKCA” and comply therefore with the following directives: Radio Equipment Regulations 2017, Electromagnetic Compatibility Regulations 2016, Electrical Equipment (Safety) Regulations 2016, the Restriction of the Use of Certain Hazardous Substances in Electrical and Electronic Equipment Regulations 2012.
 This product and – if applicable – the supplied accessories too are marked with “RoHS” and comply therefore the requirements of Directive 2011/65/EU on the restriction of the use of certain hazardous substances in electrical and electronic equipment (“RoHS recast” or “RoHS 2”).
 2012/19/EU (WEEE directive): Products marked with this symbol cannot be disposed of as unsorted municipal waste in the European Union. For proper recycling, return this product to your local supplier upon the purchase of equivalent new equipment, or dispose of it at designated collection points. For more information see: www.recyclethis.info.
 Directive 2006/66/EC and its amendment 2013/56/EU (Battery Directive): This product contains a battery that cannot be disposed of as unsorted municipal waste in the European Union. See the product documentation for specific battery information. The battery is marked with this symbol, which may include lettering to indicate cadmium (Cd), lead (Pb), or mercury (Hg). For proper recycling, return the battery to your supplier or to a designated collection point. For more information see: www.recyclethis.info.
1 Introduction
1.1 Device Description
Wild Series Thermal Imaging Monocular is designed with a NETD less 18mk, 12μm uncooled infrared detector and 1024×768 OLED high-definition display. With AI image recognition algorithm, it gets clear views under various lighting conditions, even in complete darkness, providing reliable and high-quality visual images for night activities. It can also view the moving target and meet the outdoor conditions. The apparatus can be widely used for searching and rescuing, hunting, etc.
1.2 Features
- 12μm uncooled infrared detector, NETD less than 18mk;
- 1x–4x continuous digital zoom;
- Various pseudo colors;
- Various pseudo colors;
- Joystick control design, wheel focusing realizes one-hand operation;
- Detector anti-burn mechanism;
- Super large aperture offers better temperature radiation capturing capability;
- 1024*768 resolution with 0.39 inch OLED display;
- Up to 10h continuous working for lithium battery;
1.3 Application Scenarios
- Animal Observation
- Outdoor Adventure
- Security Law Enforcement
- Emergency Search and Rescue
1.4 Appearance
- Lens cover
- Power button
- Focusing knob
- Joystick
- Capture/Record button
- Diopter knob
- Eyepiece cover
- Compartment of replaceable battery
- Type-C port
- Laser module

2 Packing List


3 Operation Guide
3.1 Charging
Here are two methods we could take to charge the device. Device Charging and Battery Charging.
Device Charging:
Connect the device and power adaptor directly with a type-C cable to power on the device. Alternatively, connect the device and PC to export files. Follow the below steps to charge the battery:

- Lift the cover from the USB port.
- Plug the cable provided into the USB port.
- Plug the opposite end of the cable into a USB power source.

- The battery should be fully charged prior to use.
- The battery is supposed to be taken out for long time non-using occasions.
3.2 Power on/off
Press and hold the power button to power on/power off the device.

3.3 Buttons and Controls
3.3.1 Buttons Combinations and Introduction
| Before entering the main menu | |||||
|---|---|---|---|---|---|
| Short Press | Long Press | Double Press | |||
| Power Button | Standby Mode | On/Off | N/A | ||
| Capture Button | Capture | Record | N/A | ||
| Joystick | Up | Down | Left | Right | Center |
| Zoom in | Zoom out | AI Range finder |
Short Push Pseudo Switch Long Push Outline Mode |
Brief Click Calibration Double Click Menu |
|
| After entering the main menu | |||||
| Joystick | Up | Down | Left | Right | Short Press |
| Move up | Move down | Exit sub-menu | Open Sub-menu | Confirm | |
3.3.2. Lens Adjustment
Diopter Adjustment
Looking through the eyepiece, adjust the position of diopter level to optimize the image sharpness on the OLED display.

3.3.3 Joystick Operation
3.3.3.1 Zoom
Push the joystick to the front to zoom in, vice versa.

Objective Lens Focusing
Manually adjust the objective lens focus when you can’t see the scene clearly.


3.3.3.2 AI Ranging and Laser Rangefinder
Push the joystick to the left to activate AI rangefinder or laser rangefinder.

Note: the laser rangefinder is only available for Wild LRF series.
3.3.3.3 Pseudo Color Switch
Brief push joystick to right to switch pseudo colors.


There are totally six pseudo colors (white hot, black hot, red hot, green, golden, violet) for user choice.

3.3.3.4 Target Outline Mode
Long push the joystick to right to enter the target outline mode.


3.3.4 Capture/Record
Image Capturing
Press Capture button to take photos. Then the photo icon in the upper left corner will flash once.

Video Recording
Press and hold Capture button to take videos. Then the recording icon starts flashing in the upper left corner, and the recording starts timing. Press and hold again to stop recording.

3.4 Set
Image Capturing
Press to enter the Imaging Setting menu. There are five sub-menus for image setting, which are “Image Mode”, “Sharpness”, “Denoise”, “Brightness”and “Contrast”

| Image Settings | ||
| Forest | The image details would be enhanced in a way. | |
| Sharpness | 0-10 | Adjust image sharpness to make the image edge sharper. The recommended value is 5. |
| Denoise | 0-10 | Adjust image noise to make the image cleaner. The recommended value is 5. |
| Brightness | 1-10 | Adjust image brightness to make the image brighter. The recommended value is 5. |
| Contrast | 1-10 | Adjust image contrast to make the target more prominent in the image. The recommended value is 5. |
3.4.2 System Setting
Press joystick to confirm Setting to enter the System Setting menu. Select by moving the joystick, and short-press the joystick to confirm the selection.
| System etting | |||
| Correction |  | The image correction mode could be set by Auto or Manual. | |
| OSD | On-screen display |  | Enable this feature to decide if the menu icons display in the recorded videos. |
| Anti-Burn |  | Detector anti-burn function, it could be set by on/off. | |
 | Once it detects harmful rays to the detector, the system will enable protection automatically. | ||
| EIS | Electronic Image Stabilization |  | Electronic Image Stabilization. It could be switched on/off in the system setting. |
| Tracking |  | Turn on heat tracking to mark the target with the highest temperature in real time in the screen. | |
| PIP | Picture in picture |  | In the picture, the image is 2x enlarged from the center of the cross. |
| Ranging | AI-Set |  | Customize the size of targets, and they all could be set by on/off. |
| LRF-Set |  | It includes the default information of LRF location. Warning: No modification is allowed in this section. | |
| LRF Boost |  | Combined with an AI rangefinder, it could measure the aimed target precisely with laser rangefinder and calculate the distances of various targets in the same scene. | |
| OLED | Hue |  | Gray, Blue, Purple and Red are optional for OLED hue. |
| Brightness |  | The brightness could be adjusted here to make the image brighter or darker. The value could be set by 1-5. | |
| BlindPixel |  | The blind pixel in the picture can be replaced. We could replace bind pixels, save the current settings or cancel it. | |
| System | Shutdown |  | The device could be set to shutdown after 30mins, 60mins, or you could turn off the function. |
| Joystick |  | Customize the sensitivity range of joystick towards each direction, so it could be better adjusted to every individual needs and requirements. | |
| Logo |  | The logo on the screen could be turned on or turned off. | |
| Time Date |  | Time and Date could be set here. | |
| M/yd |  | The measuring distance unit could be set by meter or yard. | |
| Lang |  | System language could be set here. | |
| Version |  | We could check the information of current version here. | |
| Reset |  | The settings of images could be reset here. | |
| Update |  | You can adjust and upgrade the device system. |
EIS function: Turn on the EIS function to reduce the impact of body shaking on the image and keep the image stable when observing distant targets.
3.4.3 Network Connection
Select Internet icon to and press joystick to enter the Network Connection menu.

3.4.3.1 App Download
You may download the “ThermTec Outdoor” APP through the QR code shown on the packing box, user manual or below.


3.4.3.2 Connect via Hotspot
- Turn on device’s hotspot.


- Connect mobile client with device’s hotspot.
- After the connection, you could control devices freely with APP (ThermTec Outdoor).
3.4.4 File Management
Select Files and press the joystick to enter the Files. Select the image and video sub-menus to view the images and videos and play the videos.
Image Viewing
- Press the joystick to enter image files.

- After selecting a certain image, press joystick to access further operations of the image, we could delete it, check next one or delete all the images.


Video Viewing
- Select Record and press joystick to enter video files.
- Choose a certain video and press joystick to check the video.

- Further operations could be accessed here, we could delete it, check next one, pause the video or delete all the videos.

3.5 External Video & Data Reading
Video Output
Use the given AV video cable to output analog video.
Data Reading
When external display is connected, the OLED of the device automatically turns off. Power on the device, use a type-C USB cable to connect with the computer to read the video and image data in the memory.
Note: Videos, images and rav videos taken will be saved separately in folders named “record”, “image” and “rav”
3.6 System Software Upgrade
Wild series thermal imaging monocular supports “ThermTec Outdoor” APP, which allows you to transmit the image from the thermal imager to the smartphone or tablet via Hotspot in real time mode.
Upgrading via APP
- Open ThermTec Outdoor APP.
- Turn on the hotspot of the device, and connect it with the Mobile phone.
- Select Update on the menu options
- The downloading and upgradation would be a continuous process if there is an update.
- After finishing the update, the device will reboot.
Upgrading via PC
- Please download corresponding upgrading package from official website. www.thermeyetec.com. Connect the device to PC via Type-c data cable.

- Copy the related updating firmware to the storage file of Wild. Press joystick to select Update icon, and the system will prompt “Update”

- Enter version to check firmware version.
4 Technical Data
4.1 Product Size & Drawing

Note: Wild325, Wild335 and Wild635 are of the same size.

Note: Wild335L & Wild635L are of the same size.
4.2 Specifications
| Model | Wild325 | Wild335 | Wild635 | Wild650 |
|---|---|---|---|---|
| Microbolometer | ||||
| Resolution | 384×288 | 640×512 | ||
| Pixel Pitch | 12μm | |||
| NETD | 18mK@300k | |||
| Spectral range | 8–14μm | |||
| Frame rate | 50Hz | |||
| Detection Range | 1300m | 1800m | 1800m | 2600m |
| Optics | ||||
| Objective lens | 25mm/F0.8 | 35mm/F0.8 | 35mm/F0.8 | 50mm/F0.9 |
| Field of view | 10.5° × 7.9° | 7.5° × 5.6° | 12.5° × 10° | 8.8° × 7.0° |
| Magnification | 2.4X | 3.3X | 2.0X | 2.8X |
| Digital Zoom | 1–4X continuous zoom | |||
| Eye relief | 40mm | |||
| Exit pupil | 6mm | |||
| Diopter | ±5D | |||
| Display | ||||
| Type | AMOLED | |||
| Resolution | 1024×768 | |||
| Display size | 0.39 inch | |||
| Color palette | 6 | |||
| Image mode | Forest/Target | |||
| Function | ||||
|---|---|---|---|---|
| Photo/video playback |
Yes | |||
| Language | Multiple-languages | |||
| Built-in Memory | 64GB | |||
| PIP | Yes | |||
| AI Distance Measurement |
Yes | |||
| Heat Trace | Yes | |||
| Real-time Notification |
Yes | |||
| OSD Recording | Yes | |||
| Burn prevention | Yes | |||
| EIS | Yes | |||
| Battery | ||||
| Internal battery | Replaceable and Rechargeable Li-ion Battery (18650×1) | |||
| Battery life | 10h | 8h | ||
| Interface | ||||
| Type-C | Supports battery charging, data transfer, USB video output | |||
| Hotspot | Yes, App remote control | |||
| Environment | ||||
| Working temperature |
-20°C–+50°C | |||
| Protection Level | IP67 | |||
| Weight, g | 470±5g | 485±5g | 475±5g | 510±5g |
| Size, mm | 190.2(L)×69.3(W)×58.7(H) | 190.2(L)×76.3(W)×65.6(H) | ||
| Accessories | ||||
| External Cable | USB cable | |||
| Other Accessories | Palm strap/Protective bag/Non-dust cloth and etc. | |||
| Model | Wild335L | Wild635L | Wild650L |
|---|---|---|---|
| Microbolometer | |||
| Resolution | 384×288 | 640×512 | |
| Pixel Pitch | 12μm | ||
| NETD | 18mK@300k | ||
| Spectral range | 8–14μm | ||
| Frame rate | 50Hz | ||
| Detection Range | 1800m | 1800m | 2600m |
| Optics | |||
| Objective lens | 35mm/F0.8 | 35mm/F0.8 | 50mm/F0.9 |
| Field of view | 7.5° × 5.6° | 12.5° × 10° | 8.8° × 7.0° |
| Magnification | 3.3X | 2.0X | 2.8X |
| Digital Zoom | 1–4X continuous zoom | ||
| Eye relief | 40mm | ||
| Exit pupil | 6mm | ||
| Diopter | ±5D | ||
| Display | |||
| Type | AMOLED | ||
| Resolution | 1024×768 | ||
| Display size | 0.39 inch | ||
| Color palette | 6 | ||
| Image mode | Forest/Target | ||
| Function | |||
| Photo/video playback | Yes | ||
| Language | Multiple-languages |
| Built-in Memory | 64GB |
| PIP | Yes |
| LRF Boost | Yes |
| Heat Track | Yes |
| Real-time Notification | Yes |
| OSD Recording | Yes |
| Burn prevention | Yes |
| EIS | Yes |
| Battery | |
|---|---|
| Internal battery | Replaceable and Rechargeable Li-ion Battery (18650×1) |
| Battery life | 10h 8h |
| Interface | |
| Type-C | Supports battery charging, data transfer, USB video output |
| Hotspot | Yes, App remote control |
| Environment | |
| Working temperature | -20°C~+50°C |
| Protection Level | IP67 |
| Weight, g | 515±5g 505±5g 540±5g |
| Size, mm | 190.2(L)×69.3(W)×77.1(H) 190.2(L)×76.3(W)×84.6(H) |
| Accessories | |
| External Cable | USB cable |
| Other Accessories | Palm strap / Protective bag / Non-dust cloth and etc. |
| Laser Rangefinder | |
| Safety Class | Class 1 |
| Wavelength | 905nm |
| Range | 1000m |
| Accuracy | ±1m |