
Products:
- External waterproof mic
- 2.5 hour record time on a single charge
- “Quick change” Mode/Wi-Fi button
- One touch record with vibration indication
- Battery indicator lights
- TrueVision™ Full HD 1080-60fps
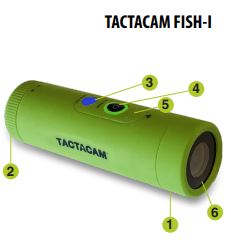
Before you start filming, charge your Tactacam completely.
(1) On the rear of the camera twist the back cap counter clockwise to the unlock position to access the components listed below.

You should see the following.
- SD card slot
- USB Type-C port (Charging and Downloading)
- Removable battery (Up to 2.5 hours continuous recording time)
- List of the Pre-set modes for your camera
- Your Tactacam’s serial number.

With the back cap removed you will see the USB C charging port and the SD card slot. Using the included USB C cord, plug your Fish-i into a wall outlet.

You will see the solid red light illuminate on your Tactacam and it will remain lit until your camera is fully charged. When the light has shut off, unplug your Tactacam.
You can also charge your Tactacam Batteries with the Tactacam Dual Battery Charger (sold separately).

1. Push the Rec/Power button. You will feel the camera vibrate 2 times and see a blinking green light around the Rec/Power button. The green LED must be blinking for the camera to be recording.
The process takes approximately 3 seconds.
NOTE: If light does not begin to flash, make sure your SD Card is installed, formatted, and not filled with videos.
2. (GREEN MODE ONLY) Push the power record button when the camera is recording in loop mode it will mark and save that video and continue to record.
3. Pause your recording in (GREEN LOOP MODE) push the mode button. The camera will vibrate 1 time and the green light will go solid around the rec/power button. Pause your recording in (BLUE or LIGHT BLUE MODE) by pushing the Rec/Power button. The camera will vibrate 1 time and the green light will go solid around the rec/power button.
4. With the camera paused, change the modes by pushing the mode button.

5. To power your camera completely off push and hold the Rec/Power button for 5 seconds.
6. The camera will automatically power off to save battery when left in pause mode after 3 minutes.
“QUICK CHANGE” FISH-I MODES
Three Pre-set video modes:
Green=LOOP recording, normal video but allows you to mark key moments in your video, the video is then back saved for the amount of time you select.
Blue=Standard recording, best for first time use, general recording and low light recording.
Light Blue=Time lapse recording for a short video of your longer recording.
REMOTE CONTROL: Fish-i is compatible with the Tactacam Remote. Please see the Tactacam support page for more remote and operation instructions.
- Fully charge your camera and remote.
- Power on your Tactacam Remote and Fish-i camera.
- You will need to pause the camera and remote for syncing.
- With the camera and remote paused, place your remote to the side. Place one finger on the camera mode button and one on the camera power/record button. Preform the following: Push the mode button and the power / record for no more then 1 sec.
NOTE: You will see the remote connection number increase by 1 number. If this is the first camera synced a 1 will be displayed on the remote.
After initial pairing, your remote can control up to (5) Tactacam 5.0 or Fish-i cameras with one button. Functions include Power ON Auto Record / PAUSE/ OFF and when not recording conserves batteries with the Auto Power off feature. All cameras and Remote will power down after 3 min when not recording. But don’t worry they all will power back on just as fast with a push of the Tactacam remote button.
Tactacam Remote Technology gives you the feed back you need, all on an LCD screen: Number of connected cameras, Record length, Remote Battery life and the Green LED indicates Recording, Pause/On and Off Tactacam Remote has been optimized at 100 feet giving you the distance and control over your cameras.
Note: Tactacam remote is only compatible with Tactacam 5.0 and Fish-I cameras.
Always use the recommended SD Card for your camera. Tactacam 5.0 requires UHS Speed Class 3 (U3) to deliver the necessary write speed for cameras like the 5.0 that can shoot 4K and high-bitrate video. U3-certified SD cards must be able to maintain a minimum write speed of 30MB/s to ensure that recording continues smoothly without any dropped frames. You can use up to a 128GB card with the 5.0 Tactacam only. Tactacam Fish-i, 4.0 and Solo WiFi cameras requires a class 10 or U1, 32, 64 or 128 GB micro SD Card.
| Mark | Minimum Serial Data | SD Bus Mode | Application | |
| UHS Speed Class | 3 | 30 MB/s | UHS-II
UHS-I |
4K2K Video Recording |
| 1 | 10 MB/s | Full HD Video Recording
HD Still Image Continuous Shooting |
||
| Speed Class | CLASS 10 | 10 MB/s | High Speed | |
| CLASS 6 | 6 MB/s | Normal Speed | HD and Full HD Video Recording | |
| CLASS 4 | 4 MB/s | |||
| CLASS 2 | 2 MB/s | Standard Video Recording |
Note: You should always format your SD Card before using it in your Tactacam for the first time or after it has been used in any other device. Only use high quality micro SD Cards. Tactacam SD
Cards, Lexar, or SanDisk Ultra Always use the recommended SD Card for your camera. Tactacam 5.0 requires UHS Speed Class 3 (U3) to deliver the necessary write speed for cameras like the 5.0 that can shoot 4K and high-bitrate video. U3-certified SD cards must be able to maintain a minimum write speed of 30MB/s to ensure that recording continues smoothly without any dropped frames. You can use up to a 128GB card with the 5.0 Tactacam only.
Tactacam Fish-i, 4.0 and Solo WiFi cameras requires a class 10 or U1, 32, 64 or 128 GB micro SD Card.
Please see more info on SD Cards at tactacam.com/support
Use one of the following methods to access videos located on your micro SD Card.
- Using the provided USB cord connect your Tactacam to your computer. Power on your camera to allow the computer and camera to communicate. You will see an icon on your computer desktop (usually named TACTACAM). Open it, any videos taken with your Tactacam will be in the “Video” folder.
- Remove your micro SD Card from your Tactacam and insert the micro SD Card into the provided micro SD Card adapter. Insert the micro SD Card adapter into your SD Card reader on your computer.
Format your SD Card. When you Format a SD Card it will erase all data on the card. If you need assistance reformatting your SD card see the following:
For a Mac:
Visit tactacam.com/support and to see video “SD Card Reformat on a Mac Computer” for full detailed instructions
For a PC:
Visit tactacam.com/support and to see video “SD Card Reformat on a Windows Computer” for full detailed instructions
Notes: It is best to format your SD Cards before using. Only use the recommended SD Cards for Tactacam cameras. When formatting your SD Card use ExFAT. For a list of the recommended micro SD Cards, visit tactacam.com/support Use care when handling memory cards. Avoid liquids, dust, and debris. As a precaution, power off the camera before inserting or removing the SD card. Check manufacturer’s guidelines regarding usage in acceptable temperature ranges.
Wi-Fi
Note: Your camera functions can only be controlled by your phone when your are connected to Wi-Fi. This setting lets you connect your camera to the Tactacam FISH-i App for mobile remote connection. When wireless is on, a blue LED appear by the wireless status icon just in front of the rec/power button. The blue wireless LED will blink when not connected for 1 min then power itself off. Once connected the blue LED will go solid. The Wi-Fi will remain on throughout the lifetime of the battery.
1.Downloading the Tactacam FISH-i App:
Download and open the Tactacam FISH-i APP from your App store on your Phone or Tablet. Follow the App’s on-screen instructions.
2. Connect to your Tactacam FISH-i
To turn on your Tactacam FISH-i Wi-Fi: While your Tactacam FISH-i is in pause mode push and hold the Mode Button for 3 seconds. You will see the blue LED indicator light turn on and start blinking.
3. From your mobile device’s Wi-Fi setting select the FISH-i Wi-Fi network. (There is no default password for your FISH-I Wi-Fi.) When connected, the blinking blue LED lightt will become solid blue.
4. Open the Tactacam FISH-i App.
5. Turn Wi-Fi Off – Press and hold the Wi-Fi/Mode button for 3 seconds. This will turn off your Wi-Fi and disconnect you from your mobile device.
Date Time – Automatic
- Your camera’s date and time are automatically set when you connect your camera to the Tactacam FISH-i App. See video tutorials at tactacam.com/support
PLAYING BACK CONTENT ON A COMPUTER
Viewing, editing and sharing
- Connect your Tactacam FISH-I to your computer using the provided
- USB C cable or by using the micro SD adapter and your computers card port.
- Open the Tactacam Video File
- Select your video and open it in your video player
For best video quality your camera records in a .mp4 file format. The best way to view, edit, and share your videos on a Mac or PC is with QuickTime Media Player – http://support.apple.com/downloads/ quicktime
Another popular program is Adobe Premiere Elements for Mac and PC. Download the free trial version here:
https://www.adobe.com/products/premiere-elements/download-trial/try.html
PLAYING BACK CONTENT ON A SMARTPHONE/TABLET
- Connect your camera to the Tactacam FISH-I App for mobile. For more information, see Connecting to the Tactacam App for Mobile tactacam.com/support
- Use the controls on the app to playback your footage on your smartphone/tablet.
HELPFUL TIPS
Follow these guidelines to get the best performance from your camera:
- Before opening the back cap, be sure the camera is free of water or debris. If needed, rinse the camera with water and dry it with a cloth.
- Before closing the back cap, be sure the seal is free of debris. If needed, clean with a blower brush or canned air.
- After every use in salt water, rinse the camera with fresh water, and dry with a soft cloth.
- If the camera lens becomes foggy, let it sit with the back cap off until it dries.
- If sand or debris hardens around the back cap, soak the rear of the camera in warm tap water for 5 minutes and then rinse thoroughly to remove the debris before opening.
- The camera is water-resistant; no housing needed. Ensure that the back cap is closed and locked before using the camera around water, dirt, or sand.
- For best audio performance, ensure the microphone hole is free of water or debris. To remove obstructions, shake the camera or blow on the mic to remove water and debris from the microphone hole. *DO NOT stick anything in the mic hole as you could damage the mic.
IMPORTANT MESSAGES/CAMERA VIBRATIONS
If the camera begins to vibrate for 5 seconds on and 5 seconds off repeatedly, check the following:
NO SD Card=The camera requires a micro SD, micro SDHC or micro SDXC card to capture videos.
SD FULL=Delete files or swap card.
SD ERROR=Camera is unable to read card. Please format the card and try again.
NOTICE: When formatting SD Cards, if you select Yes, all of your card’s content WILL BE DELETED. To avoid loss of video, download all files onto your computer in a separate file. Reformat your micro SD Card on a regular basis to ensure that the card can continue to receive information from the camera.
CAMERA BATTERY
Your camera and battery need to stay connected when operating.
DO NOT remove the battery from the camera when in use or your data will be lost.
On your Tactacam 5.0, 4.0 and Fish-I there are 4 Green LED battery indicator lights. When all 4 lights are illuminated the camera battery is full. As the battery levels decreases the lights will begin to reduce in numbers till there is one LED light remaining. The last battery level LED indicator light will begin to blink when the battery drops below 10%. If the battery reaches 0% while recording, the camera saves the file and powers off.
MAXIMIZING BATTERY LIFE
Extreme cold temperatures can decrease battery life. To maximize battery life in cold conditions, keep camera in a warm place prior to use. Protect the Rec/Power Button to prevent the camera from accidentally turning on.
CHARGING TIME USB CORD WALL PLUG
The battery charges to 80% in approximately two hours and 100% in approximately three hours when using Tactacam’s USB-compatible charger, Wall Charger for Tactacam, or other USB charging adapter. Other chargers might charge at a slower rate.
WARNING: Using a wall charging block other than a Tactacam’s Wall Charging block can damage the Tactacam’s camera battery and could result in fire or leakage. Only use chargers marked: Output 5V 1A. If you do not know the voltage and current of your charger, use the included USB cable to charge the camera from your computer.
CHARGING TIME USB CORD COMPUTER
The battery charges to 80% in approximately three hours and 100% in approximately four hours. When using Tactacam’s USB cord connected to a computer for charging, it is best to have the camera powered off. Charge times may vary depending on your computer’s USB output settings.
USING THE CAMERA WHILE CHARGING
Control the Tactacam FISH-i while the camera is plugged into a USB charging adapter. (You cannot record while charging the camera through a computer.) Your Tactacam FISH-I can also capture video when connected to a USB external charging device. Make sure to use the power adapting back cap. This power adapting back cap is not waterproof.
BATTERY STORAGE AND HANDLING
The camera contains sensitive components, including the battery. Avoid exposing your camera to extreme temperatures. Low or high temperature conditions may temporarily shorten the battery life or cause the camera to temporarily stop working properly. Avoid dramatic change in temperature or humidity when using the camera, as condensation may form on or within the camera.
When storing your Tactacam, charge the battery so it’s 75% or higher.
Remove the battery to eliminate the possibility of internal corrosion. Replace the back cap to protect against dust and other unwanted substances.
The removable battery in the camera is replaceable if it has failed. See Battery troubleshooting and other powering issues.
Do not dry the camera or battery with an external heat source such as a microwave, oven, or hair dryer. Damage to the camera or battery caused by contact with liquid inside the camera is not covered under the warranty.
Do not make any unauthorized alterations to the camera. Doing so may compromise safety, regulatory compliance, performance, and will void the warranty.
HOW DO I TURN OFF MY CAMERA?
If your Tactacam FISH-i is not connected to the Tactacam FIDH-i App for mobile, it will power off after 3 min when you stop recording. When your camera is connected to the app, Push the Rec/Power button for 5 seconds to turn off the camera.
Note: the Wi-Fi will also power off when camera is manually powered down. To turn off wireless and keep the camera on, press the Wifi/Mode button for 3 sec, the Wi-Fi blue light will turn off, then press the Rec/Power button to start recording.
MY TACTACAM WON’T RESPOND WHEN I PRESS A BUTTON
Press and hold the Rec/Power button for about 5 seconds until your camera powers off. This reset saves all of your content. If that doesn’t work, open the back cap and remove the battery for 5 seconds.
MY TACTACAM WON’T POWER ON
Make sure your Tactacam is charged. To charge your camera, use the included USB cable and a computer or wall charger.
HOW DO I GET MY VIDEOS OFF MY TACTACAM?
You have a few different options that. First, you can plug the camera directly into your computer using the USB included in your package, be sure you hit the power button once the camera is connected to make it readable by your computer. Second, you can use the micro SD Card adapter in your package by placing the micro SD Card from your camera into it and plugging that directly into your computer. Third, you can connect directly to a smartphone or tablet via the camera’s Wi-Fi capability and the videos can be pulled directly from there.
MY PLAYBACK IS CHOPPY
Choppy playback is typically not a problem with the file. If your footage skips, one of these situations is likely the cause:
Using an incompatible video player. Not all video players support the .MP4 video. For best results, use the latest Quick Time Media Player available as a free download here. https://support.apple.com/quicktime
The computer does not meet the minimum requirements for HD playback. The higher the resolution and frame rate of your video, the harder the computer has to work to play it back. When playing content directly from your camera over a USB connection, transfer the file to the computer to play back. If your computer does not meet the minimum requirements, make sure that all other programs on your computer are closed.
WHAT IS THE BATTERY LIFE?
2.5 hours of nonstop record time (without Wi-Fi use)
I FORGOT MY TACTACAM’S Wi-Fi USERNAME OR PASSWORD You will need to reset your camera. See Resetting Your Camera’s Wireless Name and Password at www.tactacam.com/support
I POWERED OFF MY TACTACAM, BUT THE LIGHT IS STILL ON
If your camera is not responding to any commands, you will need to remove your battery for 5 seconds. If this problem continues, try reformatting or replace your SD Card.
WHAT IS MY CAMERA’S SERIAL NUMBER?
The camera’s serial number is listed inside the back cap of the camera.
Mounting Tips
See Videos: www.tactacam.com/videos
HELPFUL TIPS
Keep the lens clean — avoid fingerprints. Before opening the back cap, be sure the camera is clean and dry. Shake the camera or blow on the mic to remove water and debris from the mic hole. If needed, rinse the camera with water and dry it with a cloth. Get more help and resources at: www.tactacam.com/support
WATCH TUTORIAL VIDEOS
Learn tips + tricks from the pros.
www.tactacam.com/videos
THE CAMERA IS FREEZING/LOCKING UP/VIBRATING CONTINUALLY?
- Double check the SD Card. Make sure it’s a compatible SD Card (5.0 uses Ultra 3 cards only). Try formatting or changing your SD Card.
- Vibrating continually is most commonly caused by a Full SD Card, save what files you want and reformat the card. Reformatting the SD
Card is the best solution to this as it automatically deletes everything off of the card. Directions on re-formatting SD Cards can be found online on Tactacam FAQ’s page.
THE CAMERA WILL NOT CONNECT TO WI-FI?
- Android: Go into settings, click on Wi-Fi, select FISH-I Wi-Fi, then go into the Tactacam FISH-i App. If customer is at home/work, they may need to go in and click the home/work Wi-Fi and click forget, then connect to the FISH-i in the Wi-Fi settings.
- iPhone: If the Tactacam FISH-i Wi-Fi is not showing up, the customer can reset the network settings and then it should show up.
- If the Tactacam FISH-i Wi-Fi is turning on and showing up but they can’t connect to it, another person’s device may be connecting to it before the customer can. This can happen in a busy setting like the shop. Check to make sure the Wi-Fi light is blinking.
HOW DO I PLAYBACK THE VIDEOS? – Operating Systems and Media Player
- Windows 7: 5k player
- Windows 8,9 and 10: VCL player
- Apple: QuickTime media player
- Android: MX player
- iPhone: Use the video player loaded on the phone by the factory
- Check tactacam.com for other video player options.
DOWNLOAD THE USER MANUAL
Find detailed info on settings, modes and more. https://www.tactacam.com/tactacam-user-manual/
CONTACT CUSTOMER SUPPORT
Get help and answers to frequently asked questions. Tactacam is dedicated to providing the best possible service. To reach Tactacam’s Support, visit www.tactacam.com/support
Warranty Information
Register your Tactacam and sign up for the newsletter. Receive your 1 year warranty, updates, contests info and more. www.tactacam.com/warranty-registration/
30 DAY MONEY BACK GUARANTEE: (Tactacam Web-Store Purchases Only) www.tactacam.com/warranty
