
Products:
The Primary Arms Silver Series (SLx8) 1-8x24FFP Rifle Scope brings unprecedented quality for the price point. As a low-power variable optic, this scope excels in both close-quarters and long- istance shooting. At 1x, the ACSS Raptor 5.56 reticle shrinks to a horseshoe and chevron for fast and effective target acquisition. As magnification increases, the intuitive ranging and holdover system come into view, empowering the shooter to make quick, accurate hits as far as 600 yards. We’re so confident in this optic, we back it with our trusted Primary Arms Lifetime Warranty.

ACHIEVING A CLEAR RETICLE PICTURE
Your Silver Series SLx8 1-8×24 FFP scope comes with an adjustable diopter ring that must be set to match your eye. Located at the rear of the eyepiece, it is marked simply [+ 0 -]. The Reticle Focus/Diopter (E) changes the focus of the reticle as you see it inside the scope. It does not change the focus of objects that you look at through the scope. Setting the diopter is a critical first step to successful precision shooting. You can set the diopter before you have even mounted the scope in its rings.
- Turn the Magnification/Power Ring (F) to a high setting (max is 8), and point the scope at a bright, featureless background such as blue sky or a blank white wall.
- With your head in position behind the scope, look at the wall or sky. If you look through prescription glasses when shooting, wear them now too. After 5 or 6 seconds, close your eyes.
- Now open your eyes, glance through the scope and immediately see if the reticle is sharp or blurry. If you notice that the reticle seems blurry at first and then suddenly sharpens, your eyes have focused on the reticle itself instead of looking through the scope. You must adjust the Reticle Focus/Diopter (E) and try again.
- If the reticle was blurry, turn the Reticle Focus/Diopter (E) ring and repeat the process again. The process will take multiple adjustments. Each time you repeat the process, ask yourself if the reticle was sharper or more blurry than before. The final adjustments may be very fine. If your eyes get watery or tired, walk away for a bit and come back to this later.
- Once the reticle appears sharp as soon as you glance through the scope, the diopter is set for your eyes. Everyone’s eyes are slightly different, so the ideal adjustment changes from person to person. Many shooters will mark their correct diopter position with a little dab of paint or fingernail polish next to the 0 mark, in case the ring gets turned accidentally later on. Others will apply electrical tape around the diameter of the ring to hold it in place.
This is a one-time adjustment. Reticle details may appear small when not looking at medium or long range targets, especially at low magnification. Shooting at those ranges is best done from a well-supported position using a bipod or sandbags.
RETICLE ILLUMINATION
The Illumination Knob (G) control on the left side of the scope is marked with numbers of increasing brightness from the lowest two settings being Night Vision Compatible, and the highest two being Daylight Bright. The knob cap unscrews counterclockwise, holding a CR2032 battery with the positive (+) side facing towards the cap. The windage turret cap on the opposite side holds a spare CR2032 battery inside. Reticle illumination at the lower settings is useful in low light situations like sunrise and sunset. The highest two settings are “daylight bright” settings. Reticle “bleed out”, abnormalities and small imperfections may be visible when viewed indoors or in low light conditions at these two settings. This is a normal result of the reticle etching process. Abnormalities at these two settings will not be visible when viewed in daylight conditions. Using these settings in low light situations will overpower your eye’s ability to see the target and make the reticle appear distorted. The right amount of illumination creates a clear contrast between the reticle and your intended target, without straining the eye.
THE ACSS RAPTOR 5.56 RETICLE
The ACSS Raptor 5.56 Reticle has been calibrated to give you the fastest engagement speed possible with 5.56 (and select cartridges with similar ballistics). This reticle includes autoranging horizontal stadia to combine the ranging and hold process. A bright outer horseshoe encourages quick acquisition at low magnifications. Wind dots predict the path of bullets against perpendicular wind deflection.
ESTABLISHING ZERO, OR DIALING IN YOUR SCOPE
Use the horseshoe for fast target acquisition and the chevron tip for precision. From a well-supported position using a bipod or sandbags, turn the power ring to maximum, and adjust your windage and elevation knobs to dial in your point of impact to the tip of the chevron at 100 yards. How high up or down you dial in relative to the chevron tip depends on your rifle and ammunition, as shown in the chart. How to use The Zero Chart
- Starting on the left, locate your ammunition type and barrel length.
- Adjust zero depending on your bullet velocity, barrel length, and elevation above sea level, and dial in +/- in inches at the yardage indicated, depending on which combination matches your rifle.


ADJUSTING POINT OF IMPACT
With the scope mounted on your rifle, the adjustment knob caps can be removed revealing finger adjustable knobs underneath. From a well-supported position using a bipod or sandbags, turn the Power Ring (F) to maximum, and adjust your windage and elevation knobs (B, C) to dial in your point of impact to the tip of the chevron. When sighting in your rifle, if your shots are hitting low, turn the Elevation Knob (C) counterclockwise to bring the point of impact up. If your shots are hitting to the left, turn the Windage Knob (B) counterclockwise to bring the point of impact right. Each click will change the point of bullet impact 0.25 minute of angle (MOA), or 0.25 inch at 100 yards distance.
Once your rifle is sighted in, you can use a screwdriver or fingernail to turn the indicator dial set into the knob until the “0” matches up with a dimple machined into the adjustment know cap threads. Turning this dial does not affect the point of impact and no clicks will be heard or felt. If you adjust the knob later to compensate for wind or range, it will be easy to return your scope to your rifle’s original “zero”. Each white line represents 0.25 MOA. The numbers 4, 6, 8, 16, and 18 represent total adjustment in MOA. Thus, if you turn the elevation knob from “0” to “6” you will hear and feel the turret click 24 times, and your bullet will impact the target 6 inches higher than before at 100 yards distance.

GETTING TO KNOW YOUR BULLET DROP COMPENSATION (BDC)
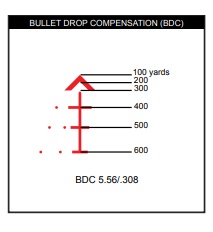
Gravity will affect your bullet’s trajectory (or path). The BDC starts at the tip of the chevron and finishes at the 600 yard mark, indicated by the lowest hash mark. Simply aim using the point in the reticle that coincides with the range to target. For targets at ranges between points you can split the difference. For example, for a target at 450 yards you should aim halfway between the 400 and 500-yard hash marks. We recommend that you establish a steady, supported position in order to utilize the BDC. Due to the first focal plane construction, the BDC will work properly at any magnification, but it is most easily seen and utilized at higher magnifications.
UNDERSTANDING THE WIND & BULLET DRIFT
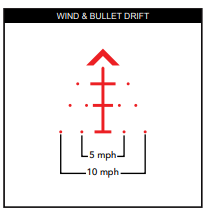
Notice the dots aligned with the BDC hash marks below the chevron. They are 5 mph and 10 mph wind marks. Wind will cause the bullet to drift left or right depending on wind direction. Understanding wind is important, as even a 2 mph wind at a 90 degree angle to the bullet’s path can cause the bullet to drift over 10” at 600 yards. For a wind blowing from your left to your right, aim using the appropriate dot on the right side. For a wind blowing right to left, use the left side dot. You can use the dots as a starting point in different conditions. For example, if you have approximately a 2.5 mph wind, you would hold half-way to the dot nearest the center of the BDC. If you have a 20 mph wind, you would double the distance to the appropriate 10mph dot, and so on. The wind hold dots will work with the optic set to any magnification, but are most easily seen and utilized at higher magnifications.
LEADING YOUR TARGET
The average target moves at 8.6 mph. The leading edge of the “horseshoe” section of the reticle is set for a target moving at a 90 degree angle to the shooter. Depending on the direction of the target’s movement, fire using the edge of the horseshoe instead of the center chevron. If the target is moving left to right, use the left edge of the horseshoe. If the target is moving right to left, use the right edge. This technique is best used from 100 to 300 yards and is highly effective on moving targets. Due to the first focal plane design of the scope, this technique can be used with the scope set to any magnification.

AUTO RANGING
Knowing the proper range to your target is crucial in order to use the right hold on the BDC. Auto ranging a standard 18” wide target horizontally is correlated with the BDC hash marks. The horizontal hash marks range estimate center mass on targets 18” wide, and predators or small game with an approximately 18” measurement from shoulder to hip. When using the BDC to auto range, simply fit the target’s width inside the BDC hash mark that matches it, and fire. All the math has been done.


LENS CARE
Please do not use any organic solvent such as alcohol or acetone on your scope. First, blow dust or any foreign objects off of the lens. Then, use a soft cotton or microfiber lens cloth to clean any fingerprints or smears off the lens. Alternatively, you may use a piece of professional lens paper for further cleaning, if necessary.
WARNING: Always ensure your firearm is unloaded (chamber empty and magazine removed) before installing optics or accessories.
WARNING: Improper installation of firearm parts or accessories may result in death or serious personal injury. If you are not properly trained in the
installation of these parts, have them installed by a gunsmith or armorer.
REMEMBER: THE FOUR RULES OF FIREARMS SAFETY
- Treat every firearm as if it were loaded
- Never let your muzzle cover anything you are not willing to destroy
- Keep your finger off the trigger until your sights are on target
- Be sure of your target and what is behind it