
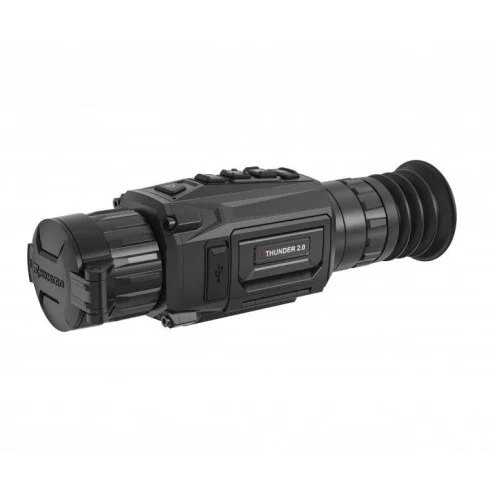
Device Description
HIKMICRO THUNDER 2.0 Thermal Image Scope featuring high thermal sensitivity ensures perfect detail recognition even in the hardest weather conditions when the object and background are with minimal temperature difference. With an extended operation time, the scope is mainly applied to scenarios such as hiking, hunting, searching and rescuing.
Main Function
Distance Measurement
The device can detect the distance between the target and the observation position.
Hot Tracking
The device can detect the highest temperature in the scene and mark the spot. This function varies according to different camera models.
Large Digital Zoom
Digital zoom up to 8× offers better focus on small target from a far distance.
Zeroing
The reticle helps you to aim at the target fast and accurately. See Zeroing.
Audio & Recoil-activated Recording
The device can record audio and support recoil-activated recording.
Image Correction
The device supports DPC (Defective Pixel Correction) and FFC (Flat Field Correction) which can optimize the image quality.
Brightness & Tone Adjustment
You can adjust the brightness and tones as needed.
Client Software Connection
The device can capture snapshots, record videos, export files, set parameters, and upgrade firmware by HIKMICRO Sight after being connected to your phone via hotspot.
Appearance
There are two types of thermal image scopes. Please take the actual product for reference.
Component

| No. | Component | Function |
| 1 | Lens Cover | Protects the lens. |
| 2 | Focus Ring/Knob | Adjusts focus to obtain clear targets. |
| 3 | Buttons | To set functions and parameters. |
| 4 | Diopter Adjustment Ring | Adjusts the dioptric setting. |
| 5 | Eyepiece | The piece placed closest to the eye to view the target. |
| 6 | Type-C Interface | To connect the device to power supply or transmit data with a type-C cable. |
| 7 | Battery Compartment | For holding the battery. |
Button

| No. | Icon | Button | Description |
| 1 |  | Power | ● Press: Standby mode/wake up device ● Hold: Power on/off Note: Power indicator statuses are as follows: ● Flashing Red & Green: error occurred. ● Solid Red: device is properly charged. ● Solid Green: device is fully charged. ● Off: device is not charged. |
| 2 |  | Mode | Press: Switch palettes Hold: Correct non-uniformity of display (FFC) |
| 3 |  | Capture | Press: Capture snapshot Hold: Start/Stop recording video |
| 4 |  | Menu | Non-Menu Mode: ● Press: Enter the quick menu ● Hold: Enter the main menu Menu Mode: ● Press: Confirm/Set parameters ● Hold: Exit the menu |
| 5 |  | Zoom | Press: Switch digital zoom Hold: Enable/Disable PIP mode |
Cable Connection
Connect the device and power adaptor with a type-C cable to power on the device. Alternatively, connect the device and PC to export files.

Battery Instruction
- The device supports removable li-ion battery. The charging limited voltage of the battery is 4.2 V. The Battery capacity is 3.6 V/4.4 Ah (15.84 Wh).
- Charge the battery for more than 4 hours before first use.
- Please purchase the batteries recommended by the manufacturer if necessary.
- Remove the battery if the device is not used for a long time.
Change Battery
Insert the battery into and remove it from the battery compartment.
Before You Start
Make sure to power off the device before removing the battery.
Steps
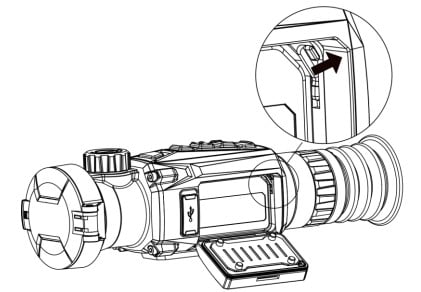
- Lift the battery compartment cover handle, and pull the battery compartment cover outwards.

2. Push the battery latch aside (as the arrow shows), and release the battery.
- Insert the battery into the battery compartment. The latch locks the battery in place when the battery is fully inserted.
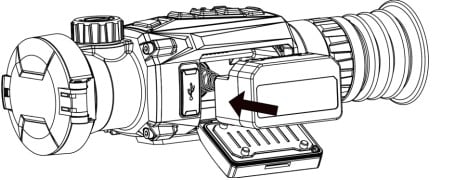
4. Push the battery compartment cover until it clicks into the locked position.
Install Rail
Before You Start
- Turn off the device first.
- Use the lint-free cloth to clean the device base and the rail.
- The rail is not included in the package. Please purchase it separately.
Steps
- Align the installation holes on the device and the rail.
- Insert the screws, and tighten them.

3. Tighten the screws to secure the rail on the device.

Power On/Off
Power On
When the battery is sufficiently charged, hold for about 1 second to power on the device.
Power Off
When the device is turned on, hold for about 1 second to power off the device.
Note
- Power-off countdown will appear when you power off the device. You can press any key to interrupt the countdown and cancel the power-off.
- Automatic low battery power-off cannot be canceled.
Auto Power Off
Set the auto power off time for your device, and then the device will automatically shut down as the set time.
Steps
- Hold to show the main menu.
- Go to
 General Settings, and select
  .
. - Press or to select the auto power off time as required.
- Hold to save and exit.
Note
- When the low power note shows, charge the battery.
- The auto power off countdown will start again when the device exits standby mode, or the device is restarted.
Main Menu
When the device is turned on, hold to enter or exit the main menu.
- Press to move up.
- Press to move down.
- Press to confirm.

Quick Menu
In the live view mode, press to show the quick menu. You can set parameters such as Brightness and Contrast in the quick menu.
Note: This function varies according to different camera models.
Client Software Connection
Connect the device to the HIKMICRO Sight app via hotspot, then you can capture picture, record video, or configure parameters on your phone.
Steps
- Search the HIKMICRO Sight app on App Store (iOS System) or Google Play™ (Android System) to download it, or scan the QR code to download and install the app.

- Hold to show the menu of device.
- Press or to select
 , and press to enable hotspot.
 - Turn on the WLAN of your phone and connect to the hotspot.
● Hotspot Name: HIKMICRO_Serial No.
● Hotspot Password: Serial No. (The last 9 numbers of serial No.) - Open the app and connect your phone with the device. You can view the interface of device on your phone.
Note
- The device cannot connect to the app if entering wrong password several times. Refer to Restore Device to reset the device, and connect the app again.
- The device should be activated for the first use. The default password must be changed after the activation.
Check Firmware Status
Steps
- Open the HIKMICRO Sight and connect your device to the app.
- Check if there is a red spot on the connection interface. If there is no red spot, the firmware is the latest version. Otherwise, the firmware is not the latest version.
- (Optional) If the firmware is not the latest version, upgrade the device. See Upgrade Device.
Upgrade Device
Upgrade Device via HIKMICRO Sight
Before You Start
Install HIKMICRO Sight on your phone and connect your device to the app.
Steps
- Tap the device series to enter the device information interface.
- Tap Device Upgrade to enter the firmware upgrade interface
- Tap Upgrade to start upgrade.
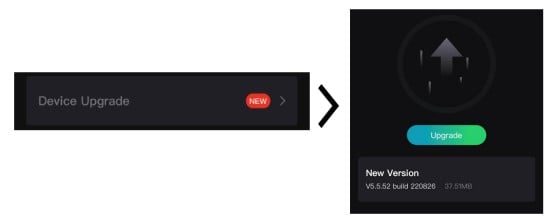
Note: The upgrading operation may vary due to app updates. Please take the actual app version for reference.
Upgrade Device via PC
Before You Start
- Please get the upgrade package first.
- Make sure the hotspot function is disabled.
- Remove batteries from the device before connecting to your PC.
- Turn on the device after connecting it to your PC, and keep the device on for 10 to 15 seconds before other operations.
Steps
- Connect the device to your PC with cable, and then turn on the device.
- Open the detected disk, copy the upgrade file and paste it to the root directory of the device.
- Hold to reboot the device, and the device upgrades automatically. The upgrading process will be displayed in the main interface.
Note: During the upgrade, make sure the device is connected to your PC. Otherwise, it may cause unnecessary upgrade failure, firmware damage, etc.
Zeroing
You can enable the reticle to view the position of the target. The functions such as Freeze and
Zoom help to adjust the reticle more accurately. See Zeroing for detailed instructions.

Adjust Diopter
Steps
- Power on the device.
- Hold the device and make sure the eyepiece covers your eye.
- Adjust the diopter adjustment ring until the OSD text or image is clear.

Note: When adjusting diopter, DO NOT touch the surface of lens to avoid smearing the lens.
Adjust Focus
Steps
- Power on the device.
- Open the lens cover.
- Hold the device and make sure the eyepiece covers your eye.
- Adjust the focus ring/knob until the image is clear.
Note: When focusing, do not touch the surface of lens to avoid smearing the lens.

Adjust Contrast
Steps
- In the live view mode, press to show the quick menu.
- Select
 and press to confirm.
 - Press or to adjust contrast.
- Hold to exit and save.
Adjust Tone
Steps
- In the main menu, select
 and press to confirm.
 - Press or to select a tone. Warm and Cold can be selected.
- Hold to exit and save.
Select Scene Mode
You can select proper scene according to actual using scene to improve the display effect.
Steps
- Hold to go to the main menu.
- Select
 and press to confirm.
 - Press or to switch scene modes.
– Recognition: Recognition mode is recommended in normal scene.
– Jungle: Jungle mode is recommended in hunting environment. - Hold to save settings and exit.
Set Palettes
You can select different palettes to display the same scene in different effects. Press in the live view mode to switch palettes.
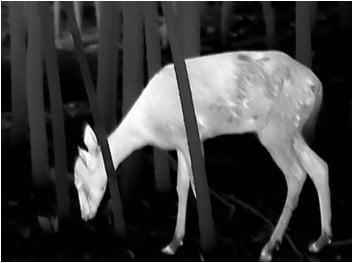
White Hot
The hot part is light-colored in view. The higher the temperature is, the lighter the color is.
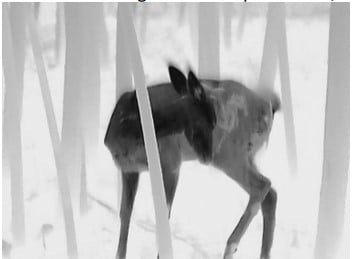
Black Hot
The hot part is black-colored in view. The higher the temperature is, the darker the color is.
Red Hot
The hot part is red-colored in view. The higher the temperature is, the redder the color is.

Fusion
From high temperature to low temperature, the image is colored in from white, yellow, red, pink to purple.

Correct Defective Pixel
The device can correct the defective pixels on the screen which are not performed as expected.
Steps
- Hold to show the main menu.
- Select
 Function Settings, and press to enter the setting interface.
 - Select
 , and press to enter the DPC setting interface.
 - Press or to select the X or Y axis, and press to confirm. Press or to set the coordinates until the cursor reaches the dead pixel. If you select
 , the cursor moves left and right; if you select
 , the cursor moves up and down.
 - Select
 , and press to correct the dead pixel.
 - Hold to save and exit.
Note
- The selected defective pixel can be magnified and displayed on the right of the interface.

- If the screen OSD blocks the defective pixel, move the cursor to reach the defective pixel, then the device performs mirror display automatically as shown in the figures below.

Flat Field Correction
The image correction function can correct non-uniformity of display.
Steps
- Hold to show the main menu.
- Go to Function Settings, and select
 Image Calib.
 - Press and to switch the FFC modes, and press to confirm.
– Manual: Hold in live view to correct non-uniformity of display.
– Auto: The device performs FFC automatically according to the set schedule when switching on the camera.
– External: Cover the lens cover, and then hold in live view to correct non-uniformity of display. - Hold to save the settings and exit.
Set Picture in Picture Mode
Steps
- In the live view mode, hold to enable PIP.
● When reticle is enabled, the PIP view is the detail of reticle.
● When reticle is not enabled, the PIP view is the detail of central part. - Hold to turn off.
Note: If digital zoom is enabled, only the PIP view zooms. The digital zoom of PIP view is 2×, 4×, and 8×
Adjust Digital Zoom
You can zoom the image by using this function.
Press in the live view mode, the live view switches between 1×, 2×, 4×, and 8×.
Note: This function varies according to different camera models.
Select Zeroing Profile
If different users use the same device, the users can configure and save the reticle settings in their respective zeroing profiles.
Steps
- In the live view mode, hold to show the main menu.
- Select
 , and press to confirm.
 - Press or to select a zeroing profile.
- Hold to save and exit.
Result
The right top of the image displays the reticle information. For example, C1-100m means you are using the No. 1 reticle in zeroing profile C, and the set distance is 100 m.
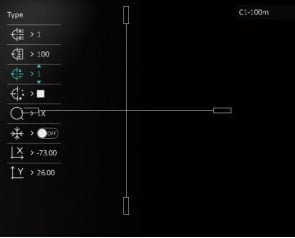
Note: There are 5 zeroing profiles in total, and you can configure 5 reticles in each zeroing profile.
Correct Reticle
Correcting the reticle can help you aim at the target with high accuracy by marking the offset between the big reticle and small reticle. Functions such as Freeze and Zoom help to adjust the reticle more accurately.
Steps
- In the main menu, press or to select
 and press to enter zeroing interface.
 - Select a zeroing No. You can set 5 reticles.
a) Press or to select , and press to confirm.
b) Pressor to select a zeroing No. to correct.
c) Press again to confirm. - Set distance to target.
a) Pressor to select , and press to confirm.
b) Press to switch the digit.
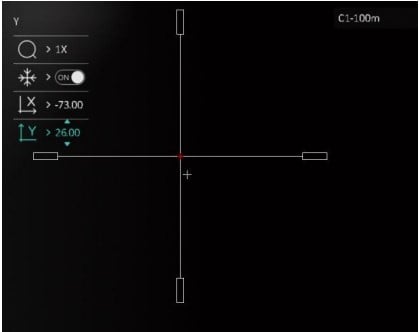
c) Press or to change the number, and press again to confirm. - Aim the target, trigger an activation, and start the zeroing.
a) Press or to select , press to freeze the image.
b) Select , and press or to enlarge the image until the target positions is clear
enough.
c) Select the or , and press to confirm. If you select , the reticle moves
left and right; if you select , the reticle moves up and down.
d) Press or to aim the big reticle at the point of impact.
e) Hold to save the settings according to the prompt.
Note
- When you switch the zeroing No., a prompt will appear on the interface. Select OK to save the parameters for the current reticle.
- When enabling the freeze function in reticle, you can adjust the position of the cursor on a frozen image. This function can prevent image flutter.
- Trigger an activation again to verify that verify that the aiming point aligns with the point of
impact. - Hold to exit the interface according to the prompt.
– OK: Save the parameters and exit.
– CANCEL: Exit but not save the parameters.
Set Reticle Style
You can select color and type for your reticle in different environments.
Before You Start
Select a zeroing No.
Steps
- In the zeroing interface, press or to select
 or
or and press to confirm.
 - Press or to switch types or colors for your reticle, and press to confirm. You can
set 10 types of reticles and choose the reticle colors from Black, White, Green, and Red. - Hold to save the settings according to the prompt.
Note: In black hot mode and white hot mode, if you set the reticle color as white or black, the colors of reticle will be inverted automatically to better aim at the target.

4. Hold to exit the interface according to the prompt.
– OK: Save the parameter and exit.
– CANCEL: Exit but not save the parameters.
Measure Distance
The device can detect the distance between the target and the observation position.
Before You Start
When measuring the distance, keep the hand and the position steady. Otherwise, the accuracy may be affected.
Steps
- Hold to show the main menu.
- Press or to select
 , and press to enter the measurement interface.
1) Press to show the setting interface. Press or to select the target from Deer,
Grey Wolf, Brown Bear, and Custom, and press to confirm.
2) Press or to change the number, and set the target height.
Note: The available height ranges from 0.1 m to 9.0 m.
3) Hold to save the setting and return to the measurement interface. - Align the center of top mark with the edge of target top. Press .
The cursor blinks on the top edge of the target. - Align the center of bottom mark with the edge of target bottom. Press .
Result
The right top of the image displays the distance measurement result and the height of the target.

General Settings
You can manually record video or capture picture when displaying live view.
Set OSD
You can choose whether to display the OSD information on the live view interface.
Steps
- Hold to show the main menu.
- Go to Function Settings, and select
 .
. - Press to enable OSD first. You can press and to select and press to display or hide the necessary OSD information.
– Date: Display or hide date information.
– Time: Display or hide time information. - Hold to save and exit.
Set Brand Logo
You can add brand logo on the live view interface.
Steps
- Hold to show the main menu.
- Go to Function Settings, and select
 .
. - Press to enable or disable Brand Logo.
- Hold to save the settings and exit.
Result
The brand logo is displayed at the bottom left of the image.
Note: After enabling this function, the brand logo only displays on the live view interface, captures and videos.
Set Display Brightness
You can adjust the display brightness of the screen.
Steps
- In the live view mode, press to show the quick menu.
- Select
 , and press to confirm.
 - Press and to adjust display brightness.
- Hold to save settings and exit.
Burning Prevention
This function can prevent the detector of the thermal channel from being burned. When you enable this function, the shield will close if the grey scale of the detector reaches a certain value. Avoid direct sunlight and enable the Burning Prevention function to reduce the risk of sensor damage from the heat.
Steps
- Hold to show the main menu.
- Go to Function Settings, and select
 .
. - Press to enable or disable the burn-prevention function.
- Hold to save settings and exit.
Capture Picture
In the live view mode, press to capture picture.
Note
When capturing succeeds, the image freezes for 1 second and a prompt shows on the display.
For exporting captured pictures, refer to Export Files.
Set Audio
If you enable the audio function, the sound will be recorded with the video. When there is too loud noise in the video, you can disable this function.
Steps
- Hold to show the main menu.
- Press or to select
 , and press to enable or disable this function.
 - Hold to save and exit.
Record Video
Steps
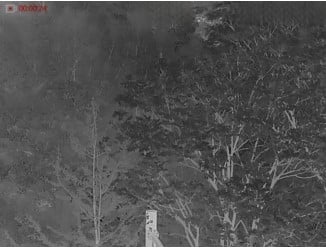
- In the live view mode, hold and start recording.
The left top of image displays the information of recording time.
2. Hold again to stop recording.
What to do next
For exporting recording files, refer to Export Files.
Prerecord Video
After enabling this function, the device can automatically record the 7 seconds before and after the recoil-activation.
Steps
- Hold to show the main menu.
- Press or to select
 .
. - Press to switch on/off this function.
- Hold to save and exit.
Note: If you activate recoils continuously, the device will record the 7 seconds before the first recoil until the 7 seconds after the last recoil.
What to do next
For exporting recording files, refer to Export Files.
Hot Tracking
The device can detect the highest temperature spot in the scene and mark it on display
Steps
- Hold to show the main menu.
- Press or to select
 , and press to mark the spot of highest temperature.
 - Hold to save settings and exit.
Result
When the function is enabled,  displays in the spot of highest temperature. When the scene changes, the moves.

Export Files via HIKMICRO Sight
You can access device albums and export files to your phone via HIKMICRO Sight.
Before You Start
Install HIKMICRO Sight on your mobile phone.
Steps
- Open HIKMICRO Sight and connect your device to the app. See Client Software Connection.
- Tap Media to access device albums.

- Tap Local or Device to view the photos and videos.
– Local: You can view the previous files on the app.
– Device: You can view the files of the current device.
Note: The photos or videos may not show in Device. Please pull down to refresh the page.
4. Tap to select a file, and tap Download to export the file to your local phone albums.

Note
- Go to Me → About → User Manual on the app to see more detailed operations.
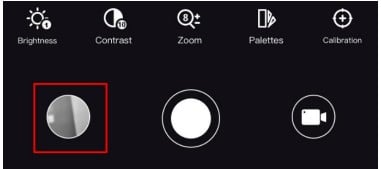
- You can also access device albums by tapping bottom left icon in the live view interface.
- The exporting operation may vary due to app updates. Please take the actual app version for reference.
Export Files via PC
Before You Start
- Turn off hotspot function.
- Turn on the device after connecting it to your PC, and keep the device on for 10 to 15 seconds before other operations.
- Remove batteries from the device before connecting to your PC, or it may cause device damage.
Steps
- Connect the device and PC with cable.
Note: Make sure the device is turned on when connecting the cable. - Open computer disk and select the disk of device. Go to the DCIM folder and find the folder named after the capture year and month. For example, if you capture a picture or record a video on June 2021, go to DCIM → 202106 to find the picture or video.
- Select and copy the files to PC.
- Disconnect the device from your PC.
Note
● The device displays images when you connect it to PC. But functions such as recording,
capturing and hotspot are disabled.
● When you connect the device to PC for the first time, it installs the drive program
automatically.
Adjust Date
Steps
- Hold to show the main menu.
- Go to General Settings, and select
 .
. - Press to enter the configuration interface.
- Press to select the year, month, or day to be synchronized, and press or to change the number, then press again to finish the setting.
- Hold to save settings and exit.
Adjust Time
Steps
- Hold to show the main menu.
- Go to General Settings, and select
 .
. - Press to enter the configuration interface.
- Press to select the hour, minute, second to be synchronized, and press or to change the number, then press again to finish the setting.
- Hold to save settings and exit.
Set Language
You can select the device language in this function.
Steps
- Hold to show the main menu.
- Go to General Settings, and select
 .
. - Press to enter the language configuration interface.
- Press or to select the language as required, and press to confirm.
- Hold to save settings and exit.
Set Unit
You can switch the unit for distance measurement.
Steps
- Hold to show the main menu.
- Go to General Settings, and select
 .
. - Press or to select the unit. Yard and m (meter) are selectable.
- Hold to save settings and exit.
View Device Information
Steps
- Hold to show the main menu.
- Go to General Settings, and select
 .
. - Press or to select , and press . You can view the device information such as version, and serial No.
Restore Device
Steps
- Hold to show the main menu.
- Go to General Settings, and select
 .
. - Press to restore the device to defaults according to the prompt.
Frequently Asked Questions
Why is the monitor off?
Check whether the device is off-battery. Check the monitor after charging the device for 5 minutes.
The image is not clear, how to adjust it?
Adjust the diopter adjustment knob until the image is clear. Refer to section Adjust Diopter.
Capturing or recording fails. What’s the problem?
Check the following items.
- Whether the device is connected to your PC. Capturing or recording is disabled in this status.
- Whether the storage space is full.
- Whether the device is low-battery.
Why the PC cannot identify the device?
Check the following items.
- Whether the device is connected to your PC with supplied USB cable.
- If you use other USB cables, make sure the cable length is no longer than 1 m.
Safety Instruction
These instructions are intended to ensure that user can use the product correctly to avoid danger or property loss.
Laws and Regulations
- Use of the product must be in strict compliance with the local electrical safety regulations.
Symbol Conventions
The symbols that may be found in this document are defined as follows.
| Symbol | Description |
 Danger Danger | Indicates a hazardous situation which, if not avoided, will or could result in death or serious injury. |
| Caution | Indicates a potentially hazardous situation which, if not avoided, could result in equipment damage, data loss, performance degradation, or unexpected results. |
 Note Note | Provides additional information to emphasize or supplement important points of the main text. |
Transportation
- Keep the device in original or similar packaging while transporting it.
- Keep all wrappers after unpacking them for future use. In case of any failure occurred, you need to return the device to the factory with the original wrapper. Transportation without the original wrapper may result in damage on the device and the company shall not take any responsibilities.
- DO NOT drop the product or subject it to physical shock. Keep the device away from magnetic interference.
Power Supply
- The input voltage for the device should meet the Limited Power Source (5 VDC, 2 A) according to the IEC61010-1 or IEC62368 standard. Please refer to actual products and technical specifications for detailed information.
- Use the power adapter provided by qualified manufacturer. Refer to the product specification for detailed power requirements.
- Make sure the plug is properly connected to the power socket.
- DO NOT connect multiple devices to one power adapter, to avoid over-heating or fire hazards caused by overload.
Battery
- Improper use or replacement of the battery may result in explosion hazard. Replace with the same or equivalent type only.
- Use the battery provided by qualified manufacturer. Refer to the product specification for detailed battery requirements.
- The device supports removable li-ion battery. The charging limited voltage of the battery is 4.2V. The Battery capacity is 3.6 V/4.4 Ah (15.84 Wh).
- Batteries of improper size cannot be installed, and may cause abnormal shutdown.
- The battery cannot be charged with external power source directly.
- Confirm there is no flammable material within 2 m of the charger during charging.
- DO NOT place the battery near heating or fire source. Avoid direct sunlight.
- DO NOT place the battery in the reach of children.
Maintenance
- If the product does not work properly, please contact your dealer or the nearest service center. We shall not assume any responsibility for problems caused by unauthorized repair or maintenance.
- Wipe the device gently with a clean cloth and a small quantity of ethanol, if necessary.
- If the equipment is used in a manner not specified by the manufacturer, the protection provided by the device may be impaired.
- It is recommended to reboot the device every 2 hours when using it to ensure the device performance.
Using Environment
- Make sure the running environment meets the requirement of the device. The operating temperature shall be -30 °C to 55 °C (-22 °F to 131 °F), and the operating humidity shall be from 5% to 95%.
- DO NOT expose the device to high electromagnetic radiation or dusty environments.
- DO NOT aim the lens at the sun or any other bright light.
- Place the device in a dry and well-ventilated environment.
- When any laser equipment is in use, make sure that the device lens is not exposed to the laser beam, or it may burn out.
Emergency
- If smoke, odor, or noise arises from the device, immediately turn off the power, unplug the power cable, and contact the service center.
Manufacture Address
Room 313, Unit B, Building 2, 399 Danfeng Road, Xixing Subdistrict, Binjiang District, Hangzhou,
Zhejiang 310052, China
Hangzhou Microimage Software Co., Ltd.
COMPLIANCE NOTICE: The thermal series products might be subject to export controls in various countries or regions, including without limitation, the United States, European Union, United Kingdom and/or other member countries of the Wassenaar Arrangement. Please consult your professional legal or compliance expert or local government authorities for any necessary export license requirements if you intend to transfer, export, re-export the thermal series products between different countries.
Legal Information
LEGAL DISCLAIMER
TO THE MAXIMUM EXTENT PERMITTED BY APPLICABLE LAW, THIS MANUAL AND THE PRODUCT DESCRIBED, WITH ITS HARDWARE, SOFTWARE AND FIRMWARE, ARE PROVIDED “AS IS” AND “WITH ALL FAULTS AND ERRORS”. HIKMICRO MAKES NO WARRANTIES, EXPRESS OR IMPLIED, INCLUDING WITHOUT LIMITATION, MERCHANTABILITY, SATISFACTORY QUALITY, OR FITNESS FOR A PARTICULAR PURPOSE. THE USE OF THE PRODUCT BY YOU IS AT YOUR OWN RISK. IN NO EVENT WILL HIKMICRO BE LIABLE TO YOU FOR ANY SPECIAL, CONSEQUENTIAL, INCIDENTAL, OR INDIRECT DAMAGES, INCLUDING, AMONG OTHERS, DAMAGES FOR LOSS OF BUSINESS PROFITS, BUSINESS INTERRUPTION, OR LOSS OF DATA, CORRUPTION OF SYSTEMS, OR LOSS OF DOCUMENTATION, WHETHER BASED ON BREACH OF CONTRACT, TORT (INCLUDING NEGLIGENCE), PRODUCT LIABILITY, OR OTHERWISE, IN CONNECTION WITH THE USE OF THE PRODUCT, EVEN IF HIKMICRO HAS BEEN ADVISED OF THE POSSIBILITY OF SUCH DAMAGES OR LOSS. YOU ACKNOWLEDGE THAT THE NATURE OF THE INTERNET PROVIDES FOR INHERENT SECURITY RISKS, AND HIKMICRO SHALL NOT TAKE ANY RESPONSIBILITIES FOR ABNORMAL OPERATION, PRIVACY LEAKAGE OR OTHER DAMAGES RESULTING FROM CYBER-ATTACK, HACKER ATTACK, VIRUS INFECTION, OR OTHER INTERNET SECURITY RISKS; HOWEVER, HIKMICRO WILL PROVIDE TIMELY TECHNICAL SUPPORT IF REQUIRED. YOU AGREE TO USE THIS PRODUCT IN COMPLIANCE WITH ALL APPLICABLE LAWS, AND YOU ARE SOLELY RESPONSIBLE FOR ENSURING THAT YOUR USE CONFORMS TO THE APPLICABLE LAW. ESPECIALLY, YOU ARE RESPONSIBLE, FOR USING THIS PRODUCT IN A MANNER THAT DOES NOT INFRINGE ON THE RIGHTS OF THIRD PARTIES, INCLUDING WITHOUT LIMITATION, RIGHTS OF PUBLICITY, INTELLECTUAL PROPERTY RIGHTS, OR DATA PROTECTION AND OTHER PRIVACY RIGHTS. YOU SHALL NOT USE THIS PRODUCT FOR ILLEGAL HUNTING ANIMALS, INVASION OF PRIVACY OR ANY OTHER PURPOSE WHICH IS ILLEGAL OR DETRIMENTAL TO THE PUBLIC INTEREST. YOU SHALL NOT USE THIS PRODUCT FOR ANY PROHIBITED END-USES, INCLUDING THE DEVELOPMENT OR PRODUCTION OF WEAPONS OF MASS DESTRUCTION, THE DEVELOPMENT OR PRODUCTION OF CHEMICAL OR BIOLOGICAL WEAPONS, ANY ACTIVITIES IN THE CONTEXT RELATED TO ANY NUCLEAR EXPLOSIVE OR UNSAFE NUCLEAR FUEL-CYCLE, OR IN SUPPORT OF HUMAN RIGHTS ABUSES.
PLEASE FOLLOW ALL THE PROHIBITIONS AND EXCEPTIONAL CAVEATS OF ALL APPLICABLE LAWS AND REGULATIONS, IN PARTICULAR, THE LOCAL FIREARMS AND/OR HUNTING LAWS AND REGULATIONS. PLEASE ALWAYS CHECK NATIONAL PROVISIONS AND REGULATIONS BEFORE PURCHASE OR USE OF THIS PRODUCT. PLEASE NOTE THAT YOU MAY HAVE TO APPLY FOR PERMITS, CERTIFICATES, AND/OR LICENSES BEFORE ANY PURCHASING, SELLING, MARKETING AND/OR USING OF THE PRODUCT.HIKMICRO SHALL NOT BE LIABLE FOR ANY SUCH ILLEGAL OR IMPROPER PURCHASING, SELLING, MARKETING, AND END USES AND ANY SPECIAL, CONSEQUENTIAL,INCIDENTAL, OR INDIRECT DAMAGES ARISING THEREOF. IN THE EVENT OF ANY CONFLICTS BETWEEN THIS MANUAL AND THE APPLICABLE LAW, THE LATTER PREVAILS.
Regulatory Information

This product and – if applicable – the supplied accessories too are marked with “CE” and comply therefore with the applicable harmonized European standards listed under the Directive 2014/30/EU (EMCD), Directive 2014/35/EU (LVD), Directive 2011/65/EU (RoHS), Directive 2014/53/EU.
This product and – if applicable – the supplied accessories too are marked with “UKCA” and comply therefore with the following directives: Radio Equipment Regulations 2017, Electromagnetic Compatibility Regulations 2016, Electrical Equipment (Safety) Regulations 2016, the Restriction of the Use of Certain Hazardous Substances in Electrical and Electronic Equipment Regulations 2012.
Frequency Bands and Power (for CE/UKCA)
The frequency bands and modes and the nominal limits of transmitted power (radiated and/or conducted) applicable to this radio device are the following: Wi-Fi 2.4 GHz (2.4 GHz to 2.4835 GHz), 20 dBm.

For the device without a supplied battery, use the battery provided by a qualified manufacturer. Refer to the product specification for detailed battery requirements
For the device without a supplied power adapter, use the power adapter provided by a qualified manufacturer. Refer to the product specification for detailed power requirements.
Directive 2012/19/EU (WEEE Directive): Products marked with this symbol cannot be disposed of as unsorted municipal waste in the European Union. For proper recycling, return this product to your local supplier upon the purchase of equivalent new equipment, or dispose of it at designated collection points.
For more information see: www.recyclethis.info.
According to the Waste Electrical and Electronic Equipment Regulations 2013: Products marked with this symbol cannot be disposed of as unsorted municipal waste in the United Kingdom. For proper recycling, return this product to your local supplier upon the purchase of equivalent new equipment, or dispose of it at designated collection points. For more information see: www.recyclethis.info.
Directive 2006/66/EC and its amendment 2013/56/EU (Battery Directive): This product contains a battery that cannot be disposed of as unsorted municipal waste in the European Union. See the product documentation for specific battery information. The battery is marked with this symbol, which may include lettering to indicate cadmium (Cd), lead (Pb), or mercury (Hg). For proper recycling, return the battery to your supplier or to a designated collection point. For more information see: www.recyclethis.info.
According to the Batteries and Accumulators (Placing on the Market) Regulations 2008 and the Waste Batteries and Accumulators Regulations 2009: This product contains a battery that cannot be disposed of as unsorted municipal waste in the United Kingdom. See the product documentation for specific battery information. The battery is marked with this symbol, which may include lettering to indicate cadmium (Cd), lead (Pb), or mercury (Hg). For proper recycling, return the battery to your supplier or to a designated collection point. For more information see: www.recyclethis.info.
Industry Canada ICES-003 Compliance
This device meets the CAN ICES-003 (B)/NMB-003 (B) standards requirements.
This device complies with Industry Canada licence-exempt RSS standard(s). Operation is subject to the following two conditions:
(1) this device may not cause interference, and
(2) this device must accept any interference, including interference that may cause undesired operation of the device.
This equipment complies with IC RSS-102 radiation exposure limits set forth for an uncontrolled environment