
Dear customer, we are delighted that you have chosen our RANGEGUIDE 2800 and would like to thank you for placing your trust in us.
The RANGEGUIDE 2800 is a pair of very powerful binoculars with a laser rangefinder, and is designed for hunters, archers, sports marksmen as well as
ornithologists.
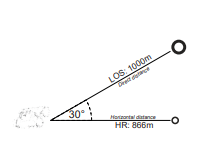
The high-quality display shows you distance as LOS (Line of Sight = direct distance to the target) as well as horizontal distance (HR=horizontal Range), together with other useful information (such as angle and temperature).
The adjustable units for the display of distances (meter or yard) and temperatures (Celsius or Fahrenheit) allows the displayed values to be adapted to your country. The display has 9 brightness settings so it can be adjusted suit the level of ambient light.
We are always striving to provide all the support you need to enjoy many unforgettable moments.
Identification of components

These images are for orientation only.
The product may differ from the illustration.
Security Information

Please read these safety instructions carefully and follow them while using the product.
Under no circumstances should you use your binoculars or other optical equipment to look into the sun or bright or laser-based light sources. This can lead to irreparable damage to the eye,
since the optics act as a magnifying glass.
Keep your binoculars out of the reach of children. Also keep all attachments out of the reach of children. In particular, small parts (danger of swallowing) and the carrying strap (danger of strangling) must be stored safely and carefully.
Please do not touch the metallic surfaces when the product has been heated by the sun or is cold as a result of exposure to cold atmospheres.
After use, always use the protective covers supplied to avoid damage that may be caused by the magnifying glass effect when exposed to sunlight.
Overview of functions and features
Binoculars with 8–1600 m rangefinder, up to 2800 m for highly reflective targets.
• Display of direct distance and horizontal distance
• Single measurement and scan modes
• Angle display
• Temperature display
• Bright OLED display with 9 adjustable brightness levels
• Robust magnesium casing
• HD-class optics through use of ED lenses and multiple coatings
• Adjustable eyecups with several locking positions
• Nitrogen-filled to prevent fogging when exposed to temperature changes
The product uses an invisible laser beam for measurement and measures the time the laser beam takes to reach the object and back.
Laser measurement depends on climatic and environmental conditions, as well as the color, surface texture, size and shape of the target to be measured.
Favorable conditions for range measurements are: Clear visibility, low brightness (twilight), bright object color, perpendicular angle and a homogeneous structure.
Range measurement is limited in conditions of haze/fog, high brightness (sun), dark object color, sharp angle or inhomogeneous structure (e.g. bush).
Attaching the carrying strap
It is possible to attach the protective eyepiece cap to the carrying strap.

Securing the lens cap
The lens cap can be secured to the strap connector with the retaining cord.
Open the fastener and thread the upper part of the retaining cord through the lanyard connection, then secure the lens cap with the lower part of the cord.
Adjusting the eyecups
The rotating eyecups have three locking positions for different applications. The detents allow the distance between the eye and the eyepiece lens to be adjusted. Thus, the distance viewing distance can be ergonomically adjusted according to personal preference. A distinction is made between use with and without glasses.
Use without glasses
When using without glasses, extend the eyecups as far as they will go by turning them counterclockwise.

Use with glasses
If you wear glasses while using the binoculars, retract the eyecups as far as they will go by turning them clockwise.

Adjusting the correct interpupillary distance
The binoculars have a mechanism to adjust the interpupillary distance. The interpupillary distance is the distance between the two pupils. The correct interpupillary distance is achieved by folding the binoculars around the
central pivot of the two halves. The interpupillary distance is correct when you see a circular image with both eyes open.

Inserting the battery
Open the battery compartment by turning the battery cover to the left (counterclockwise) (e.g. with a 2-cent coin) and insert the CR2 battery with the + pole first. See also the markings on the rubber lining. Close the battery
compartment completely by turning it clockwise. Please use only one CR 2 batter.

Battery warning
The CR2 battery is designed for approx. 4000 individual measurements at 20 degrees Celsius. If the charge on the battery falls below 20% of its maximum capacity, the battery symbol will flash 3 times when the instrument is switched on. You can continue to use the device and should replace the battery at the next opportunity.
Setting the Diopter compensation for the target marker/reticle
Switch on the target marker using the measurement button and keep the button pressed. To adjust the focus of the target marker and the display, turn the right diopter compensation control (for the target marker) to the left (-) or right (+).
Then use the central focus knob to carefully focus on the image of the object in the right binocular tube. Use the left diopter compensation control to focus the image in the left binocular tube on the same object as before. You can read off the set values on the (+) or (-) scale on the back of the binoculars.
Distance measurement

The distance measurement mode is switched on by pressing the measurement button once and remains in standby for 15 seconds.
Press the measurement button again within 15 seconds to start the measurement. The distance is displayed. To preserve battery life, the instrument switches off automatically after 15 seconds of inactivity.
Single measurement
With the RANGEGUIDE 2800 switched on, use the target marker to aim at the object to be measured and press the measurement button briefly. The direct distance is displayed in the first line for 15 seconds. The device then
switches off automatically.

If the reflection from the object is not sufficient for the measurement, the following display appears:
_ _ _ _ _ M/Y
Simply restart the measurement with a new target.
Continuous measurement / scan mode
To switch on the scan mode, press and hold the measurement button . As long as you keep the button pressed, the device will continuously measure the distance to the target object and display the respective distance to different objects.
If you release the measurement button , the current measured value will be displayed for a further 15 seconds as for the single measurement. The device then automatically switches to standby mode and then switches off after 15 seconds.
The direct distance, horizontal distance and angle display are updated up to 4 times per second.
Overview of displayed information

The red OLED target marker always lights up when active.
The first line of the display always shows the direct distance in meters (M) or yards (Y).
You can choose whether the second line of the output displays the measured values for the horizontal distance (in meters or yards), the angle (in + / – degrees) or the temperature (in degrees Celsius or degrees Fahrenheit).
Basic display functions (Brightness, Meter/Yard, °C/°F, BEST/LAST)
To change the basic display options, switch the instrument on by pressing the measurement button and briefly (< 2 sec) press the menu button within the standby time of 15 seconds.
The brightness display will then flash LEV 4. You can increase the brightness with the measurement button continuously up to level 9 and then again from 1 to 9. Confirm the brightness adjustment with the Menu button and proceed to the Meter / Yard selection.
Now the unit M or Y to be selected will flash. Select either M or Y using the measurement button . Confirm by pressing the menu button to proceed to the temperature selection.
Now the unit °C or °F to be selected will flash instead. Press the measurement button to advance and select either °C or °F. Confirm by pressing the menu button .
Finally, you will reach the BEST/LAST target selection. Again, the BEST or LAST setting to be selected will flash. Please use the measurement button to select the appropriate setting and confirm using the menu button.
Once you have completed these 4 options, you have configured your RANGEGUIDE 2800. Adjustments should then only be made to the brightness in the basic settings. However, you can change the 4 options selected here at any time by following the procedure described above again. For details on the settings, see the following pages.
Display brightness setting

The RANGEGUIDE 2800 has 9 brightness levels for use at ambient light levels from dusk (e.g. level 1, 2, 3) to bright sunshine (level 7, 8 or 9). The default setting is level 4 (LEV 4).
Switch on the instrument using the measurement button and select the display brightness suitable for the conditions. Level 1 (darkest level) is ideal for extreme twilight and may not be visible during the day. Simply use the measurement button to select a brighter setting that is easy for you to read.
Distance Unit setting

The RANGEGUIDE 2800 is designed for worldwide use. Therefore, you can choose for the direct distance and horizontal distance measurements to be displayed in either meters (M) or yards(Y).
Temperature unit setting

In addition to the direct distance in line 1, the temperature in line 2 can also be displayed in degrees Celsius or degrees Fahrenheit.
Target selection behavior setting
The RANGEGUIDE 2800 offers two operating modes: BEST for the strongest target (best target) and LAST for the furthest target (last target).
The BEST mode is the default and displays the object with the strongest signal. This mode is recommended for most applications. The LAST mode displays the furthest distance when scanning different objects. This mode is useful for detecting and measuring a specific target behind a group of objects such as bushes or trees. (Here, the most distant signal is preferred and stronger, closer signals are suppressed).
Changing the display mode
In addition to the 4 basic settings (selection menu via Pressing the menu button < 2 seconds) the RANGEGUIDE 2800 also offers 4 different display modes.
LOS ONLY (direct distance measurement)

This display provides the clearest possible field of view.
(The display is in line 1)
LOS ANGLE

Direct distance measurement in line 1.
Angle display in line 2.
LOS HR

Direct distance measurement in line 1.
Horizontal distance measurement in line 2.
LOS TEMP

Direct distance measurement in line 1.
Temperature display in line 2
Direct distance / horizontal distance / angle
Selecting the display mode
Switch on the instrument by pressing the measurement button . In standby mode (within 15 seconds, target is lit), press the menu button for > 2 seconds to enter the display selection menu.
LOS ONLY flashes (after 20 seconds the device automatically saves the setting and returns to the standby mode).
While LOS ONLY or one of the 3 other display modes is flashing, you can use the measurement button to go to the next selection and select one of the 4 operating modes.
The setting is saved by pressing the menu button . If you do not confirm the setting by pressing the menu button , the last setting selected is automatically saved after 20 seconds of inactivity.
Technical Data
| 10×50 | ||
| Magnification | 10x | |
| Objective lens diameter | (mm) | 50 |
| Exit pupil | (mm) | 5 |
| Field of view | (m/100m) | 110 |
| Field of view in (Deg) | 6.2 | |
| Diopter adjustment | (dpt.) | +/-5 |
| Close focus | (m) | 4 |
| Viewing distance | (mm) | 17 |
| Interpupillary distance | (mm) | 58-75 |
| Nitrogen filling | ||
| Laser class (Eye Safe) | 1 | |
| Waterproof | ||
| Length/Width/Height | (mm) | 160/120**/58 |
| Casing | Magnesium | |
| Weight | (g) | ca. 1000 |
| Number of measurements using one CR2 battery (3V) |
ca. 1000 | |
| Battery monitoring | (at 20%) | |
| *Maximum measureable distance (high target reflectivity) |
(m) | up to 2.800 |
| *Typical measurement range |
(m) | 10-1.600 |
| Measurement accuracy up to 1000 m |
(m) | +/- 1 |
| Measurement accuracy 1000 – 3000 m |
(m) | +/- 2 |
| Distance unit of measurement |
Meter / Yard | |
| Mode / Display | Single measurement Scan mode Direct distance Horizontal distance Angle measurement Temperature (C/F) |
|
| Display | OLED | |
| Brightness levels | 9 |
*The range is strongly dependent on the weather conditions (e.g. clear visibility or fog) and on the size and reflectivity of the target object.
**Width at 64 mm interpupillary distance
Accessories
| Carrying bag (Hardcase) with carrying strap | 10×50 |
| Neoprene Carrying strap | * |
| Cleaning Cloth | * |
| Objective lens cap | * |
| CR2 Battery | * |
| Instruction Manual | * |
Storage
After use, store the RANGEGUIDE 2800 in a dry and wellventilated place.
If you are using your product in an environment with high humidity, store it in an airtight container with a moisture absorbent to reduce the risk of fungal growth.
Care, cleaning and maintenance
The optics can be cleaned with an optical cleaning cloth. Always keep optical surfaces clean and remove dirt, fingerprints or water stains to ensure lasting performance.
To clean the optical surfaces, lightly breathe on them; then use the optical cleaning cloth to clean the dirt from the lens surfaces.
Please note that coarse dirt particles should be removed either by blowing them off or with a clean hairbrush; otherwise you may scratch the surface of the lenses.
All external mechanical parts and the rubber reinforcements can be cleaned with a soft, clean and slightly damp cleaning cloth.
Please do not use the optical cleaning cloth to clean the external components and rubber reinforcements.
Replacement parts supply
If you require replacement parts or accessories for your RANGEGUIDE 2800, please contact a specialist dealer or GPO GmbH & Co. KG. DEUTSCHLAND.
Additional safety instructions regarding lasers & battery handling
The product uses an invisible laser beam. Please note
the following:
• Do not press the distance measurement button while
looking into the device.
• Do not aim at the eyes.
• Do not aim the laser at people.
• Do not look into the laser with other optical devices such as magnifiers or binoculars.
• Unless you want make a measurement, remove your finger from the measurement button to avoid unintentional measurement.
• Keep the device out of the reach of children
Do not disassemble, modify, or attempt to repair the device. Laser beams can be hazardous to your health.
CR2 Lithium Battery Safety Instructions
Install the battery with the correct polarity (+/-).
• Do not attempt to charge a CR2 battery.
• Do not throw the battery into water or fire.
• Do not disassemble the battery.
• Dispose of the battery in accordance with local regulations.
WARNING
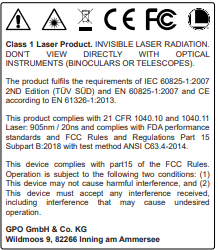
This product has been tested and conforms to the following standards.
Disposal of waste electrical and electronic equipment (WEEE)
This equipment contains electrical and/or electronic components and should not be disposed of with normal household waste. Instead, it should be disposed of in the
appropriate municipal recycling center. There is no charge to you for this. If the device contains replaceable (rechargeable) batteries, these must first be removed and,
if necessary, disposed of in accordance with the applicable regulations (see also the instructions in the instruction manual for this product).
For more information, contact your municipal authority, your local waste disposal company, or the store where you purchased this product.
GPO GmbH and Co. KG WEEE-Reg.-Nr.: DE 45735335.
Repairs
All repairs should be carried out only by authorized workshops or by GPO GmbH & Co. KG.
Improper use and opening of the products by unauthorized workshops will void the warranty.
WARRANTY
Your RANGEGUIDE 2800 comes with a warranty of twoyears from the date of purchase against defects in materials and workmanship. If the product is defective, we
will repair or replace it at our discretion.
This warranty does not cover damage caused by improper use or handling or by any repair carried out other than by a GPO GmbH & Co authorized service center.
The following items or information must be enclosed with returns under this warranty:
• Name, address and current phone number.
• A description of the defect.
• A copy of your proof of purchase showing the date.
Please send only the product to be repaired. Do not include any other accessories (batteries, cases, straps, etc.).
The product should be well packaged in a sturdy shipping box to avoid damage in transit and sent to the following address:
GPO GmbH & Co. KG
Wildmoos 9
82266 Inning Am Ammersee
Germany
+49 (0) 8143-99 20 870 20
[email protected]