Products:
Thank you for purchasing your new Bushnell® Prime™ Laser Rangefi nder. This manual will help you optimize your viewing experience by explaining how to utilize the rangefi nder’s features and how to care for it. Read the instructions carefully before using your rangefi nder.
INTRODUCTION
Your Bushnell® Prime™ is an ultra compact, premium laser rangefi nder with the latest Digital Technology, providing precise range readings from 5-1700 yards/5-1554 meters (for model LE1700SBL. Max range is 1300 y/1189 m for model LE1300SBL). Measuring 1.3 x 4.4 x 2.9 inches, the 6-ounce Prime™ delivers extremely fast target acquisition, with +/- 1 yard accuracy to the maximum range. The Prime laser rangefi nder features Bushnell’s patented ARC™ (Angle Range Compensation with Ballistics Intelligence), a new Ranging Engine for faster, more consistent response and readings, a Vivid LCD display with higher light transmission and water resistant (IPX4) construction along with EXO™ Barrier Coating on the optics.
*Note: You will get both longer and shorter maximum distances depending on the refl ective properties of the particular target and the environmental conditions at the time the distance of an object is being measured. The color, surface fi nish, size and shape of the target all affect refl ectivity and range. The brighter the color, the longer the range. White is highly refl ective, for example, and allows longer ranges than the color black, which is the least refl ective color. A shiny fi nish provides more range than a dull one. A small target is more diffi cult to range than a larger target. The angle to the target also has an effect. Shooting to a target at a 90 degree angle (where the target surface is perpendicular to the fl ight path of the emitted energy pulses) provides good range while a steep angle on the other hand, provides limited ranging. In addition, lighting conditions (e.g. the amount of sunlight) will affect the ranging capabilities of the unit. The less light (e.g. overcast skies) the farther the unit’s maximum range will be. Conversely, very sunny days will decrease the unit’s maximum range.
HOW OUR DIGITAL TECHNOLOGY WORKS
The Primelaser rangefi nder emits invisible, eye safe, infrared energy pulses. The Prime rangefi nder’s microprocessor results in instantaneous and accurate readings every time. Sophisticated digital technology instantaneously calculates distances by measuring the time it takes for each pulse to travel from the rangefi nder, to the target, and back.

BATTERY ACTIVATION / BATTERY LIFE INDICATOR
Before first use: Remove the battery compartment cover by lifting the battery cover tab and then rotating the cover counter-clockwise. Remove and discard the red plastic disc covering the positive battery terminal, then replace the battery cover.
NOTE: It is recommended that the CR2 3-volt lithium battery be replaced at least once every 12 months. Insert it into the compartment negative end first.


BASIC OPERATION
• While looking through the laser rangefinder, press and release the Power/Fire button to activate the display.
• If the display appears blurry, rotate the rubber eyecup/diopter adjustment in either direction until the display is sharp for your vision.
• Placing the aiming circle (located in the center of the display) on a target at least 5-6 yards away, depress and hold the Fire button down until the range reading is displayed below the aiming circle.
• Once a range has been acquired, you can release the Fire button. The four “crosshairs” just outside the aiming circle will go out, indicating the laser is no longer being transmitted. The display will remain on and display the last distance measurement for about 15 seconds, until the display automatically switches off to extend battery life.
• You can press the Fire button again at any time to check the range to a new target. To re-fire, press the button again.
• To scan the laser across an area and get continuously updated range readings, simply continue to hold the Fire button down and sweep the rangefinder over multiple targets. The crosshairs outside the aiming circle will flash to indicate scan operation.
DISPLAY INDICATORS/ICONS
The Prime rangefinder’s display incorporates the following illuminated indicators:
Angle Range Compensation Modes
• Bow Mode (1)
• Rifle Mode (2)
Battery Level Indicator (3)
Aiming Circle/Dot (4)
Active/Scan Laser Indicator (5)
Targeting Modes
• BullsEye Mode (6)
• Brush Mode (7)
Primary Numeric Display displays Line-of-sight Distance (8)
Holdover / Bullet-drop Horizontal Distance indicators for Rifle Mode
• MOA holdover units selected (9)
• MIL (holdover units selected (10)
• IN (inch) or CM (centimeter) holdover units selected (11)
• SD = Variable Sight-In Distance (12)
Range (Distance) Units (13): Y=Yards, M=Meters
Secondary Numeric Display (14) (Holdover / bullet drop for Rifle mode, True Horizontal Distance for Bow Mode)
SETUP Mode (15)
Angle Indicator (16)

TARGETING MODES
The Prime laser rangefinder can be operated in one of three available targeting modes, with Standard mode as the default. To select a different targeting mode, press the Mode button briefly until the desired indicator (BullsEye or Brush) appears. To return to Standard mode, press Mode one more time after the Brush mode indicator is seen.
The targeting modes are:
- Standard Mode with Automatic SCAN (LCD Indicator – none) This setting allows most targets to be ranged, up to 1700 or 1300 yards (depending on model). Used for moderately reflective targets that are typical of most distancing situations. The minimum distance in the standard mode is 5 yards. To use the Automatic SCAN feature, simply press and hold the Fire button, then move the rangefinder from object to object while keeping the Fire button depressed. Automatic SCAN will allow the range to be continuously updated as multiple objects are targeted. Crosshair lines flash while scanning.
- BullsEye™ Mode with Automatic SCAN (LCD Indicator (6) – ) This advanced mode allows easy acquisition of small targets and game without inadvertently getting distances to background targets that have stronger signal strength. When more than one object has been acquired, only the distance of the closest object will be displayed. With the rangefinder in BullsEye mode, align the aiming circle onto the object (i.e. deer) that you want distance to. Next, press and hold the Fire button and move the Aiming Circle slowly over the deer. If the laser beam recognized more than one object (deer and background trees), the distance of the closer object (deer) will be displayed in the LCD.
- Brush™ Mode with Automatic SCAN (LCD Indicator (7) – ): This advanced mode allows objects such as brush and tree branches to be ignored so that distance only to background objects are displayed. When more than one object has been acquired, only the distance of the farthest object will be displayed in the LCD. With the rangefinder in Brush mode, align the aiming circle onto the object that you want distance to. Next, press and hold the Fire button and move the Aiming Circle slowly over the object. If the laser beam recognized more than one object (closeup tree branch and a deer in the background), distance of the further object (deer) will be displayed.
TIP: While pressing the Fire button, you can move the device slowly from object to object and intentionally force the laser to hit multiple objects to ensure that you are only displaying the furthest of the objects recognized by the laser. Once the device has shut off, the unit will always default back to the last targeting mode used.
ANGLE RANGE COMPENSATION (ARC)
The Prime Laser Rangefinder with ARC™ was especially designed with hunters in mind. Your Primerangefinder features a built-in inclinometer that solves a problem hunters have been faced with for years. Bow and rifle hunters have struggled with extreme uphill and downhill angles because of how these angles alter true horizontal distance to your target. The ARC™ solution: an integrated inclinometer provides angular data to a processor chip when targeting objects that are either uphill or downhill. This data is then combined with internal algorithmic formulas. The user selectable ARC modes allow you to adjust the performance parameters of the unit to suit your specific situation and environment. Along with the standard “line of sight” distance, when the Fire button is released, the Primelaser rangefinder’s display can also show you the true horizontal distance (in Bow Mode-see the ARC MODES section) or bullet drop/holdover (in Rifle Mode) near the bottom of the display (14), along with the angle of incline in degrees, indicated at the left side of the display (16). For example, a bowhunter in a tree stand may be aiming at a deer that is downhill at a -52o relative to his position. The line of sight distance is 32 yards, but he is likely to “overshoot” the target based on that. The THD distance (compensated for the angle) reads 23 yards. That is the distance the hunter should base his shot upon.
USING THE SETUP MENU
The Setup Menu is used to select various options, such as the ARC Mode (Bow, Rifle, etc.) and distance units (Yards or Meters) of your preference. To enter the Setup Menu after powering on the unit, hold the Mode button down until “SETUP” appears in the display (15). You will remain in the Setup Menu until you change or confirm all possible settings (varies depending on selected ARC mode), and “SETUP” is no longer displayed. Once in the Setup Menu, press the Mode button to scroll through or toggle the available items. Press the Fire button to confirm and save the currently displayed option/setting. The first item you can select from the Setup Menu is the ARC Mode. Press the Mode button until the icon for the mode you want is displayed, then press the Fire button to confirm and continue selecting other related options/settings. More details regarding the various ARC modes are provided in the next section.
ARC (ANGLE RANGE COMPENSATION) MODES
• REGULAR Mode ( ): This mode does not provide any degree of elevation or compensated distance information (no secondary display (14), only the line of sight distance (8). Select this mode (press Fire button with “rE6” displayed while in Setup) for general purpose use, or when not using the rangefinder for bow or rifle hunting applications. After confirming your selection of Regular mode, the only other item in the Setup Menu is the Unit of Measure option (13). Pressing the Mode button will toggle the Units from the default “Y” (yards) to “M” (meters). Press the Fire button to confirm your selection (leave units set to Yards, or change it to Meters) and exit the Setup Menu, returning to normal operation.
• BOW Mode ( ): Calculates and displays the degree of incline, and the resulting true horizontal distance in yards or meters, in addition to the line of sight distance. Select this mode (press Fire button with the bow icon (1) displayed while in Setup) for bowhunting, or other use if you don’t need bullet drop/holdover information. After confirming your selection of Bow mode, the only other item in the Setup Menu is the Unit of Measure option (13). Pressing the Mode button will toggle the Units from the default “Y” (yards) to “M” (meters). Press the Fire button to confirm your selection (leave units set to Yards, or change it to metric) and exit the Setup Menu, returning to normal operation.
Bow Mode Example
The true horizontal distance is shown near the bottom of the display (14) , alternating with the tilt angle in degrees. For example, a bowhunter in a tree stand may be aiming at a deer that is downhill at a -52o angle relative to his position. The line of sight distance is 32 yards, but he is likely to “overshoot” the target based on that. The THD distance (compensated for the angle) reads 23 yards. That is the distance the hunter should base his shot upon. If he was to shoot as if the target was 32 yards away, he would shoot over the top of the deer because of the severe angle.
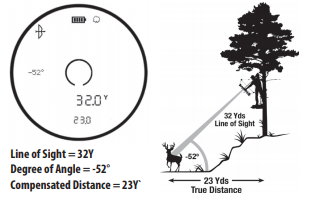
If in BOW mode, the line of sight distance will display in the primary numeric display and the inclination and horizontal distance will display in the secondary numeric displays. Bushnell® determined through extensive testing and interviews with high-profile bow hunting experts that multiple bow ballistic groups were not necessary. Bow-hunters want to know true horizontal distance because that is how they practice shooting, and once they confidently know that, they can make any necessary adjustments. Giving the bow-hunter anything else other than horizontal distance creates additional confusion and uncertainty.
Many people mistakenly believe that uphill shots perform differently from downhill shots because of gravity. However, it is not due to gravity, but more of an aberration of the sighting system used on bows. The sighting pin on a bow resides several inches above the mechanical axis of the arrow. For example, when one is aiming 23 degrees up an incline, the arrow is at a different angle.
• RIFLE Mode(s) ( ): Calculates and displays the amount of bullet drop, at the target in inches, centimeters, Mils, or MOA. The amount of bullet drop is determined by the line of sight distance to the target, degree of elevation, along with the specific ballistic characteristics of the caliber and ammunition load. When you range your target, the line of sight, degree of elevation, and bullet-drop/holdover in inches, centimeters, Mils, or MOA will be displayed from 100 to 800 yards/meters with a maximum inclination of +/- 70°.
One of eight ballistic groups (identified as A, B, C, D, E, F, G, and H) for center fire rifles and two ballistic groups (Identified as I and J) for Black Powder / Muzzleloaders can be selected by the user, with each formula representing a given combination of caliber and loads. The ballistic groups are selected by the user via the Setup menu. After entering the Setup menu (by holding the Mode button for a few seconds), briefly press the Mode button until you see the blinking Rifle icon (2), along with the letter for the ballistic group for your preferred ammo (or load).
Knowing Which Ballistic Group To Select
Bushnell engineers have researched currently available ballistic data and grouped many of the most popular calibers and loads into eight ballistic groups (A,B,C,D,E,F,G,H). Once you know what caliber and load you are shooting simply look through the chart to determine which one of the eight ballistic groups match with your particular load and caliber. For Muzzleloaders, we have worked with PowerBelt Bullets to incorporate ballistic data into two ballistic groups (I and J). Below are a few of the most popular caliber/load combinations. A complete list of approximately 2000 caliber and load combinations can be found on Bushnell’s website (www.bushnell.com).
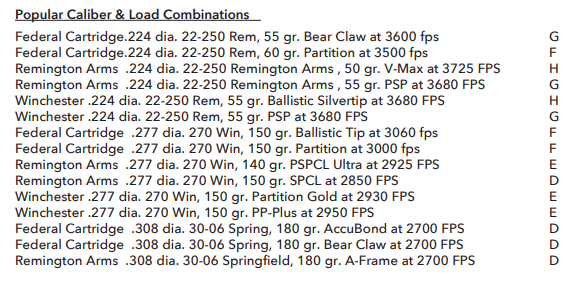

After you have determined which ballistic group corresponds to your caliber and load, select this ballistic group letter along with Rifle mode. The internal formula will determine amount of bullet drop/holdover in inches or centimeters based upon distance, angle, and ballistics of your caliber and load.
What if my caliber/load is not listed?
While we have taken great care to include as many calibers and brand names in our ballistics tables, new loads are always being developed. In addition, some shooters load their own ammunition with unique ballistic characteristics. If you cannot find your load in our ballistic tables, you can still use the bullet drop feature of the laser rangefinder. As above, sight in your rifle at 100 yds. Then shoot the rifle, without adjusting the riflescope, at 300 yds. Measure the bullet drop from the point of aim. Using this drop, select the ballistic group from below. If you will be shooting longer distances then you may want to check the bullet drop at 500 yds. Because there is enormous variation in rifle barrels, chambers, and hand loads, you should thoroughly test the ballistic setting before actual hunting. You may need to move up or down one group depending upon your tests.
After you have confirmed your selection of Rifle mode with the ballistic group you need (by pressing the Fire button while it appears in the display), the next item is the Unit of Measure option (13). Pressing the Mode button will toggle the Units from the default “Y” (yards) to “M” (meters). Press the Fire button to confirm your selection (leave units set to Yards, or change it to metric).
Next, you will see “SD”, meaning Sight-In Distance. Briefly pressing the Mode button will cycle through a choice of 100, 150, 200 or 300 yards. Press the Fire button to confirm and save the setting when your preferred sight-in distance is displayed.
Lastly, you will have a choice of formats for the bullet drop/holdover data that will appear in the secondary numeric display (14): IN (inches)*, ML (Mils) or MOA (moa). Briefly press the Mode switch to cycle through the 3 options, pressing the Fire button to confirm and save the setting when your preferred bullet drop format is displayed. *Note: if the unit of measure was set to Meters (M), the bullet drop will be calculated and displayed in CM (centimeters) rather than inches.
Rifle Mode Example
Line of sight is 376 yards, angle is -33 degrees, and the bullet-drop/holdover is 28 inches. ARC not only takes into account ballistic data based off your caliber and load from distances of 100-800 yards, but also compensates for any uphill and downhill angles which also affect bullet-drop.

The Prime rangefinder’s state-of-the-art digital technology allows the hunter or shooter to know precisely where to hold for an effective shot. This information should be treated as a helpful guide or tool and in no way should it ever replace practice and familiarity with your rifle, cartridge and load. We encourage practice shooting at different ranges so you know how your rifle, cartridge and load will perform under various conditions. Always know what is behind your bullet; if you don’t know, don’t take the shot.
• Reticle Select: The last option available in the Setup menu allows you to select your preference of reticle type for the center of the display (for all modes). Press the Mode button to cycle through Circle, Dot, and Circle with Dot (this is the default) options. Press the Fire button to confirm the selection of the reticle you prefer, and exit the Setup menu.
CLEANING AND GENERAL CARE
The lenses of your Bushnell Prime laser rangefinder are fully multi-coated for highest light transmission. As with any multicoated optics, special care must be taken in cleaning the lenses. Follow these tips for proper lens cleaning:
• Blow away any dust or debris on the lens (or use a soft lens brush).
• To remove dirt or finger prints, clean with the supplied micro-fiber cloth rubbing in a circular motion. Use of a coarse cloth or unnecessary rubbing may scratch the lens surface and eventually cause permanent damage. The included washable microfiber cleaning cloth is ideal for the routine cleaning of your optics. Simply breathe lightly on the lens to provide a slight amount of moisture, then gently rub the lens with the microfiber cloth.
• For a more thorough cleaning, photographic lens tissue and photographic-type lens cleaning fluid or isopropyl alcohol may be used. Always apply the fluid to the cleaning cloth – never directly on the lens.
All exterior lens surfaces have our new EXO Barrier™ coating (in addition to full multi-coating). EXO Barrier, quite simply, is the best protective lens coating technology Bushnell has ever developed. Added at the end of the coating process, EXO Barrier molecularly bonds to the lens and fills the microscopic pores in the glass. The result is an ultra-slick coating that repels water, oil, fog, dust and debris – rain, snow, fingerprints and dirt will not stick. EXO Barrier is built to last: the bonded coating will not fade with the passage of time or normal wear and tear. The rangefinder is manufactured and tested to withstand water exposure up to IPX4 standards. It is water resistant, but should not be submerged.
TROUBLESHOOTING
Never disassemble your laser rangefinder. Irreparable damage can result from unauthorized service attempts, which also void the warranty.
If unit does not turn on, display does not illuminate:
• Depress Power/Fire button.
• Check and if necessary, replace battery. If unit does not respond to button presses, replace the battery with a good quality CR2 3-volt Lithium battery.
If unit powers down (display goes blank when attempting to power the laser):
• The battery is either weak or low quality. Replace the battery with a new 3 -volt lithium battery (CR2).
If target range cannot be obtained:
• Make sure the display is illuminated.
• Make sure that the Power/Fire button is being depressed.
• Make sure that nothing, such as your hand or finger, is blocking the lenses at the front of the rangefinder that emit and receive the laser pulses.
• Make sure unit is held steady while depressing Power/Fire button.
NOTE: The last range reading does not need to be cleared before ranging another target. Simply aim at the new target using the display reticle, depress the power button and hold until new range reading is displayed.
Tehnical Specification
| SKU | Mag x. Obj Lens Diam. | Max Range (Y/M) (Reflcetive Target) | Range to Tree (Y/M) | Range to deer (Y/M) | Ranging Accuracy | Optical Coatings | Lenght (in/mm) | Weight (oz/g) |
| LP1700SBL | 6x 24mm | 1,700/1,554 | 1,000/914 | 700/640 | +/- 1 yd | Fully-multi coated, EXO Barrier | 4,3/109 | 6,0/170 |
| LP1300SBL | 6x 24mm | 1,300/1,189 | 800/732 | 600/549 | +/- 1 yd | Fully-multi coated, EXO Barrier | 4,3/109 | 6,0/170 |
