
Products:
- Bushnell AR Optics 3-9×40
- Bushnell AR Optics 3-12×40
- Bushnell AR Optics 1-8×24
- Bushnell AR Optics 1-4×24
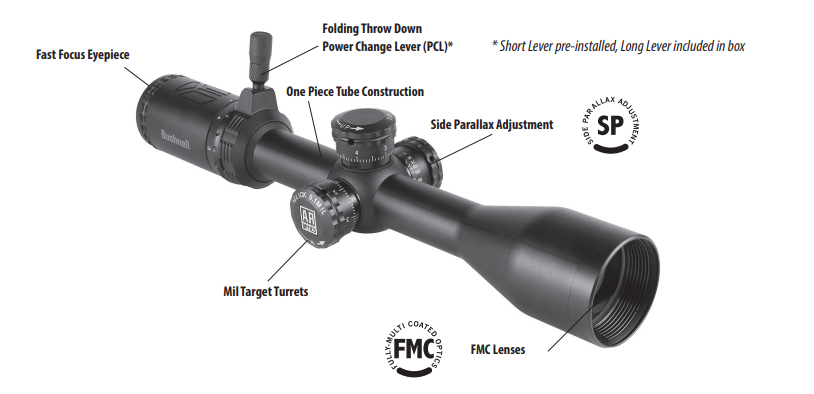
Congratulations on your choice of a Bushnell® AR Optics riflescope. It is a precision instrument constructed of the finest materials and assembled by highly skilled craftsmen for a lifetime of trouble-free use under the most demanding conditions. This booklet will help you achieve optimum performance by explaining how to use its various features and how to care for it. Read the instructions carefully before mounting and using your scope. The accompanying photographs are guides to the nomenclature and location of the riflescope parts mentioned throughout this text.
EYEPIECE FOCUSING
This adjusts the focus so that the reticle (cross hairs) appears sharp to your eyes. All Bushnell riflescopes are focused at the factory for 20/20 or corrected vision. If the reticle appears sharp, no adjustment is needed. If the reticle appears unsharp, adjust as follows.
FAST FOCUS EYEPIECE DESIGN
The eyepiece is designed to provide a precise fast focus. Simply look at a distant object for several seconds without using your scope. Then, shift your vision quickly, looking though the scope at a plain background. Turn the fast-focus eyepiece clockwise or counter clockwise until the reticle pattern is sharp and clear.
MOUNTING
To achieve the best accuracy from your rifle, your Bushnell scope must be mounted properly. (We strongly recommend that those unfamiliar with proper procedures have the scope mounted by a qualified gunsmith).
Should you decide to mount it yourself:
1. Use a high-quality mount with bases designed to fit your particular rifle. The scope should be mounted as low as possible without touching either the barrel or the receiver.
2. Carefully follow the instructions packed with the scope mounts you have selected.
3. Before tightening the mount rings, look through the scope in your normal shooting position. Adjust the scope (either forward or backward) until you find the furthest point forward (to insure maximum eye relief) that allows you to see a full field of view.
WARNING: IF THE SCOPE IS NOT MOUNTED FAR ENOUGH FORWARD, ITS REARWARD MOTION MAY INJURE THE SHOOTER WHEN THE RIFLE RECOILS.
4. Rotate the scope in the rings until the reticle pattern is perpendicular to the bore and the elevation adjustment is on top.
5. Tighten the mounting screws as tight as possible.
BORE SIGHTING
Bore sighting is a preliminary procedure to achieve proper alignment of the scope with the rifle bore. It is best done using a Bushnell Bore Sighter. If a bore sighter is not available, it can be done as follows: Remove the bolt and sight through the gun barrel at a 100 yard target. Then sight through the scope and bring the crosshairs to the same point on the target. Certain mounts have integral windage adjustments and, when bore sighting, these should be used instead of the scope’s internal adjustments. If major elevation adjustments are needed, they should be accomplished by shimming the mount base.
ZEROING
Final sighting-in of your rifle should be done with live ammunition, based on your expected shooting distance. Please refer to the page in this manual covering your model’s reticle for specific calibration reference/zero distance information.Three-shot groups are useful for averaging the point of impact.
ELEVATION AND WINDAGE ADJUSTMENT
Your Bushnell® AR Optics scope features finger-adjustable, audible-click elevation and windage adjustments. Grasp the top of the target turret and turn it in the appropriate direction (elevation turret has marked “Up” direction, windage turret has marked “R” for right direction). Each “click” or increment on the Adjustment Scale Ring will change the bullet impact .1 Mil. The adjustment value for your scope is clearly marked
on its target turrets.
REALIGNING THE TARGET TURRETS
This step is optional. After sighting in your scope, you may want to realign the zero marks on the removable turret cap with the index dots.
1. Using the included Allen wrench, loosen the three hex screws around the perimeter of the target turret. Pull the turret straight up and off.
2. Realign the zero marking on the target turret with the index mark on your scope. Seat the target turret cap. Take care not to disturb your zero by “losing” a click or two when loosening the screw.
3. Replace and retighten the three hex screws around the perimeter of the turret cap.
VARIABLE POWER ADJUSTMENTS
To change magnification, fold the Throw Down PCL (Power Change Lever) out and use it to rotate the Power Selector Ring so the desired number on the power scale is aligned with the Index Dot (3x in the photos). For even more rapid power change operation, unscrew the top half of the PCL (short lever) and replace it with the longer PCL (included). Lower powers provide a wider field of view. Higher powers should be reserved for precise long-range shots. The Drop Zone BDC reticle is calibrated for use at the highest power setting on your scope.

USING THE SIDE PARALLAX FOCUS CONTROL (SELECT MODELS ONLY)
You may have noticed that placing your eye at different positions behind the scope’s eyepiece causes the reticle crosshairs to appear to move around to different points on your target. This is called “parallax error” (target and reticle are not in the same focal plane), and it becomes more noticeable (and more of a problem) at shorter distances and/or when the scope is set to higher powers. Your riflescope may provide an adjustment for parallax compensation, which works by moving an optical element until the target (based on its distance) appears in the same plane of focus as the reticle. Instead of the typical parallax compensation design which adjusts the objective lens at the front of the scope (“adjustable objective” or “AO”), your scope uses an movable lens back near the reticle, so the adjustment can be more easily made with a “side focus” knob placed next to the windage and elevation adjustments. Just line up the estimated distance to your target with the index dot on the body of the scope, and you will eliminate the aiming errors caused by parallax. After setting the side focus, you can double check by moving your head around from side to side behind the eyepiece-the point of aim should not shift if the side focus is correctly set. An alternative method is to look through the scope and turn the Side focus knob until the target, at whatever range, is sharply focused.
USING YOUR AR OPTICS RETICLE
The AR Optics Drop Zone BDC (Bullet Drop Compensation) reticles give shooters a series of aiming points that correspond to different types of ammunition. These aiming points allow shooters to expand their effective range. Bushnell would like to stress that these tools are only as good as the time spent practicing with them. Nothing can replace quality firing range time and becoming comfortable shooting at each of the prescribed yardages, while noting bullet placement. It is imperative for the shooter to spend time at the range, gaining familiarity with the reticle and how it works with their firearm and bullet load. Ballistic performance can vary depending upon a number of factors, including barrel length, powder type, bullet type, and numerous weather/atmosphere related variables.
THE DROP ZONE-22 RIMFIRE BALLISTIC RETICLE
Scopes with the DROP ZONE-22 Rim re Reticle are designed to be sighted-in at 50 yds, with aiming points every 25 yds, out to 125 yds. This reticle is calibrated for use with .22 Long Rifl e high velocity ammunition. The scope must also be set to the highest magnifi cation for the reticle’s ballistic feature to function properly. In the case of the 2-7x 32mm model, the power change ring must be set at 7x for the ballistic function to work correctly.
How To Use the Reticle:
1. Sight in at 50 yds on any magnifi cation setting.
2. Determine distance to target. For the best accuracy in determining distance, utilize a Bushnell Laser Rangefi nder (Scout DX 1000 ARC, G-Force DX ARC).
3. Set the scope’s magnifi cation to 7x (7 power).
4. Place the appropriate aiming point on the desired target. If the target was determined to be at 115 yds, hold directly between the 100 yd aiming point and the 125 yd aiming point.
Calibration Reference
Zero Distance: 50 Yards
Ammo Load: 40 gr .22 LR, Muzzle Velocity 1240 FPS

THE DROP ZONE-223 BALLISTIC RETICLE
Scopes equipped with the DROP ZONE-223 ballistic reticle are designed to be sighted-in at 100 yds, and provide aiming points in the shape of a dot every 100 yds, out to 500 yds. In addition, the top of the reticle’s bottom post (located below the 4th dot) represents a holdover point for a shot at 600 yds. The Drop Zone 223 reticle is calibrated for use with 223 Rem/5.56 ammunition loaded with 55-62 grain bullets. All AR Optics scopes must also be turned to the highest magnifi cation setting in order for the reticle’s ballistic feature to function properly. In the case of the 3-9x 40mm model, the power change ring must be set at
9 power for the ballistic function to work correctly. The 4.5-18x 40mm models should be set at 18 power for proper ballistic reticle performance.
How To Use the Reticle:
1. Sight in at 100 yds on any magnifi cation setting.
2. Determine distance to target. For the best accuracy in determining distance, utilize a Bushnell Laser Rangefi nder (Scout DX 1000 ARC, G-Force DX ARC).
3. Set the scope’s magnifi cation to its highest power.
4. Place the appropriate aiming point on the desired target. If the target was determined to be at 350 yds, hold directly between the 300 yd aiming point and the 400 yd aiming point.

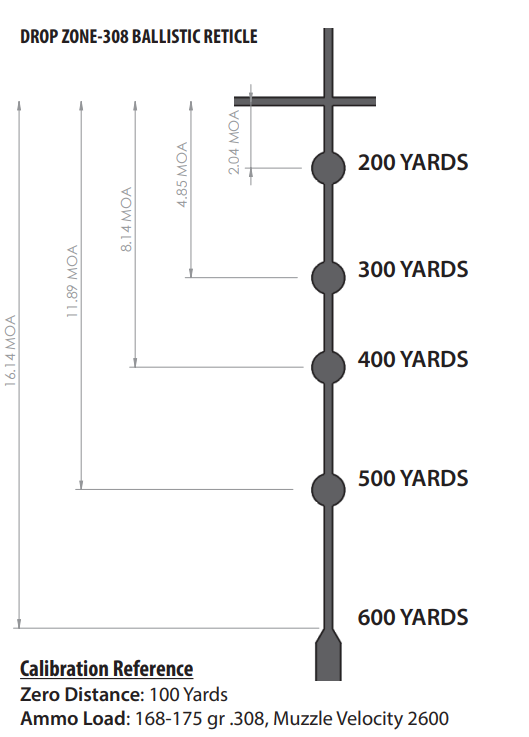
THE DROP ZONE-308 BALLISTIC RETICLE
Scopes equipped with the DROP ZONE-308 ballistic reticle are designed to be sighted-in at 100 yds, and provide aiming points in the shape of a dot every 100 yds, out to 500 yds. In addition, the top of the reticle’s bottom post (located below the 4th dot) represents a holdover point for a shot at 600 yds. The Drop Zone 308 reticle is calibrated for use with 308 Win/7.62 ammunition loaded with 168-175 grain bullets. All AR Optics scopes must also be turned to the highest magnifi cation setting in order for the reticle’s ballistic feature to function properly. In the case of the 3-9x 40mm model, the power change ring must be set at 9 power for the ballistic function to work correctly. The 4.5-18x 40mm models should be set at 18 power for proper ballistic reticle performance.
How To Use the Reticle:
1. Sight in at 100 yds on any magnifi cation setting.
2. Determine distance to target. For the best accuracy in determining distance, utilize a Bushnell Laser Rangefi nder (Scout DX 1000 ARC, G-Force DX ARC).
3. Set the scope’s magnifi cation to its highest power.
4. Place the appropriate aiming point on the desired target. If the target was determined to be at 350 yds, hold directly between the 300 yd aiming point and the 400 yd aiming point.
THE BTR-1 TACTICAL RETICLE
Scopes with the BTR-1 (Bushnell Tactical Reticle) are designed to be sighted-in at 100 yds, with aiming points every 100 yds, out to 500 yds. This reticle is calibrated for use with 223 Rem/5.56 ammunition loaded with 55-62 grain bullets. Because the BTR-1 reticle is located in the fi rst focal plane (FFP) position within the scope, it will be accurate for all targets at any magnifi cation setting.
How To Use the Reticle:
1. Sight in at 100 yds on any magnifi cation setting.
2. Determine distance to target. For the best accuracy in determining distance, utilize a Bushnell Laser Rangefi nder (Scout DX 1000 ARC, G-Force DX ARC).
3. Place the appropriate aiming point on the desired target. If the target was determined to be at 350 yds, hold directly between the 300 yd aiming point and the 400 yd aiming point.

THE DROP ZONE 6.5 CREEDMOOR RETICLE
The Drop Zone 6.5 reticle is ideal for use with 6.5 Creedmoor centerfi re cartridges in target shooting and hunting applications. After you initially sight in and establish a point of aim at 100 yards using the center of the reticle, bullet drop compensation will be indicated by the dots below it for distances from 200 to 500 yards (the bottom of the crosshair can be used for 600 yards). The image on the right provides a detailed look at the Drop Zone 6.5 reticle.

Calibration Reference
Zero Distance: 100 Yards
Ammo Load: 140 gr Open Tip Match 6.5 Creedmoor, Muzzle Velocity 2700 FPS
THE BTR-300 BLACKOUT RETICLE
The BTR-300 reticle can be used with both subsonic and supersonic velocity loads. When using subsonic loads, it should be sighted-in at 50 yards, and provides aiming points at 100 and 125 yards. For supersonic loads, sight in your scope at 100 yards. The two lower dots can be used for 235 and 300 yard distances.

MODELS WITH ILLUMINATED RETICLES
The “third knob” along with elevation and windage turrets is a brightness adjustment control (not a side focus knob), numbered from 0 to 11 (Fig. 1). To increase the brightness, set the control to a higher number (opposite the white index dot). To turn off the illumiination and when storing the scope, set the dial to “0”. To replace the battery, remove the cap on the brightness adjustment control knob using a coin, and insert a CR2032 battery with the “+” mark facing up (Fig. 2).
MAINTENANCE
Your Bushnell AR Optics riflescope, though amazingly tough, is a precision instrument that deserves reasonably cautious care.
1. When cleaning the lenses, first blow away any dry dirt and dust, or use a soft lens brush. Fingerprints and lubricants can be wiped off with lens tissue, or a soft clean cloth, moistened with lens cleaning fluid. Use lens covers whenever it is convenient.
WARNING: UNNECESSARY RUBBING OR USE OF A COARSE CLOTH MAY CAUSE PERMANENT DAMAGE TO LENS COATINGS.
2. All moving parts of the scope are permanently lubricated. Do not try to lubricate them.
3. No maintenance is needed on the scope’s outer surface, except to occasionally wipe off dirt or fingerprints with a soft cloth.
STORAGE
Avoid storing the scope in hot places, such as the passenger compartment of a vehicle on a hot day. The high temperature could adversely affect the lubricants and sealants. A vehicle’s trunk, a gun cabinet or a closet is preferable. Never leave the scope where direct sunlight can enter either the objective or the eyepiece lens. Damage may result from the concentration (burning glass effect) of the sun’s rays.