Products:
The RT-6™ Riflescope line is a proven favorite in the competitive shooting world. They’re built for consistent, repeatable, mid-distance shooting with features and comfort that add up to an extreme value in versatility. Your RT-6 includes the following features:
• Competition-Ready Reticle. The Ballistic AR™ is perfect for 3-Gun, close quarter battle, or big-game stalking with trajectory compensation out to 600 yards.
• High Performance Glass. Provides excellent brightness and clarity with lasting durability – exactly what you expect from Burris.
• Double Spring-Tension Internal Assemblies. RT-6s are built to withstand the harshest shooting environments and hold zero round after round.
• Index-Matched, Hi-Lume® MultiCoated Lenses. Enhanced low-light performance and glare elimination, making more shots possible and increasing your success rate.
How To Use Your RT-6 Riflescope
Eyepiece Focusing
The eyepiece can be focused so that the reticle appears sharp and black to any individual’s eye. Follow this procedure to quickly adjust the focus:
1. Point the scope at the sky or a plain wall and take a quick glance through the scope. If the reticle appears sharp and black, no further adjustment is necessary.
2. If the reticle does not appear sharp and black, take quick glances through the scope while rotating the eyepiece focus ring until the reticle pattern is sharp and black.
NOTE: Do not look through the eyepiece as you turn the focus ring. Your eyes will adjust to the out-of-focus condition.
Windage / Elevation Adjustment Low-Profile Adjustment Knobs
The low profile adjustment knobs on RT-6 riflescopes feature a finger adjustment for both windage and elevation. The dials are calibrated so that 1 click = .5 MOA. Once you have
successfully zeroed your scope, you can reset the zero on your dials with these simple steps:
1. With turret caps removed, grip or press down on knob top firmly to keep knob from turning.
2. Put pen or other small object into the small hole located on the dial, 180° from “0”.
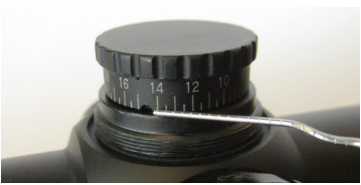
3. Keeping firm grip on the knob, use the pen to turn the dial back to zero, lining up the number zero with the white indicator dot. Only the numbered dial should move – do not allow the entire knob to move or else you will alter your windage and elevation zero settings.
NOTE: You do not have to reset the zero on your dials for your scope to function properly. Doing so can give you peace of mind that your zero is set, plus you can easily confirm if it has
moved at any time, but this step is optional.
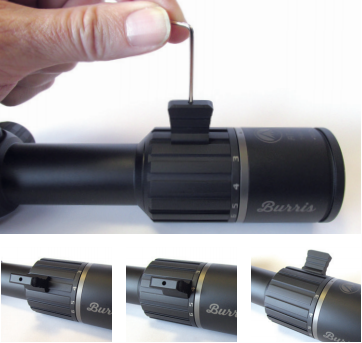
Throw Lever Adjustment
The RT-6 comes with an integrated throw lever on the magnification ring. Featuring a versatile design, it can be positioned at any point on the ring.
To change the position of the lever, loosen the locking screw using the supplied wrench. Slide the lever off the current rib and select your preferred position and then slide the lever over the
new rib. Position the lever anywhere along the rib. Tighten the mounting screw on the top of the lever using the supplied hex wrench. Make sure that it is snug, but do not over-tighten.
Illuminated Reticle Adjustment
Rotary Illumination
Illumination makes it easier to see the reticle in low light conditions. The intensity of the illumination is controlled by a rotary illumination switch located on the left side of the adjustment turret. The switch has 10 intensity levels and an “Off” position in between each level. The reticle is powered by a 3-volt lithium cell battery #CR2032. To install a new battery, simply unscrew the
battery cap on the rotary switch and install the new battery flat side (+) up. It is advisable to remove the battery for long-term storage (over a month).

Care & Maintenance
RT-6 riflescopes are fully waterproof and fogproof. In the event that the lenses are subjected to dust, dirt or mud, follow these steps to clean and protect the lens surface. Failure to remove grit before final cleaning is sure to damage lens coatings. Coarse dirt/debris must be removedfrom the lens surface. The most convenient wayto clean a lens surface is to use a Lens Pen. Position the scope so particles will fall away fromthe lens, and then use the Lens Pen or soft brushto gently whisk away the debris while blowingon the lens to dislodge the particles. For heavydirt, like dried mud, use a spray of clean wateror lens cleaning fluid to remove the dirt.Your RT-6 riflescope will provide reliable performance given reasonable care and treatment. All moving assemblies are permanently lubricated. Only occasional cleaning of the outsideof the scope and the exterior lenses is required. Never disassemble your scope. Disassembly by anyone other than our factory will void the warranty. If you have any other problems with your riflescope, contact Burris Customer Service.
Ballistic AR™ Reticle
*Subtensions shown for High Power Magnification.
The Ballistic AR Reticle is a versatile tactical reticle with milradian measurements and is ideal for achieving long-range accuracy with 5.56 and .223 ammunition. It features an illuminated broken circle with center dot for ultra-fast engagement at short distances. Trajectory compensation is offered out to an impressive 600 yards.


RT-6™ 1-6X24mm SPECIFICATIONS Magnification 1-6
| Magnification | 1-6x |
| Objective End Diameter | 30 mm |
| Clear Objective Diameter | 24 mm |
| Ocular End Diameter | 46 mm |
| Reticle | Ballistic AR™ |
| Illumination | Yes |
| Focal Plane | RFP |
| Main Tube Size | 30 mm |
| Field of View ( Low to high @100yards) | 106-18,5 ft. |
| Eye relief | 3,3-4 in. |
| Exit Pupil ( low to high ) | 11,5-5,2 mm |
| Click Value | 1 / 2 MOA |
| Elevation Adjustment, Total Capability* | 80 MOA |
| Windage Adjustment, Total Capabalitiy* | 80 MOA |
| Length | 10,3 in. |
| Weight | 17,4 oz. |


