The Spitfire AR prism scope
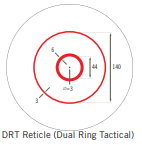
Specifically designed for the AR platform, the Spitfire AR prism scope combines a compact, prism-based design with the intuitive, glass-etched DRT (Dual Ring Tactical) reticle—providing vital speed and accuracy in close-range situations.

Vortex Spitfire AR 1x Prism Scope
Controls and Adjustments
Battery Installation
Remove the battery compartment cover using a coin or screwdriver. Install and orient the AAA battery so the positive (+) side faces inward, then replace the cover. When replacing the cover, be sure it is fully screwed down with the o-ring seal in place.
Illumination Control
To activate illumination, press either Up or Down button. To turn illumination off, press both Up and Down buttons and hold for 3 seconds.
Illumination is available in both red and green colors. To change between colors, momentarily press and release both Up and Down buttons at the same time. Illumination intensity can be adjusted by either tapping Up or Down buttons, or holding button down to automatically cycle through adjustment range. The Spitfire has twelve levels of brightness, with the last two being ultra-low to allow use with NV equipment.

Vortex Spitfire AR 1x Prism Scope
Auto Dim/Auto power off – If brightness is at level 8 or higher and there is no button push for 2 hours, Spitfire will dim to level 6 automatically. If no activity occurs after an additional 12 hours, unit will shut down. Pushing either button will return unit to previous brightness and color setting.
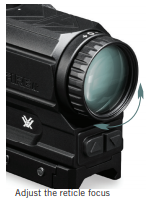
Reticle Focus
The Spitfire prism scope uses a fast focus eyepiece designed to quickly and easily provide a sharply focused reticle.
Vortex Spitfire AR 1x Prism Scope
To adjust the reticle focus:
- Look through the scope at a blank white wall or up at the sky.
- Turn the eyepiece focus dial in or out until the reticle image is as crisp as possible.
Note: Try to make this particular adjustment quickly, as the eye will try to compensate for an out-of-focus reticle.
Once this adjustment is complete, it will not be necessary to re-focus every time you use the scope. However, because your eyesight may change over time, you should re-check this adjustment periodically.
Warning
Looking directly at the sun through a scope, or any optical instrument can cause severe and permanent damage to your eyesight.
Vortex Spitfire AR 1x Prism Scope
Windage and Elevation Adjustments
The Spitfire features adjustments and a reticle scaled in MOA’s— minutes of angle. MOA unit arc scales are used when ranging or adjusting for bullet trajectory.
Each small click will move the point of impact ½ Minute of Angle (MOA). ½ MOA will closely correspond to 1/8 inch at 25 yards, ¼ inch at 50 yards and ½ inch at 100 yards.
To adjust the settings
- Remove the dial covers.
- Turn the adjustment dial in the appropriate direction as indicated by the arrows. Move the dials in the direction you wish the bullet’s point-of-impact to go.
- After sighting in, re-align the zero numbers on the turret dials. See page 8.
Example
At a 50 yard sight-in distance, it will take four clicks of the dial to move the bullet’s point of impact one inch.
Mounting The Spitfire
Orient the Spitfire so the adjustment buttons face the shooter.

Vortex Spitfire AR 1x Prism Scope
- Loosen the base crossbolts and attach the Spitfire to the rail/base, making sure that recoil lugs are solidly seated in the base groove.
- Check that the mount fully engages the base, press the Spitfire down and forward, then tighten the base crossbolts.
Note: To prevent recoil injury, position it so that you have at least four inches of eye relief once the Spitfire scope is attached. Because the Spitfire has generous eye relief, the scope can be mounted further away if desired.
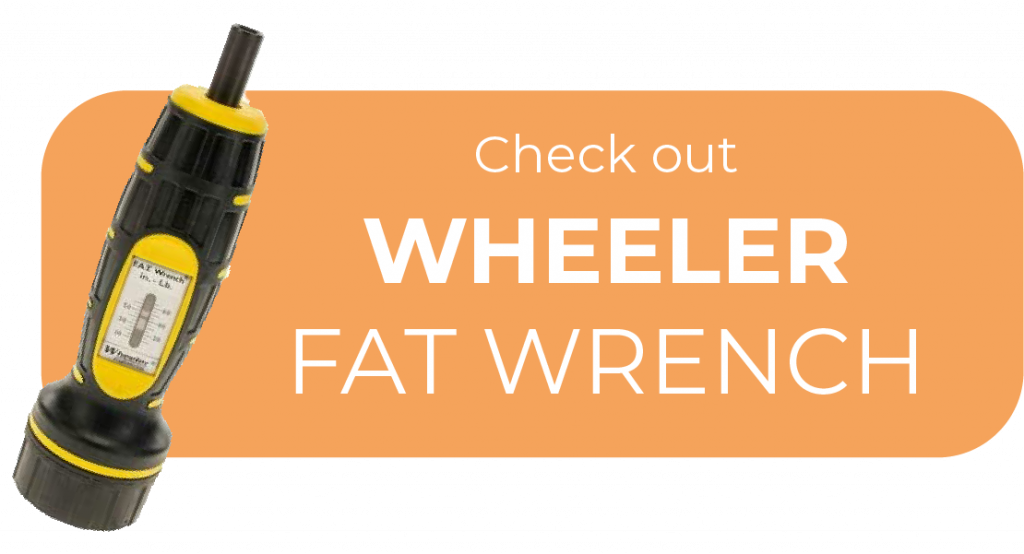
We suggest using a torque driver to properly mount your riflescope
Sighting In
Bore Sighting
After mounting, an initial bore sighting of the Spitfire at short range (25–50 yards) will save time and money at the range. This can be done using a bore sighter according to the manufacturer’s instructions, or by removing the bolt on some rifles and visually sighting through the barrel.
To visually bore sight a rifle:
- Place the rifle solidly on a rest and remove the bolt.
- Sight through the bore and center the target inside the barrel.
- With the bull’s eye centered in the bore, make windage and elevation adjustments until the center dot is aligned over the bull’s eye.

Final Range Sight-In
Final sight-in should be done at the range using the exact ammunition you expect to hunt or shoot with:
- After the Spitfire has been bore sighted, fire a shot or two at your desired zero distance to check that you’re roughly on target. If necessary, adjust the dot to put you near the center of the target (see Windage and Elevation Adjustment on page 6).
- Fire a three-shot group as precisely as possible.
- Using the center of this group as a reference, make any necessary adjustments for windage and elevation correction. Using arrows for reference, adjust dials in the direction you wish the group to move.
- Fire a final three-shot group to confirm proper adjustment. Repeat as necessary.
Indexing Turret Dials
After completing the final sight in:
While holding the elevation turret cap firmly between thumb and forefinger to prevent rotation, use the hex wrench to loosen and remove the central screw on the top of the cap. Be careful to not misplace the o-ring.
Carefully lift the turret cap straight up and off of the turret body.
Re-install the cap, turning so the “0” mark aligns with the reference dot on the scope body.
Reinstall the central screw while holding the turret cap firmly between thumb and forefinger to prevent rotation. Be sure the o-ring is in place.
Repeat the same procedure on the windage turret if desired.
Optional 5.56mm BDC Dial
A 5.56mm BDC turret dial is included with your Spitfire. This dial is marked in yards rather than MOAs, and will provide reasonable accuracy with many popular loads for the AR15 rifle. For reference, the BDC dial very closely matches a 60 grain bullet (.265 G1 BC) @ 3000fps or the M855 62 grain bullet (.307 G1 BC) @ 2850 fps Each numeral on the dial corresponds to hundred yard increments, with the dial spanning a range from 100 to 700 yards. Rifle should be zeroed at 100 yards, and dial installed with the numeral 1 lined up with dot indicator on body of Spitfire (see “Indexing Turret Dials” for additional dial installation instructions). To use BDC turret, simply turn turret counter-clockwise until numeral shown matches the yardage you are shooting at and use the center dot to aim and hit target. After shooting, remember to turn dial back to the 100 yard mark.
Troubleshooting
Please check the following before returning a scope for service:
If the reticle does not illuminate:
- Is the battery dead? Replace.
- Is the battery installed correctly? Be sure the battery is oriented with plus sign facing inward.
- Is the battery cover loose? Be sure cover is snug and contact points are clean.
If bullets are not grouping:
- Be sure the crossbolts are tight. You should not be able to twist or move the Spitfire in any direction. Many times, problems thought to be with the scope are actually mount problems.
Note: For any issues not listed above, please view our online Troubleshooting Guide at www.vortexoptics.com/content/ troubleshooting.
Maintenance
Cleaning
The Spitfire requires very little routine maintenance other than to periodically clean the exterior lenses. The exterior of the scope may be cleaned by wiping with a soft, dry cloth.
When cleaning the lenses, be sure to use products that are specifically designed for use on coated optical lenses such as the VTX Lens Pen and FogFree Cleaning Kits.
- Be sure to blow away any dust or grit on the lenses prior to wiping the surfaces.
- Using your breath, or a very small amount of water or pure alcohol, can help remove stubborn things like dried water spots.
In need of good cleaning tools?

Lubrication
All components are permanently lubricate, so no additional lubricant should be applied.
Note: Do not attempt to disassemble any components of the scope.
Storage
- Keep lens covers closed to protect the lenses when not in use.
- Remove the battery when putting in storage for extended periods.
- Avoid storage in direct sunlight or in any very hot location.
- Storage and use in extreme cold will shorten battery life.
The VIP Warranty
We build optics based on our commitment to your absolute satisfaction. That’s why our products are unconditionally guaranteed and we make this Very Important Promise to you—a Very Important Person.
Rest assured that in the event your Spitfire prism scope becomes damaged or defective, we will repair or replace the optic at no charge to you. Call us at 800-426-0048 for prompt, professional, and friendly service.

2120 West Greenview
Drive Middleton, WI 53562
[email protected]
Note: The VIP Warranty does not cover loss, theft, deliberate damage or cosmetic damage that does not hinder the performance of the product.
This text is a transcription of the file in PDF format.
Product: https://www.optics-trade.eu/en/vortex-spitfire-ar-1x-prism-scope.html


I am having a difficult time zeroing my ortes 1x Spitfire on my A4 platform (has a forward fixed post).
1st time out I had it dialed in on the X. Last couple times out I am all over the paper. Weapon is clean.
My challenge on a 25 yd indoor range is getting the little fixed dot on the target with that front post in the way