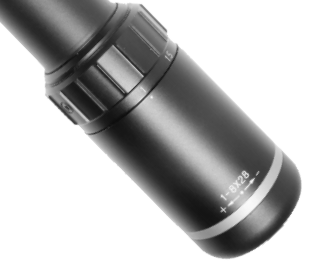
Riton X7 Tactix 1-8×28
THANK YOU FOR CHOOSING RITON OPTICS.
We know that you have many options and we are thankful for
selecting Riton as your optics provider.
As a company founded by Law Enforcement and Military Veterans, we take our commitment to service seriously. We have an unwavering passion for offering high quality optics at the industry’s most competitive prices and matched by incredible service. You will see the difference in everything we do because we are different, and we developed this company to be exactly that so that you, the consumer, get everything you deserve. If you are ever in need of additional information or assistance, please contact us. We are here to continually serve you as a valued partner.
X7 TACTIX 1-8X28
Optic Specifics Developed in conjunction with Charlie Melton, Navy Seal Team Sniper and Trainer, the X7 Tactix 1-8×28 has a First Focal Plane (FFP), illuminated reticle for a true one power magnification similar to a “red dot” type optic, where both eyes
are open for quick target engagement in close-quarters combat. The tactical optic offers a distinct advantage once the magnification is increased, giving the ability to accurately engage targets and range estimate in every conceivable tactical situation.

DETAILED PRODUCT FEATURES:
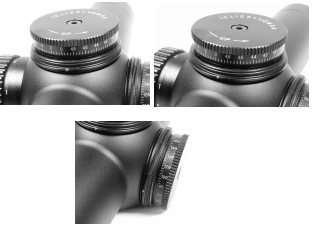
• Advanced Turret System with Zero Reset Turrets
• Aircraft Grade Aluminum with Rugged Design Ready for the
Toughest Environments
• 100% Waterproof, Fog proof and Shockproof (tested up to 1200 G’s)
• 1/2 MOA Fingertip Windage and Elevation Adjustment
• Fast-Focus Eyepiece
• Assembled in EP-Level Clean Room
• Riton Capped Turrets
Technical Specifications
| Magnification: | 1-8 |
| Parallax Adjustment: | Fixed at 100 Yards |
| Tube Diameter: | 34mm |
| Objective Lens Diameter: | 28mm |
| Focal Lens Position: | First Focal Plane |
| Lens Coating: | Fully Multi-Coated, Full Wide Band, Waterproof Coated, Low Light Enhancement |
| Reticle: | CM1 Iluminated Reticle |
| Field of View at 100 yds: | 105.8~13.1’ |
| Material: | 6061-T6 Aircraft Grade Aluminum |
| Weight: | 25oz/709g |
| Lenght: | 10.9”/277mm |
| Eye Relief: | 90mm/3.5” |
| Exit Pupil: | Low 7.5 – High 2.9mm |
| Click Value at 100 yds/mm: | 1/2 MOA |
| Adjustment Range: | 175MOA |
| Mounting Length: | 171mm/6.75” |
| Turret Type: | Capped |
Explanation of Minute of Angle (MOA)
MOA unit of arc measurements are based on degrees and
minutes. There are 360 degrees in a circle and 60 minutes in a
degree for a total of 21,600 minutes (MOA) in a circle. A minute of angle will subtend 1.05 inches at a distance of 100 yards.

| 100 Yards | 200 Yards | 300 Yards | 400 Yards | 500 Yards | |
| 1/2 MOA | .50 IN | 1 IN | 1.50 IN | 2 IN | 2.50 IN |
First Focal Plane (FFP) Reticle
The reticle in your Riton riflescope is first focal plane (FFP) and
is located in front of the image erecting and magnifying lenses.
With the reticle in this position, the reticle is magnified along with the viewing image. The advantage of this type of reticle is the size of the reticle stays the same size in relationship to the size of the target. This allows for all subtentions on the reticle to be the same at any power.
TO CHANGE MAGNIFICATION:
Simply turn the magnification ring to the desired magnification
level. Lower powers offer a wider field of view while higher powers offer a zoomed in focused view.
Reticle Information
The Riton X7 1-8×28 is equipped with the Riton Illuminated CM1
reticle.

Fast Focus Eyepiece
The Riton fast focus eyepiece is designed to quickly and easily
adjust the focus on the rifle-scope’s reticle.
TO ADJUST THE RETICLE FOCUS:
1. Look through the scope on max magnification at a blank white wall or white paper.

2. Turn the eyepiece in or out until the reticle image is as crisp
as possible.
Explanation of Parallax
Parallax describes a situation where the focal plane of the object in the scope is offset from the reticle. If you have parallax, you have an optical illusion that must be corrected. Parallax should not be confused with focus. Parallax compensation changes neither the focus of the reticle nor the focus of the image; it simply moves the planes at which these two objects are in focus so that they share the same plane.
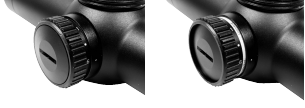
Illumination System
The variable intensity reticle illumination system aids in low light
situations.
TO ACTIVATE THE ILLUMINATION:
1. Rotate the adjustment knob in either direction.
Note – The illumination knob allows for 11 levels of brightness intensity.
TO CHANGE BATTERY:
1. Unscrew the outer cap.
2. Remove the battery.
3. Replace with a new CR2032 battery with positive side out.
4. Re-install the battery cap and be sure to tighten fully.

Mechanical Zero
Your Riton riflescope is pre-set from the factory with the reticle in the center of the adjustment ranges.
TO FIND FACTORY ZERO:
1. Dial turret one direction until it will no longer rotate.
NOTE – Do not force the turret past it’s stopping point.
2. Dial turret opposite direction counting how many MOA it
turns.
3. Divide that total number of MOA in half and dial to that
number for your factory zero.
4. Complete this procedure for both windage and elevation
dials to approximately center the reticle.
Mounting Your Riton Riflescope
Always use high quality rings or mount that match your optic’s
main tube diameter.
TO MOUNT YOUR RITON RIFLESCOPE:
1. Mount the bottom ring halves or mount on the mounting
base of your rifle.

2. Place the riflescope on the bottom ring halves and loosely
install the upper ring halves so that your riflescope is able to
move between rings.
3. Before tightening the scope ring screws, adjust for maximum
eye relief to avoid injury from recoil.
4. Tighten the scope rings per the torque specs of the rings or
mount.
Note – If using Riton scope rings or mount, the recommended torque specs are 45 in/lbs for the base and 18 in/lbs for the top halves of the rings.
Eye Relief and Reticle Alignment
TO SET A PROPER EYE RELIEF AND RETICLE ALIGNMENT:

1. Set the riflescope magnification to the highest setting.
2. Slide the riflescope as far forward as possible in the rings.
3. While looking through the riflescope in a normal shooting
position, slide the riflescope back towards your face, paying attention to the field of view. Just as the full field of view is visible, stop the movement of the riflescope.
4. Without disturbing the front-back placement, rotate the riflescope until the vertical cross-hair exactly matches the vertical axis of the rifle. Use of a reticle leveling tool, a weight hung on a rope, or bubble levels to help with this procedure.
5. After aligning the reticle, tighten and torque the ring
screws down per the manufacturer’s instructions.
Bore Sighting
Bore sighting is a preliminary procedure to achieve proper
alignment of the scope with the rifle’s bore. Initial bore sighting of the riflescope will decrease the amount of time and ammunition you need to use at the range.
This can be done by using a mechanical or laser bore sighter
according to the manufacturer’s instructions or by removing the
bolt and sighting through the barrel on some rifles.
TO BORE SIGHT YOUR RIFLESCOPE:
1. Place the rifle solidly on a rest and remove the bolt.
2. Sight through the bore at a target approximately 50 yards
away.
3. Move the rifle and the rest until the target is visually centered
inside the barrel.
4. With the target centered in the bore, make windage and
elevation adjustments until the reticle cross-hair is also
centered over the target.
Note – If a laser bore sighting or any other similar device inside the bore was used, it must be removed before firing. An obstructed bore can cause serious damage to the gun and possible injury to the shooter.
Zeroing the Scope
IMPORTANT SAFETY CHECKS:
• Always check your weapon and surroundings for safety.
• Follow all weapon manufacturer safety guidelines.
• Always shoot from a solid rest using consistent and proper
form.
• Be sure that your target is level to aid in accurate sight-in
process.
TO ZERO THE SCOPE:
1. Start sight-in process from 25 yards, from solid rest fire
3-shot group, ensuring that you fire at same spot each time.
Use grid lines on target to center and level your cross-hairs.
2. After the first 3-shot group, make adjustments to bring bullet
impact to center of target you’re shooting at. Repeat this
process at 100 yards and you will have accurate 100 yard
zero.
Note – Scope graduations are 1/4 MOA. Scope turrets are marked with direction of bullet impact change. At 100 yards a 1/4 MOA scope adjustment will move bullet impact 1/4 inch in direction adjusted. At 25 yards that same 1/4 MOA adjustment will be 4 times smaller, so 1/4 MOA adjustment at 25 yards will move bullet impact 1/16 of an inch.
Setting The Zero Stop Turrets
By zeroing the rifle at 100 yards, the shooter can calculate how
many clicks of adjustment are needed for different distances or
wind conditions.
TO ZERO RESET YOUR TURRETS AFTER YOUR RIFLE IS
SIGHTED IN:
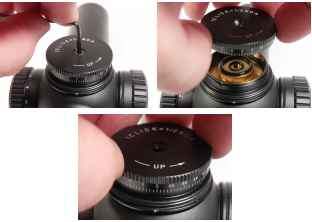
1. Unscrew the turret cap.
2. Remove the screw from center of turret and take off the
turret knob.
3. Put the turret knob back on with zero line aligned with mark
below the turning knob.
4. Tighten the screw to lock it in.
Troubleshooting
Problems thought to be associated with the scope are often actually mount problems. Take time to ensure the mounts are tight to the rifle and that scope is secured and doesn’t twist or move in the rings. Confirm that correct base and rings are being used and in the proper orientation. Be sure to torque rings per manufacturer’s specs.
Keep in mind there are many issues that can cause poor bullet grouping. Always utilize a solid rest and maintain good shooting technique. Have a qualified gunsmith look over your rifle to be sure all things are in working order. See that the action and barrel are properly cleaned. Some rifles and ammunition don’t work well together, try different ammunition and see if accuracy improves.
Riton Warranty
As a part of the Riton Promise we believe in providing you with the best possible service, including the industry’s best warranty. The quality of our products makes this the best warranty you’ll likely never have to use; however, as hunters and outdoorsmen and women, we know that bad things sometimes happen to even the most cautious.
OUR WARRANTY IS SIMPLE:
• No proof of purchase or registration required for your Riton products.
• Lifetime warranty regardless of original purchaser.
• All warranty replacements will receive a brand-new product off the shelf. We will not ever replace the product with a repaired or
refurbished product.
• Replacement product will be shipped within 48 hours of receiving and approving your return.
• Loss, theft and/or deliberately worn and damaged products are not covered. Warranty is VOID if damage results from unauthorized repair or alteration.
1-855-39-RITON
[email protected]
RITONOPTICS.COM


Hi,
When I purchased the X6 TACTICS scope I thought it came with its own mount. Sent an email asking if it is true but did not get any answer. I finally ordered the Riton RT_M Quick Detach Mount 39mm/1in but it did not fit. Tried to find the right one but I couldn’t, not in your manual, not anywhere on the web. Very frustrated
Hi, very sorry to hear you’re having trouble with mounting your scope. Write an email to [email protected] and our team will be glad to recommend you the right mount for your scope.