| SPECIFICATIONS | 79071 | 79076 |
| Lens diameter, mm | 24 | 24 |
| Equivalent IR power, mW | 200 | 200 |
| Range of power adjustment(min/max), mW | 30-200 | 30-200 |
| Wevelength, nm | 805 | 940 |
| Range of beam divergence, degree | 5.7-10 | 5.7-10 |
| Power Supply | 3 (2xAA) | 3 (2xAA) |
| Average opration time with one set of batteries, hour | 2 | 2 |
| Operating temperature | – 20°С …+40°С / -4 °F… +104 °F | |
| Dimensions, mm/inch | 132x45x52 / 5,2×1,8×2 | |
| Weight (without/with batteries) | 140/190 // 4.9 / 6.7 | |
Package contents
- Pulsar-805/940 IR Flashlight
- Carrying case
- Two АА batteries
- Adapter for devices with a 1/4” socket
- Cleaning cloth
- User manual
Description
The high-power IR Flashlights Pulsar-805 and Pulsar-940 are designed to
provide additional infrared (IR) illumination (invisible to the human eye in
Pulsar-940) during observation with night vision devices in very low light
conditions (no moon, heavy cloud etc.), including complete darkness. The IR
Flashlights allow you to:
- increase detection range;
- identify objects more accurately;
- get a more detailed image of the observed object;
- adjust beam from spot to flood;
- smoothly adjust power depending on viewing conditions.
The IR Flashlights are equipped with a standard Weaver mount which allows
you to affix the auxiliary IR to Pulsar devices with a Weaver rail. The Pulsar-805 is suitable for use with analog night vision riflescopes (such as the
Sentinel Gen.1, Sentinel GS, Sentinel G2+, Phantom G2+), and monoculars (e.g. the Challenger series). The Pulsar-940 can be employed with digital riflescopes Digisight N550 and digital monoculars (e.g. units of the Recon series). You can also use them as hand-held units.
Application
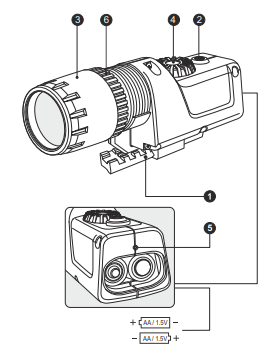
- Remove the IR from the carrying case.
- Turn the knob of the battery cover 90° counterclockwise, remove the
cover and install two AA batteries as indicated (see illustration). Close
the cover and lock. - Attach the IR illuminator to the Weaver rail (1) and tighten the locking
screw. - Switch on the IR Illuminator by pushing the “ON/OFF” button (2), the
red LED indicator (5) lights up. - To adjust the beam from spot to flood, rotate the lens holder (3) until
you get the best image through your night vision riflescope/device. - To adjust the IR power, rotate the controller (4).
- After use switch off the IR by pushing the “ON/OFF” button (2) – the red LED indicator goes out.
Note: If you need to adjust the IR spot position, turn the locking ring (6) 5-10 degrees counter-clockwise. Match the IR spot with the image
viewed through a night vision device by moving the IR lens holder (3)
transversely. Tighten the locking ring (6).
Caution! During operation rings of the radiator become hot, which is normal
and is not a defect .
Care and Maintenance
- The housing of the flashlight can be cleaned with a soft cloth. Do not
use an abrasive cloth/chemical cleaning solutions. Always use
cleaning equipment designed for photographic equipment. Dust can
be removed from the lens with a soft brush. The lens can be cleaned
with any cloth designed for cleaning optical equipment. Do not pour
lens cleaner on the lens itself! - Condensation on the lens may occur when bringing the IR Flashlight in
from the cold. This is normal; condensation should disappear within
one hour.
Warranty
The Manufacturer warrants its products against defects in materials and
workmanship for a period of three years from the moment of purchase or from the manufacturing date if there is no receipt to prove purchase. To avoid any problems, we recommend becoming familiar with the device’s
user manual.
The warranty does not cover any external damage to the device, its casing or
adjustable parts’ movements (i.e. smooth movement or rough movement).
The manufacturer has the right to render the warranty null and void
in the following cases:
- if the device has been modified or tampered with,
- if the device has been dropped or has marks of mechanical or chemical
damage, - if the device has been tampered with by unauthorized repair,
- if the device has been damaged as a result of fire or natural disasters,
- if the device has been damaged as a result of liquids or other
substances getting inside.
In the event of activating the warranty repair service, please contact the
distributor where the device was purchased or contact the national distributor in your country.
Any product returned under this warranty should be packaged in a sturdy,
outsideshipping carton, to prevent damage in transit.
In addition, it must be accompanied with the following items:
- Letter explaining the unit’s problem.
- Copy of the original receipt showing when and where the product was
purchased. - Return Shipping Information, including return address and contact
person.
Please contact our service centre with any questions you might have at
e-mail: [email protected]