Products:
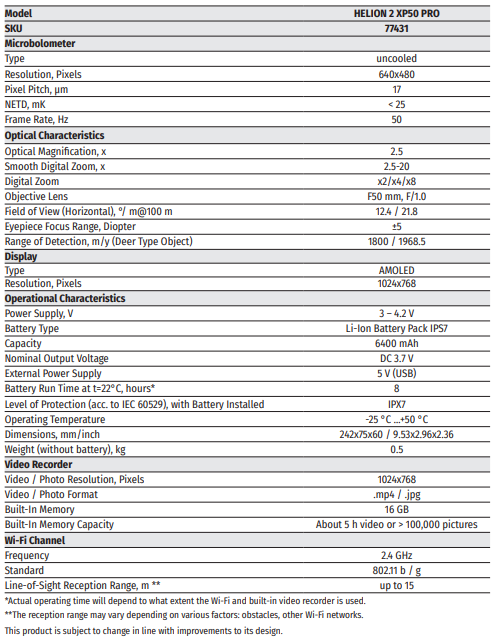
TECHNICAL SPECIFICATIONS
PACKAGE CONTENTS
• Helion 2 Pro thermal imaging scope
• IPS7 Battery Pack
• Battery charger with mains charger
• USB cable
• Carrying case
• Hand strap
• Warranty card
• Quick start guide
• Lens cloth
DESCRIPTION
Helion 2 Pro thermal imaging scopes are based on an IR sensor (uncooled microbolometer). The scopes are designed for the use both in the night-time and during the day in adverse weather conditions (fog, smog, rain) to see through obstacles hindering detection of targets (branches, tallgrass, thick bushes, etc.). Helion 2 Pro thermal imaging scopes do not require an external source of light and are not affected by bright light exposure. Helion 2 Pro thermal imaging scopes are designed for various applications including hunting, observation, security, terrain orientation, search and rescue operations, etc.
DISTINCTIVE FEATURES
• NETD less than 25 mK
• User-friendly interface
• Four operating modes: Forest, Rocks, Identification, User
• Three calibration modes: (Manual, Semi-Automatic, Automatic)
• Eight colour palettes for observation
• Defective pixel repair function
• Image Detail Boost function
• Stadiametric rangefinder
• Display Off function
• Functional and ergonomic design
• All-metal body made of light-alloy metal
• Updatable firmware
• Wide operating temperature range (-25 to +50°C)
VIDEO/AUDIO RECORDING
• Built-in video and sound recorder
• Integration with macOS and Android devices
• Direct YouTube streaming and recording to the Internet using the Stream Vision application
• Wi-Fi remote control and viewing using a smartphone
BATTERY PACK
• Quick release Li-Ion Battery Packs IPS7 / IPS14
• Operating time in Wi-Fi mode up to 16 hours*
• Operates on AA batteries**
• USB charging capability for IPS7 / IPS14
* with IPS14 Battery Pack (purchased separately).
** with a special battery container (purchased separately).
EXTERNAL VIEW AND CONTROLS
1. Lens cover
2. Lens focus ring
3. Battery Pack
4. Micro-USB connector
5. Eyeshade
6. Diopter adjustment ring
7. Record button REC
8. Navigation button DOWN
9. Button MENU
10. Navigation button UP
11. Activation / calibration button ON
12. Latch for lens change
13. Lever for Battery Pack
14. Tripod socket
DESCRIPTION OF CONTROLS
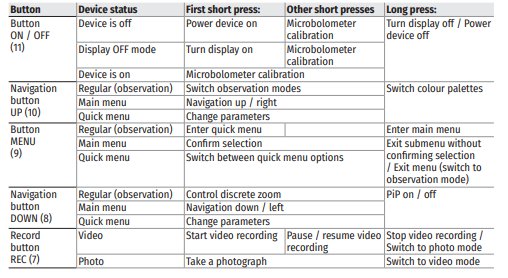
USING THE BATTERY PACK
Helion 2 PRO thermal imaging scopes are supplied with a rechargeable Li-Ion Battery Pack IPS7 which allows operation for up to 8 hours. Please remember to charge the Battery Pack before first use.
CHARGING
- Lift the lever (C) of the charging base.
- Remove the protective cover from the Battery Pack.
- Insert the battery into the charger until it stops, as shown in Fig., lower the lever (C).
- Upon installation, a green indicator (D) on the charger will start to glow and begin flashing:
- once if the battery charge ranges from 0% to 50%;
- twice if the battery charge ranges from 51 and 75%;
- three times if the battery charge ranges from 76% to 99%.
- If the indicator lights green continuously, the battery is fully charged. You can disconnect it from the charger.
- To charge the battery, connect the micro-USB plug of the USB cable to port (E) of the charger.
Connect the plug of the USB cable to the mains adapter.
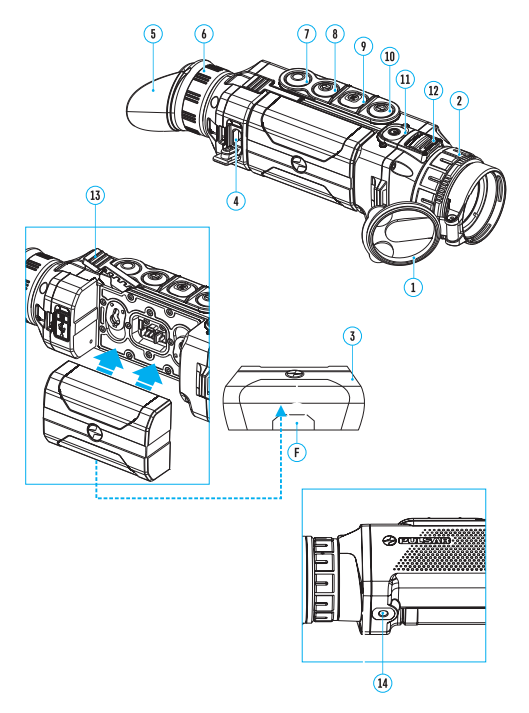
- Plug the mains adapter into a 100-240 V socket and the battery charging process will start
- If the indicator of the charger lights up red continuously upon battery installation, the battery charge level is probably lower than acceptable (the battery has been in deep discharge for too long). In this case, keep the battery in the charger for a long time (up to several hours), then remove and re-insert it. If the indicator then starts blinking green, the battery is good but if it keeps lighting up red it’s defective.
Do not use the battery!
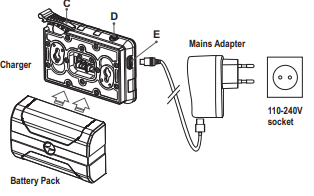
INSTALLATION
• Remove the protective cover from the Battery Pack.
• Lift the lever (12).
• Insert the battery into the dedicated slot in the device body until it stops so that element F (see Fig. 2 on the flyleaf) is located below.
• Lock the battery by lowering the lever
PRECAUTIONS
• Only use the charger supplied with the Battery Pack. The use of any other charger may irreparably damage the Battery Pack or the charger and may cause fire.
• During long-term storage, the Battery Pack should be partially charged – the charge level should be between 50% and 80%.
• Do not charge the Battery Pack immediately after bringing it from a cold environment to a warm one. Wait for 30-40 minutes for the Battery Pack to get warm.
• Do not leave the Battery Pack unattended while charging.
• Never use a modified or damaged charger.
• Charge the Battery Pack at a temperature from 0 °C to +45 °C, otherwise the battery life will decrease significantly.
• Do not leave the Battery Pack with a charger connected to the mains after charging is complete.
• Do not expose the Battery Pack to high temperatures or a naked flame.
• Do not submerge the Battery Pack in water.
• Do not connect an external device with a current consumption that exceeds permitted levels.
• The Battery Pack is short circuit protected. However, any situation that may cause short-circuiting should be avoided.
• Do not dismantle or deform the Battery Pack.
• When using the Battery Pack at sub-zero temperatures the battery capacity decreases. This is normal and is not a defect.
• Do not use the Battery Pack at temperatures above those shown in the table – this may decrease battery life.
• Do not drop or hit the Battery Pack.
• Keep the Battery Pack out of the reach of children.
EXTERNAL POWER SUPPLY
The thermal imaging scope can be powered with an external power supply such as Power Bank (5 V).
• Connect the external power supply to the USB port (4) of the device.
• The device will switch to operation from the external power supply and the IPS7 Battery Pack will begin slowly charging.
• The display will show the battery icon with the charge level as a percentage.
• If the device operates on external power supply but the IPS7 Battery Pack is not installed, the icon is shown.
• When external power supply is disconnected, the device will switch to the internal IPS7 Battery Pack without powering off.
Warning! Charging IPS7 / IPS14 Battery Packs from a Power Bank at air temperatures below 0 °C may reduce battery life. When using external power, connect the Power Bank to the device after it has been turned on and working for several minute
OPERATION
WARNING! Do not point the objective lens of the device at intensive sources of light such as devices emitting laser radiation or the sun. This may render the electronic components inoperative. The warranty does not cover damage caused by improper operation.
POWERING ON AND IMAGE SETUP
• Open the lens cover (1).
• Turn the device on with a short press of the ON (11) button.
• To obtain a crisp image of the icons on the display, rotate the diopter adjustment ring (6). After this, there is no need to rotate the diopter adjustment ring for distance or any other conditions.
• To focus on an object being observed, rotate the lens focus ring (2).
• To set up display brightness and contrast and smooth digital zoom, please refer to the QUICK MENU FUNCTIONS section.
• After use, turn off the device with a long press of the ON (11) button.
MICROBOLOMETER CALIBRATION
Calibration allows levelling of the microbolometer background temperature and eliminates image flaws (such as vertical stripes, frozen images, etc.).
There are three calibration modes: Manual (M), Semi-Automatic (SA) and Automatic (A). Select the desired mode in the menu option Calibration mode .
M Mode (Manual). Close the lens cover then press the ON (11) button briefly. Having finished calibration, open the lens cover.
SA Mode (Semi-Automatic). Calibration is activated with a short press of the ON (11) button. You do not have to close the lens cover (the microbolometer is closed with an internal shutter automatically).
A Mode (Automatic). The device calibrates by itself according to the software algorithm. You do not have to close the lens cover (the microbolometer is closed with an internal shutter automatically). User assisted
calibration with the ON (11) button is also allowed in this mode (as in the Semi-Automatic mode).
DISCRETE DIGITAL ZOOM
The device allows you to quickly increase base magnification (please refer to the Magnification line in the Technical Specifications Table) by two or four or eight times, as well as to return to the base magnification. To operate the discrete digital zoom, press successively the DOWN (8) button.
QUICK MENU FUNCTIONS
The quick menu allows you to change the base settings (display brightness and contrast) and use the smooth digital zoom and stadiametric rangefinder.
• Enter the menu with a short press of the M (9) button.
• To toggle between the functions below, press successively the M (9) button.
• Brightness – press the UP (10) / DOWN (8) buttons to change display brightness from 0 to 20.
• Contrast – press the UP (10) / DOWN (8) buttons to change display contrast from 0 to 20.
• To exit the menu, press and hold the M (9) button, or wait 10 seconds to exit automatically.
Note. Display brightness and contrast settings are saved in the memory when the device is turned off.
• Smooth digital zoom – press the UP (10) / DOWN (8) buttons to change digital zoom value from 2.5x to 20x. Smooth digital zoom is in 0.1 increments. Smooth digital zoom is in 0.1 increments.
Note. The actual magnification is the product of the base magnification and smooth digital zoom values. For example: the device’s base magnification is 3.0x and smooth zoom value is x1.7, so the actual magnification is 5.1x (3.0×1.7).
• Stadiametric rangefinder press the UP (10) / DOWN (8) buttons to change the distance between special markers to determine the distance to the observed object. Please refer to section STADIAMETRIC RANGEFINDER for more details.
• Base mode – allows you to select one of the three modes as a base for the User mode.
MAIN MENU FUNCTIONS
OPERATION MODE:
• Enter the main menu with a long press of the M (9) button.
• Press the UP (10) / DOWN (8) buttons to switch between the main menu options.
• Enter a submenu of the main menu with a short press of the M (9) button.
• Exit a submenu with a long press of the M (9) button.
• Automatic exit takes place after 10 seconds of inactivity.
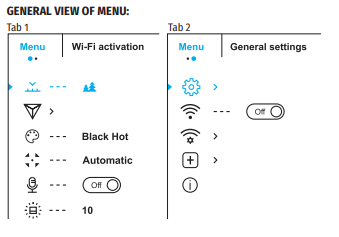
MAIN MENU CONTENTS AND DESCRIPTION



STATUS BAR

The status bar is located in the lower part of the display and shows information on the actual operating status of the device, including:
• Colour palette (shown only if the Black Hot palette is selected)
• Observation mode
• Calibration mode (in the automatic calibration mode, three seconds before automatic calibration a countdown timer 00:01 is shown in place of the calibration mode icon).
• Current full magnification (for example, 16x)
• Microphone
• Wi-Fi connection status
• Time
• Battery charge level (if the device is powered by the Battery Pack) or External battery power indicator (if the device is powered by an external power supply).
VIDEO RECORDING AND PHOTOGRAPHY
Helion 2 PRO thermal imagers feature video recording and photography of the image being observed to the internal memory card. Before using this feature please set the date and time (see the corresponding menu options). The built-in recorder operates in two modes – VIDEO and PHOTO:
VIDEO MODE. VIDEO RECORDING
• The device is in the VIDEO mode upon turning on.
• In the top left corner of the display you will see the video icon and the remaining recording time in the format HH:MM (Hours:Minutes); 12:10.
• Start video recording with a short press of the REC (7) button.
• Pause video recording with a short press of the REC (7) button.
• Resume recording video with a short press of the REC (7) button.
• Stop recording video with a long press of the REC (7) button.
• When video recording is started the icon disappears and the icon REC and a recording timer in the format MM:SS (Minutes:Seconds) appears instead; lREC | 00:25.
• Video files are saved to the internal memory card after video recording stops.
• Switch between modes (Video-> Photo-> Video…) with a long press of the REC (7) button.
PHOTO MODE. PHOTOGRAPHY
• Switch to the PHOTO mode with a long press of the REC (7) button.
• Take a picture with a short press of the REC (7) button.
• The image freezes for 0.5 sec while the photo is saved to the internal memory.
• In the top left corner of the display you will see a camera icon and the number of pictures you are able to take. If the number is less than 100 the actual number will be shown (i.e. 98) but if more than 100 pictures can be taken >100 will be displayed next to the icon.
Notes:
दyou can enter and operate the menu during video recording;
द the counter for multimedia files CANNOT BE RESET;
द recorded videos and photos are saved to the internal memory card in the format img_xxx.jpg (photos); video_xxx.mp4 (videos) where xxx is a three-digit counter for videos and photos;
Warning:
द The maximum duration of a recorded file is five minutes. After this time expires, a video is recorded into a new file. The number of recorded files is limited by the capacity of the device’s internal memory;
द regularly check the free capacity of the internal memory and move recorded footage to other storage media to free up space on the internal memory card.
WI-FI FUNCTION
Helion 2 PRO thermal imagers feature a wireless connection option (Wi-Fi) which links them with external appliances (smartphone, tablet PC).
• Activate the main menu by long pressing the М (9) button.
• Select the Wi-Fi activation menu option using the UP (10) / DOWN (8) buttons and briefly press the M (9) button icon to activate the Wi-Fi module.
Wi-Fi operation is shown in the status bar as follows:

• The device is recognized by an external device as Helion2_XXXX where XXXX are the four last digits of the serial number.
• After entering the password (default: 12345678) on a mobile (see Wi-Fi Setup section of the Main Menu Functions section of this manual for more information on setting a password) and setting up a connection,
the icon in the status bar changes to .
STADIAMETRIC RANGEFINDER
Helion 2 PRO thermal imagers are equipped with a stadiametric rangefinder which allows the user to determine the distance to an object of a known size with reasonable accuracy.
• Select the Stadiametric Rangefinder function with short presses of the M (9) button until the icon is selected.
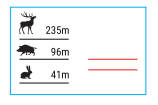
• You will see on the display: measurement bars, icons of three reference objects and respective distances for the three objects. • There are three pre-set reference objects:
द Hare – height 0.3m
द Wild boar – height 0.7m
द Deer – height 1.7m
• Position the lower fixed bar under the object being ranged and by pressing the UP/ DOWN buttons, move the upper horizontal bar relative to the lower fixed bar until the object fits entirely between the two bars. The distance to the object is automatically recalculated as you move the upper line.
• If ranging does not take place within 10 seconds, the information disappears from the display.
• To select the unit of measurement (Meters or Yards), go to the respective menu option.
• Before it appears on the display, a measured distance value is rounded up to 5m for larger values and rounded down to 1m for smaller values.
• Exit the rangefinder mode with a long press of the М (9) button or wait 10 seconds to exit automatically.
DISPLAY OFF FUNCTION
This function deactivates the transmission of an image to the display by minimizing its brightness. This prevents accidental disclosure. The device keeps running.
• When the device is on, press and hold the ON (11) button.
• The display goes out and the message Display Off appears.
• Turn the display back on with a short press of the ON (11) button.
• When you press and hold the ON (11) button, the display shows the message Display Off with a countdown. Pressing & holding the button down for the duration of the countdown will power the device off completely

PIP FUNCTION
PiP (Picture in Picture) allows you to see a zoomed image simultaneously with the main image in a dedicated window.
• Turn on/off the PiP function with a long press of the DOWN (8) button.
• Change the zoom ratio in the PiP window with a short press of the DOWN (8) button.
• The zoomed image is displayed in a dedicated window with the full optical magnification being shown.
• The main image is shown with optical magnification ratio which corresponds to x1.0.
• When PiP is turned on, you can operate the discrete and smooth digital zoom. The full optical magnification will take place only in the dedicated window.
• When PiP is turned off, the image is shown with the optical magnification set for the PiP function.

STREAM VISION
Helion 2 thermal imagers support Stream Vision technology which allows you to stream an image from the thermal imager to a smartphone or tablet in real time via Wi-Fi. Detailed instructions on the operation of Stream Vision technology can be found in a separate booklet or on the www.pulsar-vision.com website.
Note: the Stream Vision application allows you to update the firmware features of your Pulsar Device.
How to update instructions are as below:
• Download free of charge Stream Vision App on Google Play or App Store. Scan the QR codes to download Stream Vision free of charge:
• Connect your Pulsar device to your mobile device (smartphone or tablet).
THERMAL IMAGING SCOPE HELION 2 XP50 PRO 10
• Launch Stream Vision and go to section My Devices.
• Select your Pulsar device and press Check Updates
Important:
द if your Pulsar device is connected to phone, please turn on mobile data transfer (GPRS/3G/4G) to download
update;
द if your Pulsar device is not connected to your phone but it’s already in the My Devices section, you may use Wi-Fi to download update.
• Wait for the update to download and install. Pulsar device will reboot and will be ready to operate.
USB CONNECTION
• Connect one end of the USB cable to the Micro-USB (4) port of your device and the other end to the USB port of your PC / laptop.
• Turn the device on with a short press of the ON (11) button (a device that has been turned off cannot be detected by your computer).
• Your device will be detected by the computer automatically; no drivers need to be installed.
• Two connection modes will appear on the display: USB Mass storage device (external storage device) and Power
• Select the connection mode with the UP (10) and DOWN (8) buttons.
• Confirm the selection with a short press of the M (9) button.
CONNECTION MODES:
USB Mass storage device. In this mode the device is detected by the computer as a flash card. This mode is designed for work with the files saved in the device’s memory. The device’s functions are not available in this mode; the device turns off automatically.
• If video recording was in progress when the connection was made, recording stops and the video is saved.
• When the USB is disconnected from the device where connection is in the USB Mass storage device mode, the device remains in the Off state. Turn the device On for further operation.
Power. In this mode, a PC/laptop is used as an external power supply. The status bar shows the icon . The device continues operating and all functions are available.
• The Battery Pack installed in the device is NOT being charged.
• When the USB is disconnected from the device when in the Power mode, the device keeps operating with the Battery Pack if it is available and sufficiently charged.
MAINTENANCE AND STORAGE
Maintenance should be carried out at least twice a year, and should consist of the following measures:
• Wipe external plastic and metal surfaces with a cotton cloth to remove dust and dirt. Silicone grease is allowed.
• Clean the electric terminals of the Battery Pack and the device’s battery slot using a grease-free organic solvent.
• Check the objective and eyepiece lenses. If required, remove dust and sand (preferably by a noncontact method). Clean the external surfaces of the lenses with products expressly designed for this purpose.
• Store the device in a carrying case. Remove the Battery Pack for long-term storage.
TECHNICAL INSPECTION
It is recommended to carry out a technical inspection before each use of the device. Check the following:
• The state of the objective and eyepiece lenses (there should be no cracks, grease spots, dust, deposits).
• The device appearance (there should be no cracks on the housing).
• The state of the Battery Pack (it should be charged) and electric contacts (there should be no signs of salts or oxidation).
• The controls should be in working order
TROUBLESHOOTING
The table below lists problems that may occur when using the device. Carry out the recommended checks and troubleshooting steps in the order listed in the table. If there are defects not listed in the table or it is
impossible to resolve the problem yourself, the device should be returned for repair.
