Optical Magnification, xProducts:
- Pulsar Axion LRF XQ38 Thermal Imaging Monocular: https://www.optics-trade.eu/en/pulsar-axion-lrf-xq38-thermal-imaging-monocular.html
This text is a transcription of the file in PDF format.
TECHNICAL SPECIFICATIONS
| Model | AXION LRF XQ38 |
| SKU | 77428 |
| Microbolometer | |
| Type | uncooled |
| Resolution, Pixels | 384×288 |
| Pixel Pitch, μm | 17 |
| Frame Rate, Hz | 50 |
| Optical Characteristics | |
| Optical Magnification, x | 3.5 |
| Smooth Digital Zoom | 3.5-14 |
| Digital Zoom, x | 2/4 |
| Lens Focus, mm | 38 |
| Focal Ratio, D/F’ | 1.2 |
| Minimum Focusing Distance, m | 3 |
| Eye Relief Diameter, mm | 3.5 |
| Angular Field of View (HxV), Degree | 9.8×7.4 |
| Linear Field of View, m Per 100 m | 17.2 |
| Eyepiece Focusing Range, Diopter | +4/-5 |
| Detection Distance for Deer-Sized Objects, (m) | 1350 |
| Display | |
| Type | AMOLED |
| Resolution, Pixels | 1024×768 |
| Operational Characteristics | |
| Power Supply, V | 3-4.2 V |
| Battery Type | APS 5 Li-ion Battery Pack |
| Capacity | 4900 mAh |
| Nominal Output Voltage | DC 3.7 V |
| External Power Supply | 5 V (USB Type-C) |
| Battery Run Time At T=22 °C, h | 7 |
| Degree of Protection, IP Code (IEC60529) | IPX7 |
| Operating Temperature Range, °C | -25 … +40 |
| Dimensions, mm | 167x74x73 |
| Weight (Without Battery), kg | 0.38 |
| Characteristics Of The Rangefinder | |
| Wavelength, nm | 905 |
| Measurement Range, m* | 1000 |
| Measurement Accuracy, m | 1 |
* Depends on the characteristics of the object under observation and environmental conditions.
PACKAGE CONTENTS
- AXION LRF XQ Thermal Imager
- APS 5 rechargeable battery
- 2 lock-cover of APS 5 battery
- Battery Pack Charger
- Power Adapter
- USB Type-C Cable
- Carrying case
- Hand strap
- Quick User Manual
- Lens-cleaning cloth
- Warranty sheet
- Adaptor for mounting the device on a tripod
Improvements may be made to the design of this product to enhance its user features. The current version of the User Manual can be found on the website www.pulsar-vision.com
DESCRIPTION
AXION LRF XQ thermal imaging monoculars are designed for use both at night-time and during the day in adverse weather conditions (fog, smog, rain) to see through obstacles (branches, tall grass, dense bushes, etc.) hindering target detection.
Unlike night-vision devices based on electron-optical converters, thermal imaging devices do not need an external light source and are resistant to bright light. AXION LRF XQ thermal imagers are designed for various applications including hunting, observation, security, terrain orientation, search and rescue operations, etc.
AXION LRF XQ thermal imagers are equipped with a built-in laser rangefinder with a range of up to 1000 m and a measurement accuracy of ± 1 m.
FEATURES
• Microbolometer with a resolution of 384×288 pixels
• Microbolometer pixel size is 17 microns
• 1024×768 AMOLED display resolution
• Compact size and light weight
• Functional and ergonomic design
• User-friendly interface
• Eight color modes
• Three calibration modes: Manual, Semi-Automatic, Automatic
• Detection distance of up to 1350 m
• Smooth digital zoom 3.5-14x
• Four observation modes: Forest, Rocks, Identification, User
• Integrated laser rangefinder
• Display Off function
• Defective pixel repair function
• Wide operating temperature range (-25°С to +40°С)
• Fully waterproof (IPX7 rated)
• Tripod mount
BATTERY PACK
• Quick Change Li-Ion Battery Pack APS 5
• Charging from USB Power Bank
• USB Power Delivery quick charge
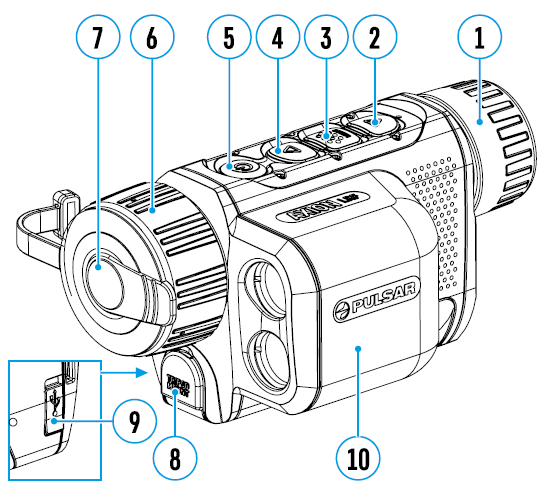
COMPONENTS AND CONTROLS
1. Eyepiece focus ring
2. DOWN/REC button
3. MENU button
4. UP/ZOOM button
5. Power ON/CALIBRATION button
6. Lens focus ring
7. Lens cover
8. Tripod adapter
9. USB Type-C connector
10. Laser rangefinder
| LED indicator displays the current status of the device: | |
| LED Indicator | Operating Mode |
| Device is turned on | |
| The device is turned on/battery charge < 10% | |
BUTTONS OPERATION
| Button | Operating Mode | First short press | Subsequent short presses | Long press |
| Button ON/OFF (5) |
Device is turned off | Turn device on | Device calibration | Turn device on |
| Display is turned off | Turn display on | Device calibration | Turn device off | |
| Device is turned on, quick menu, main menu | Device calibration | Turn display off / Turn device off | ||
| Button UP/ZOOM (4) |
Device is turned on | Toggle between observation modes | Zoom | |
| Quick menu | Increase value | Increase value | ||
| Main menu | Navigate up / right | Navigate up / right | ||
| Button MENU (3) |
Device is turned on | Access quick menu | Enter main menu | |
| Quick menu | Switch between quick menu options | Exit quick menu | ||
| Main menu | Confirm selection, enter menu items | Exit menu items, main menu | ||
| Button DOWN/ REC (2) |
Device is turned on | Turn on rangefinder | Single distance measurement | Device is turned on |
| The device is on, the rangefinder is on | Single distance measurement | Activate rangefinder scan mode | ||
| The device is on, the rangefinder is in scanning mode |
Deactivate rangefinder scan mode | Turn off rangefinder | ||
| Quick menu | Decrease value | Decrease value | ||
| Main menu | Navigation down / left | Navigation down / left | ||
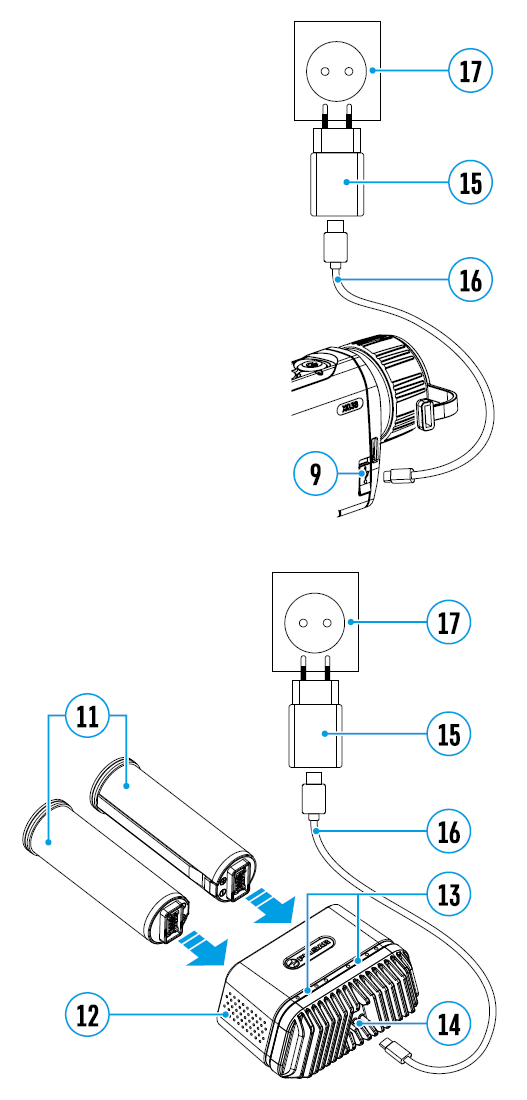
BATTERY PACK CHARGING
The AXION LRF XQ thermal imager comes with an APS 5 rechargeable Lithium-ion battery. APS 5 batteries support USB Power Delivery fast charging technology when using a standard charging set (charger, USB Type-C cable, power adapter). Before first use, make sure the battery is fully charged.
Option 1
• Install the APS 5 battery (11) in the battery compartment (19) of the device.
• Connect the USB cable (16) to the USB Type-C connector (9) of the device.
• Connect the other end of the USB cable (16) to the Power Adapter (15).
• Plug the Power Adapter (15) into a 100-240 V socket (17).
Option 2
• Insert the APS 5 battery (11) along the guide into the APS 5 charger (12) slot as far as it will go (see Fig.). The APS charger is supplied with your device and sold separately.
• Connect the plug of the USB Type-C cable (16) to the USB Type-C connector of the Power Adapter (15).
• Plug the Power Adapter (15) into a 100-240 V socket (17).
• Connect the other end of the USB Type-C cable (16) to the USB Type-C connector (14) of the charger.
• LED indicators (13) will display the battery charge level (see Table).
Note: two batteries can be charged at the same time, a second slot is provided for it.
| LED indication (13) in the battery charging mode: | |
| Battery Level | |
| Battery level is from 0% to 25% | |
| Battery level is from 26% to 50% | |
| Battery level is from 51% to 80% | |
| Battery level is from 81% to 99% | |
| The battery is fully charged. It can be disconnected from the charger. | |
| Defective battery. It is forbidden to use the battery. | |
| LED indication (13) in the standby mode*: | |
| Battery Level | |
| Battery level is from 0% to 25% | |
| Battery level is from 26% to 50% | |
| Battery level is from 51% to 80% | |
| Battery level is from 81% to 99% | |
| The battery is fully charged. It can be disconnected from the charger. | |
| Defective battery. It is forbidden to use the battery. | |
* Standby mode – operating mode when the batteries in the charger, but the power adapter is not connected. In this mode, the indication is on for 10 seconds.
Attention! When using a power adapter that does not support USB Power Delivery fast charging technology, the flicker frequency of LED indicators decreases by 3 times and charge time increases.
Attention! The charger heats up during fast charging. Excess heat is removed through the radiator and does not affect the device operation.
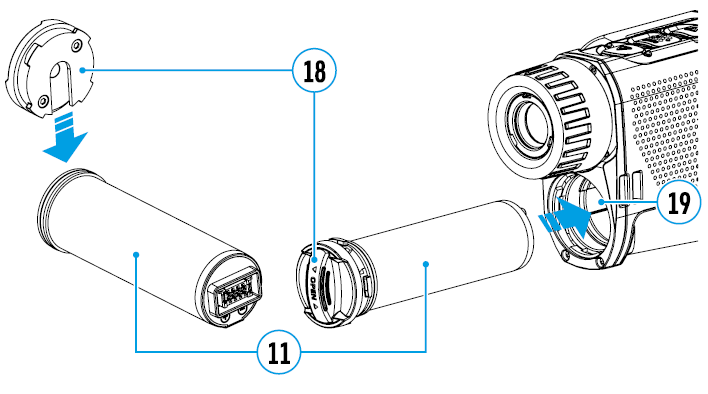
INSTALLING BATTERY PACK
• Put the Lock-cover (18) on the rechargeable APS 5 battery (11).
• Insert the APS 5 battery (11) along the guide into the battery compartment (19).
• Lock the battery (11) by turning the Lock-cover (18) clockwise until it stops.
• Turn the Lock-cover (18) counterclockwise to remove the batteries (11).
PRECAUTIONS:
• Always use the APS 5 charger supplied with the device (or purchased separately) to charge APS 5 batteries. Using an unsuitable charger can cause irreparable damage to the battery and fire.
• Do not charge the battery immediately after brining it from cold to warm. Wait at least 30 minutes for the battery to warm up.
• Do not leave the battery unattended while charging.
• Do not use the charger if it has been modified or damaged.
• Do not leave the battery in a charger connected to the mains after charging is complete.
• Do not expose the battery to high temperatures or naked flames.
• Do not use the battery as a power source for devices that do not support APS 5 batteries.
• Do not disassemble or deform the battery or charger.
• Do not drop or strike the battery or charger.
• The battery and charger must not be immersed in water.
• Keep the battery out of the reach of children.
RECOMMENDATIONS FOR USE:
• The batteries should be partially charged (50 to 80 %) for long-term storage.
• The battery is to be charged at an ambient temperature of 0°C to +35°C or the lifespan of the battery will decrease significantly.
• When using the battery at sub-zero ambient temperatures, the battery capacity decreases. This is normal and not a defect.
• Do not use the battery at temperatures outside the range of -25°C to +40 °С or it may reduce battery life.
• The battery is short circuit protected. However, any situation that may cause short-circuiting should be avoided.
EXTERNAL POWER SUPPLY
External power can be supplied from an external source, such as a Power Bank (5 V).
• Connect the external power source to the USB Type-C connector (9) on the device.
• The device will switch to draw power from the external source while the АPS 5 battery will be gradually recharged.
• A battery icon ![]() will appear on the display showing the percentage charge level.
will appear on the display showing the percentage charge level.
• An icon ![]() will be displayed when the device is powered by an external power source and the АPS 5 battery is not connected.
will be displayed when the device is powered by an external power source and the АPS 5 battery is not connected.
• The device automatically switches to the APS 5 battery when the external power supply is disconnected.
Attention! Charging APS 5 batteries from an external source at temperatures below 0°C can reduce battery life. When using external power, connect the Power Bank to the device only after it has been turned on and working for at least several minutes.
OPERATION
WARNING! Never point the lens at intensive energy sources such as laser radiation emitting devices or the sun. It can damage electronic components in the device. The warranty does not cover damage arising from failure to comply with the operating rules.
POWERING ON AND IMAGE SETTING
• Open the lens cover (7). The lens cover can be secured to the strap using the built-in magnet.
• Press the ON/OFF (5) button briefly to turn on the device.
• Adjust the eyepiece focus ring (1) of the device until the symbols on the display are sharp.
• Rotate the lens focus ring (6) to focus on the object being observed.
• Enter the main menu with a long press of the MENU (3) button and select the desired calibration mode: Manual (M), Semi-Automatic (SA) or Automatic (A).
• Calibrate the image by briefly pressing the ON/OFF button (5). If the SA or A calibration mode has been selected the microbolometer is closed with an internal shutter automatically. However, if the M calibration mode has been selected you must close the lens cover before calibrating manually.
• Select the desired observation mode (Forest, Identification, Rocks, User) by briefly pressing the UP (4) button. User mode allows you to change and save user defined brightness and contrast settings in the quick menu.
• Enter the main menu with a long press of the MENU (3) button and select the desired color palette (for more details see the Main Menu Functions section).
• Activate the quick menu by briefly pressing the MENU (3) button to adjust the brightness, contrast and smooth digital zoom (for more details see the Quick Menu Functions section).
• Upon completion of use, turn the device off by a long press of the ON (5) button.
MICROBOLOMETER CALIBRATION
Calibration enables the device to equalize the microbolometer background temperature and eliminate the image flaws (such as vertical bars, phantom images, etc.).
During calibration, the image on the display briefly freezes for up to 1 second. There are three calibration modes: Manual (M), Semi-Automatic (SA) and Automatic (A).
Select the required mode in the Calibration mode menu item ![]() .
.
M mode (manual).
• Close the lens cover and press the ON (5) button briefly.
• Open the lens cover after the calibration is completed.
SA mode (semi-automatic)
• Press the ON (5) button briefly to activate calibration.
• There is no need to close the lens cover because an internal shutter covers the microbolometer automatically.
A mode (automatic)
• The device is calibrated autonomously according to firmware algorithms.
• There is no need to close the lens cover because an internal shutter covers the microbolometer automatically.
• In this mode, the user can still choose to calibrate the device using the ON (5) button if required (as in the SA mode).
DISCRETE DIGITAL ZOOM
The device functionality allows you to quickly increase the base magnification by 2 or 4 times as well as return to the base magnification. Press and hold the UP (4) button to change the digital zoom.
IMAGE DETAIL BOOST
The Image Detail Boost ![]() function increases the contour sharpness of heated objects to improve the image detail. The results of the function depend on the selected mode and the observation conditions: the higher the object contrast the more noticeable the effect. This option is enabled by default but can be disabled in the main menu.
function increases the contour sharpness of heated objects to improve the image detail. The results of the function depend on the selected mode and the observation conditions: the higher the object contrast the more noticeable the effect. This option is enabled by default but can be disabled in the main menu.
QUICK MENU FUNCTIONS
The basic settings (adjusting brightness and contrast, using the Smooth Digital Zoom functions) can be changed using the quick access menu.
• Enter the menu by briefly pressing the MENU (3) button.
• A short press of the МENU (3) button enables you to toggle between functions, as described below.
Brightness ![]() – press the UP (4) / DOWN (2) buttons to change display brightness from 0 to 20.
– press the UP (4) / DOWN (2) buttons to change display brightness from 0 to 20.
Contrast ![]() – press the UP (4) / DOWN (2) buttons to change image contrast from 0 to 20.
– press the UP (4) / DOWN (2) buttons to change image contrast from 0 to 20.
Smooth Digital Zoom ![]() – press the UP (4)/DOWN (2) button to change the value of the digital zoom from 3.5 to 14. The digital zoom changes in 0.1 increments.
– press the UP (4)/DOWN (2) button to change the value of the digital zoom from 3.5 to 14. The digital zoom changes in 0.1 increments.
Base Mode ![]() – allows you to select one of the three other modes as the base for the User mode.
– allows you to select one of the three other modes as the base for the User mode.
• Press and hold the MENU (3) button to exit the menu or wait for 10 seconds to exit automatically.
MAIN MENU FUNCTIONS
• Enter the main menu with a long press of the MENU (3) button.
• Press the UP (4) / DOWN (2) buttons to move through the menu items.
• Press the MENU (3) button briefly to select the menu item.
• Press and hold the MENU (3) button to exit the menu or wait for 10 seconds to exit automatically.
GENERAL VIEW OF MENU:

MAIN MENU CONTENTS AND DESCRIPTION
| Mode
|
Observation mode selection. There are four observation modes: Forest (mode for low temperature contrast conditions), Rocks (mode for high temperature contrast conditions), Identification (high detail mode), and User (personalized brightness and contrast settings mode).Option 1: • Press the UP (4) button briefly to switch the observation mode. Option 2:
|
| Image Detail Boost |
Enable / disable Image Detail Boost. • Press and hold the MENU (3) button to enter the main menu. • Use the UP (4) / DOWN (2) buttons to select Image Detail Boost icon • Press the MENU (3) button briefly to turn the function on / off. |
| Color modes
|
Color palette selection White Hot is the default display mode. To select an alternative palette, do the following: • Press and hold the MENU (3) button to enter the main menu. • Use the UP (4) / DOWN (2) buttons to select Color Modes icon • Press the MENU (3) button briefly to enter the submenu. • Use the UP (4) / DOWN (2) buttons to select the desired palette. • Press the MENU (3) button briefly to confirm the selection. – Black Hot – a black and white palette where white corresponds to cold temperatures and black to hot temperatures. – Red Hot – Red Monochrome – Rainbow – Ultramarine – Violet – Sepia |
| Calibration Mode
|
Calibration mode selection • There are three calibration modes: Manual, Semi-Automatic and Automatic. • Press and hold the MENU (3) button to enter the main menu. • Use the UP (4) / DOWN (2) buttons to select the Calibration Mode icon • Press the MENU (3) button briefly to enter the submenu. • Use the UP (4) / DOWN (2) buttons to select one of the calibration modes described below. • Press the MENU (3) button briefly to confirm the selection.Automatic. In this mode the firmware determines the need for calibration. The calibration process starts automatically. Semi-Automatic. The user determines the need for calibration based on the image quality and can action at a convenient time depending on the object being observed. Manual. In the Manual (silent) calibration mode the user determines the need for calibration (as in SA mode) but the lens cover must be closed during calibration. |
| PiP Mode
|
Picture in Picture mode • Press and hold the MENU (3) button to enter the main menu. • Use the UP (4) / DOWN (2) buttons to select the PiP Mode icon • Press the MENU (3) button briefly to turn on / off. |
| Icon Brightness
|
Icon brightness • Press and hold the MENU (3) button to enter the main menu. • Use the UP (4) / DOWN (2) buttons to select the Icon Brightness icon • Press the MENU (3) button briefly to enter the submenu. • Use the UP (4) / DOWN (2) buttons to select the desired brightness level from 0 to 10. • Press the MENU (3) button briefly to confirm the selection. |
| General Settings
|
This menu section allows you to change the interface language, set the date, time, units of measure, return the device to factory default settings and perform memory card formatting. • Press and hold the MENU (3) button to enter the main menu. • Use the UP (4) / DOWN (2) buttons to select the General Settings icon • Press the MENU (3) button briefly to enter the submenu. • Choose the required menu option with UP (4) / DOWN (2) buttons. |
| Language
|
Language selection • Press the MENU (3) button briefly to enter the Language submenu. • Use the UP (4) and DOWN (2) buttons to select one of the available interface languages: English, German, Spanish, French, and Russian. • Press the MENU (3) button briefly to confirm the selection. • Press and hold the MENU (3) button to save your selection and exit from the submenu. |
| Date
|
Date setting • Press the MENU (3) button briefly to enter the Date submenu. The date is displayed in dd/ mm/yyyy format. • Use the UP (4) / DOWN (2) buttons to select the desired year, month, and date. Press the MENU (3) button briefly to toggle between digits. • Press and hold the MENU (3) button to save the date and exit the submenu. |
| Time
|
Time setting • Press the MENU (3) button briefly to enter the Time submenu. • Select the time format (24-hour clock or AM / PM) by pressing the UP (4) /DOWN (2) buttons. • Press the MENU (3) button to select the hours. • Press the UP (4) and DOWN (2) buttons to select the hour value. • Press the MENU (3) button to select the minutes. • Press the UP (4) and DOWN (2) buttons to select the minute value. • Press and hold the MENU (3) button to save the time and exit the submenu. |
| Units of Measure
|
Rangefinder units of measure • Press the MENU (3) button briefly to enter the Units of Measure submenu. • Press the UP (4) / DOWN (2) buttons to select either Meters or Yards as the unit of measure. • Press the MENU (3) button briefly to confirm your selection. • Exit from the submenu will happen automatically. |
| Default Settings
|
Factory reset • Press the MENU (3) button briefly to enter the Default Settings submenu. • Use the UP (4) and DOWN (2) buttons to select Yes to restore default settings or No to cancel. • Confirm your selection with a short press of the MENU (3) button. • If Yes is selected, display will show “Do you want to restore default settings?” and Yes and No options. Select Yes to restore the default settings. • Selecting the No option will cancel the reset and exit the submenu. The following settings will be returned to their defaults before being changed by the user: Observation Mode – Forest; Calibration Mode – Automatic; Language – English; Magnification – Standard (without digital zoom); PiP – Off; Color Mode – White Hot; Units of Measure – Meters.Attention! When restoring the factory defaults the date, time and user pixel map are saved. |
| Rangefinder
|
This menu item contains settings for the built-in laser rangefinder. • Press and hold the MENU (3) button to enter the main menu. • Use the UP (4) / DOWN (2) buttons to select the Rangefinder icon • Press the MENU (3) button briefly to enter the submenu. |
| Reticle Type
|
Rangefinder reticle selection  • Press the MENU (3) button briefly to enter the Reticle Type submenu • Use the UP (4) / DOWN (2) buttons to select one of the three reticles. • Confirm your selection with a short press of the MENU (3) button. |
| Target Position Angle (TPA)
|
This feature allows you to determine the target position angle. When the function is activated the angle is constantly displayed in the upper right corner of the display. • Select the TPA function by pressing the UP (4) / DOWN (2) buttons. |
| Calculation of True Horizontal Distance (THD)
|
This function allows you to measure the true horizontal distance to the target based on the elevation angle. • Select the THD function by pressing the UP (4) / DOWN (2) buttons. • Press the MENU (3) button briefly to turn the THD function on / off. |
| Defective Pixel Repair
|
When using the device, defective (dead) pixels may appear on the microbolometer. These are bright or dark points of a constant brightness that are visible on the image. Defective pixels on the microbolometer can increase in size relatively when digital zoom is activated. AXION LRF XQ thermal imagers allow the user to remove any defective pixels on the microbolometer using firmware as well as to cancel removing. • Press and hold the MENU (3) button to enter the main menu. • Use the UP (4) / DOWN (2) buttons to select the Defective Pixel Repair icon • Press the MENU (3) button to enter the submenu. |
| Defective Pixel Repair
|
Select the Defective Pixel Repair option by briefly pressing the MENU (3) button. • A marker • A magnifying glass (G) will appear on the right side of the display – a rectangle with an enlarged view of the marker for precise pixel selection – and the coordinates (I) of the marker under the magnifying glass. • Press the UP (4) and DOWN (2) buttons briefly to align a defective pixel with the center of the enlarged marker in the magnifying glass – the pixel should be removed. Press the MENU (3) button briefly to switch the marker direction between the horizontal to the vertical. • Press the ON (5) button briefly to delete the dead pixel. • Once the pixel has been successfully deleted, an OK message will briefly appear on the screen. • You can then delete the next defective pixel if required by moving the marker across the display. • Press and hold the MENU (3) button to exit the function.  |
| Restore Default Pixel Map
|
This option allows the user to return all previously disabled defective pixels to their original state. • Use the UP (4) / DOWN (2) buttons to select the Restore Default Pixel Map icon • Activate the function by briefly pressing the MENU (3) button. • Using the UP (4) / DOWN (2) buttons, select Yes if you want to return to the factory pixel map and select No if you do not. • Confirm your selection with a short press of the MENU (3) button.Attention! One or two pixels on the display of the device in the form of bright white, black or colored (blue, red or green) points mayappear. These points cannot be removed and are not a defect. |
| Device Information
|
This menu item allows the user to view the following information about the device: – SKU Number – Firmware Version – Device Name – Hardware Version – Device Serial Number – Service Information • To display information, do the following: • Press and hold the MENU (3) button to enter the main menu. • Use the UP (4) / DOWN (2) buttons to select the Device Information icon . • Press the MENU (3) button briefly to view / exit the information. |
STATUS BAR

The status bar is at the bottom of the display and displays information on the actual operating status of the device, including:
• Color Mode (shown only when the Black Hot color mode is selected)
• Observation Mode
• Calibration Mode (in Automatic calibration mode a countdown timer will appear instead of the calibration mode icon 3 seconds before automatic calibration begins)
• Magnification
• Time
• Power Indication:
![]() – charge level if the device is powered by a battery
– charge level if the device is powered by a battery
![]() – charge level if the device is charging and powered by a battery
– charge level if the device is charging and powered by a battery
![]() – no battery, the device is connected to an external power supply
– no battery, the device is connected to an external power supply
USING A BUILT-IN LASER RANGEFINDER
The AXION LRF XQ thermal imager is equipped with an integrated laser rangefinder.
SINGLE MEASUREMENT MODE
• Press the ON/OFF (5) button briefly to power the device on.
• Activate the rangefinder by pressing the DOWN (2) button briefly. A red mark appears on the display.
• Place the rangefinder’s reticle on the target. Press the DOWN (2) button briefly to measure the distance to the object once.
• The measurement results are displayed in the upper right corner.
• The rangefinder shuts down after 3 seconds of inactivity.
SCAN MODE
• Press the ON/OFF (5) button briefly to power the device on.
• Activate the rangefinder by pressing the DOWN (2) button briefly. A red mark appears on the display.
• Activate the scan mode by long pressing the DOWN (2) button to continuously measure the distance to objects.
• The measurement results are displayed in the upper right corner.
• Deactivate the rangefinder by long pressing the DOWN (2) button.

– Additional rangefinder settings are available in the “Rangefinder” section of
the main menu.
– To select either Meters or Yards as the unit of measure please see the corresponding menu item.
– When you turn on the rangefinder, the PiP window turns off.
OPERATING FEATURES:
• The accuracy and distance of the measurement depends on the reflection coefficient of the object surface and weather conditions. The reflection coefficient depends on the texture, color, size and shape of the object. Generally, lighter colored objects and those with a shiny surface will have a higher reflection coefficient.
• Measurement accuracy can be influenced by the light conditions, fog, haze, rain, snow, etc. The results may be less accurate when operating in sunny weather or if the rangefinder is directed towards the sun.
• It is easier and more reliable to measure the distance to large objects than to small ones.
DISPLAY OFF FUNCTION
This function deactivates the image transmission to the display by minimizing its brightness. This helps prevent accidental disclosure. However, the device stays on.
When this function is in use, the device switches to the standby mode, which allows it to be switched on quickly if necessary.
• When the device is on, press and hold the ON (5) button for less than 3 seconds. The display goes blank and the message Display Off appears.
• Press the ON (5) button briefly to turn on the display.
• When you press and hold the ON (5) button, the display shows the message Display Off with a countdown. Holding the button down for the duration of the countdown will power the device off completely.

PIP FUNCTION
The PiP (Picture-in-Picture) function allows you to see both the main image and a magnified image in a dedicated window.
• To turn on and off the PiP function see the PiP Mode section in the Main Menu Functions section of the manual.
• Press and hold the UP (4) button to change the magnification ratio in the PiP window.
• An enlarged image of the central area of the display is shown in an additional window above and the image area is captured by angles.
• The main image is displayed with an optical magnification ratio of x1.0.
• When the PiP is turned on you can control both the discrete and smooth digital zoom. In this case the zoom value changes only take place in the dedicated window.
• When the PiP function is turned off, the screen will display at the magnification that was set in PiP mode.

USB CONNECTION
Connecting the device to a computer used as an external power source:
• Connect one end of the USB cable to the device micro-USB port (9) and the other end to the port on your computer.
• Switch the device on with a short press of the ON (5) button.
• The computer is used as an external power supply. The icon ![]() appears in the status bar. The device will continue operating and all the functions are available.
appears in the status bar. The device will continue operating and all the functions are available.
• Note: The battery installed in the device will not be charged.
• When disconnecting from the computer, the device will continue to operate from the APS 5 battery if it is present and provided it has enough charge.
TECHNICAL INSPECTION
It is recommended to carry out a technical inspection before each use of the device. Check the following:
• The device appearance (there should be no cracks on the body).
• The state of the objective, eyepiece and rangefinder lenses (there should be no cracks, grease spots, dirt or other deposits).
• The state of the rechargeable battery (it should be charged) and the electric contacts (there should be no signs of salts or oxidation).
• The controls should be in working order.
MAINTENANCE
Maintenance should be carried out at least twice a year and include the following steps:
• Wipe the exterior metal and plastic surfaces with a cotton cloth to remove dust and dirt. Silicone grease may be used for this.
• Clean the electrical contacts of the rechargeable battery on the device using a non-greasy organic solvent.
• Check lenses of objective, eyepiece and rangefinder. If necessary, remove the particles of dust and sand (preferably using a non-contact method). Cleaning of the exterior surfaces of the optics should only be done with products specifically designed for this purpose.
TROUBLESHOOTING
The table below lists problems that may occur when using the device. Carry out the recommended checks and troubleshooting steps in the order listed in the table. If there are defects not listed in the table or it is impossible to resolve the problem yourself, the device should be returned for repair.
| Malfunction | Possible cause | Corrective action |
| The thermal imager does not turn on | The battery is completely discharged | Charge the battery |
| The device does not operate from an external power source | The USB cable is damaged | Replace the USB cable |
| The external power supply is discharged | Charge the external power supply (if necessary) | |
| Blurred image with vertical stripes or an uneven background | Calibration is required. | Perform image calibration according to the Microbolometer Calibration section of the manual |
| Poor quality image. There is noise or ghost images of previous scenes or objects | Manual calibration has been performed with the lens cover open | Check the calibration mode, close the lens cover and calibrate the device |
| Image is too dark | Brightness or contrast level is too low | Adjust the brightness or contrast |
| Color bars appear on the display or the image disappears | The device was exposed to static charges during operation | When the exposure to static charges is over, the device may either reboot automatically or require to be switched off and on again |
| The image of the object being observed is missing | You are looking through glass | Remove the glass or change the viewing position to avoid it |
| Poor image quality / reduced detection distance | These problems may occur during observation in adverse weather conditions (snow, rain, fog, etc.) | |
| When the device is used in low temperature conditions the image quality is worse than in positive temperatures | In positive temperature conditions, objects being observed (surroundings and background) heat up differently because of thermal conductivity, thereby generating a high temperature contrast. Consequently, the image quality produced by the thermal imager will be better. In low-temperature conditions, objects being observed (background) will cool down to roughly the same temperature, which leads to a greatly reduced temperature contrast and a degraded image quality. This is normal for all thermal imaging devices | |
| Rangefinder does not measure distance | In front of the receiver lens or emitter lens there is an object that prevents signal transmission. | Make sure that: the lenses are not blocked by your hand or fingers; the lenses are clean. |
| The device vibrates when measuring | Hold the device level while measuring | |
| Distance to the object exceeds 1000m. | Choose an object at a distance closer than 1000m | |
| Low reflection ratio (i.e. leaves of trees) | Choose an object with a higher reflection ratio | |
| Large measurement error | Inclement weather conditions (rain, mist, snow) | |
Repair of the device is possible within 5 years.


