Products:
COMPONENTS
Each HAWK system comes with the following components:
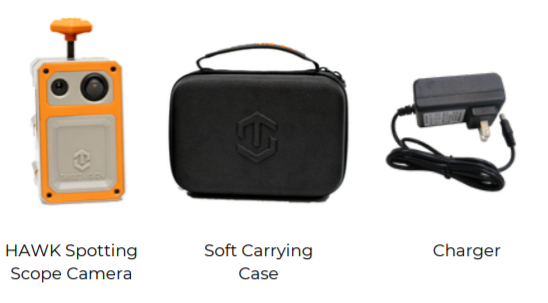
FEATURES
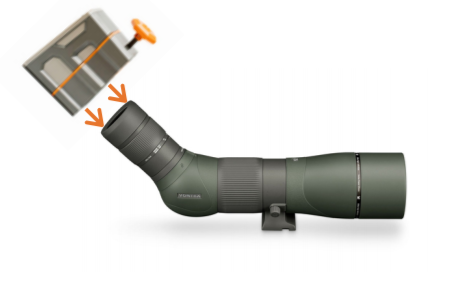
The Hawk spotting scope camera is the next evolution of digiscoping, it turns any spotting scope into a smart scope in just minutes. Simply slide the hawk over the eyepiece of the spotting scope and open the TARGETVISION app on your smartphone or tablet to view the camera feed and unlock all of the app features (track and number shots, save photos, review sessions, record video and stills). Seeing your shot has never been easier.
- Fits eyepieces between 38mm and 56mm
- Live HD video (1920 x 1080)
- App-Based software (iOS & Android)
- Quick and easy setup
- 7+ hour runtime
- Lightweight, portable, and compact
- 2-year warranty
- Drop-resistant
- Weather-resistant
- No cell or WiFi service required
- Batteries: rechargeable
- Lithium-Ion
- Band: WiFi 2.4GHz
- Weight: 1 lb
INSPECTION
Please inspect your HAWK system before use to ensure that all components listed on page 2 are present. Prior to first use, you should fully charge the system
CHARGING
Use only the included charging adapter to charge the system. The included adapter is rated for power input of 100V – 240V and power output of 12.6V DC at 800mA. The adapter is intelligent and will stop charging the system once the battery is fully charged. Your Longshot system should be turned off while charging. Please allow up to 4 hours for the camera to fully charge
| Charger LED Color | Charge Status |
| Green |
|
| Red |
|
BATTERY LEVEL INDICATOR
Between the charging port and power switch of the HAWK there are 4 LED’s that indicate the battery’s charge level. Each LED represents 25% of the battery life. When the battery level becomes too low for the system to operate, the LED’s will flash and the system will turn off. You may also notice a slight delay from the time you flip the power switch until the time the lights come on, this is a result of the circuitry within the battery level indicator board and is standard operation.

MOUNTING
To properly mount your camera to your spotting scope:
- Slide the camera’s universal mounting assembly over the eyepiece of your scope until the camera makes contact with the rear of the eyepiece. The camera has a spacer built in to account for most eye relief setups; however, the camera may need to be setup a little further off the eyepiece depending on your particular scope.

Longshot Hawk Trail Cameras Instruction Manual - Turn the mounting knob clockwise to tighten the camera ontoyour eyepiece. As you tighten the mount, it will self center the camera on the eyepiece.

Longshot Hawk Trail Cameras Instruction Manual
CONNECTION
Before connecting to your camera, it is recommended to download the TARGETVISION application from your device’s app store. Connecting to your HAWK is as simple as connecting to a WiFi network. Simply turn the camera on, go into the WiFi settings of your device, locate and connect to the camera’s network:
- SSID: HAWKXX:XX:XX:XX:XX:XX
- Password: longshot
Once you have established a connection, open the TARGETVISION application on your device and use the live video feed to adjust the position and focus of your spotting scope.
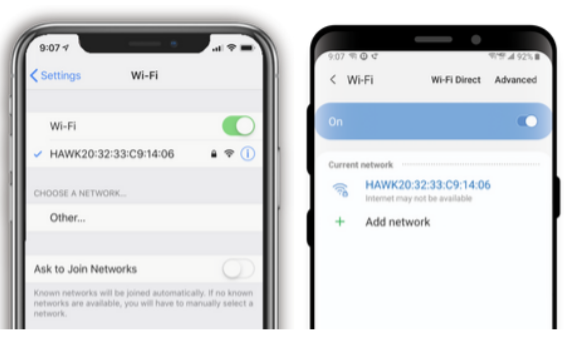
Please note: Once connected to the WiFi network
- Apple devices may warn that there is “no internet connection” available
- Android devices may warn that “internet may not be available”
This is normal and nothing to be concerned about. There is not internet available when you are connected to your camera’s network. Please proceed by opening the Targetvision app and you should see a camera feed.
ADJUSTMENT
Eye Relief: Depending on your scope, you may need to adjust the cameras mounting position to compensate for eye relief and get the best picture possible. In some cases, if the camera is too close to the eyepiece, the center of the image can appear washed out. The best solution to this is to simply mount the camera further away from the eyepiece.
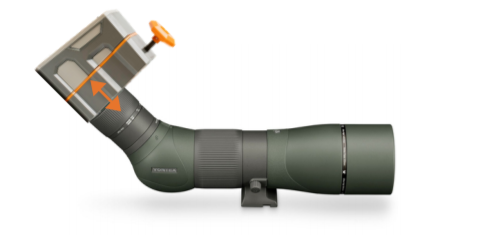
Zoom: Most spotting scopes require you to rotate the eyepiece to adjust the magnification of the scope. If this is the situation in your case, you can rotate the eyepiece without having to re-mount the HAWK. Once you are done adjusting the eyepiece, simply rotate the back half of the system to upright the camera view. The camera will remain centered on the eyepiece throughout the process.

DOWNLOAD
The TARGETVISION app is a free app that is only available for iOS and Android devices. To download the app, please navigate to your device’s app store (the App Store for iOS and the Play Store for Android), search for TARGETVISION (all one word), and choose install. Once the app has been installed, you will need to connect to your HAWK’s WiFi network to see the video feed.

APP OVERVIEW
The TARGETVISION App allows you to see and interact with your target like never before. The app has a clean and simple user interface that maximizes the utility of your device’s screen by showing the camera feed across the entire screen and keeping buttons unobtrusive yet accessible with our most popular features only a tap away. More advanced features are stored within the options menu while settings, support, and media files can be found within the main menu.
Due to the nature of the iOS and Android operating systems, our software must be developed independently to work properly on each platform, essentially doubling our software development time and cost. Currently, we must implement significant user interface and/or feature updates on one platform at a time. This fact has lead to a difference in the user interface and feature set of our iOS and Android apps, which you will see reflected further in the guide below.
Please keep in mind that software development is a very costly and time consuming process. We appreciate your patience and feedback as we continue to improve.
iOS BUTTONS & LAYOUT
The TARGETVISION iOS app is simple and easy to use with the most used features only a tap away. The screen shots below show the three main screens, the home screen, main menu, and shooting options menu. Please reference the icon guide below the screenshots for an explanation of the home screen icons and continue reading for more details on how each feature works.

ANDROID BUTTONS & LAYOUT
The TARGETVISION Android app is simple and easy to use with the most used features only a tap away. The screen shots below show the three main screens, the home screen, main menu, and shooting options menu. Please reference the icon guide below the screenshots for an explanation of the home screen icons and continue reading for more details on how each feature works.

BLINKER SHOT LOCATOR
With the Blinker Shot Locator feature, it’s quick and easy to find your your newest bullet hole. Simply touch the shot locator icon and your most recent bullet hole will start blinking, making it a breeze to find. For the feature to work correctly, you must tap the shot locator button after each shot you take. This is because the feature takes a snapshot of your target each time you tap the button and then alternates between the last two images of your target to blink your last shot. If you don’t tap the button after each shot then you will likely begin to see multiple holes flashing, because the software is just comparing the most recent snapshot to a snapshot of the target the last time you pushed the button.
SHOT MARKING
Shot Marking is one of the core features of the TARGETVISION app. It allows you to keep track of your shots by simply tapping on them as they appear. As you tap, the app will place a semi-transparent marker over the image and will auto number the markers as well. You can adjust the marker size and color via the options menu as well as mark groups of shots different colors. Shot markers cannot be moved once they have been placed but you can undo shot markers with the undo button or remove all markers currently on the screen with the “Reset Overlays” button in the options menu (currently only available on iOS).
MARKER SIZE
The Marker size option allows you to roughly match the size of the shot marker to the size of your bullet hole. Once you select a marker size, that selection is saved as the default marker size until you change it again.
MARKER COLOR/MARKING GROUPS
Changing the marker colors and marking groups are done differently on iOS and Android. The biggest difference between the two is that iOS retroactively marks groups while Android proactively marks them.
iOS
There are two different ways to change the marker colors. The first will change the default marker color and the second will change the marker color of your previous string of shot markers.
Default Marker Color: This setting can be found under MAIN MENU > SETTINGS > DEFAULT MARKER COLOR. The default marker color you choose will be saved until you go in to change it again.
Mark Group: The mark group feature is intended to help you mark prior strings of shots to track your groups or to keep track of different shooters. Once you choose a color from the mark group menu, your
prior string of shot markers will all turn that color. New shot markings placed after marking a group will be in the default color.
ANDROID
Navigate to the SHOOTING OPTIONS MENU > MARKER COLOR. Once you select a marker color, all shot markers will be that color until you choose a new color. To mark a group, be sure to change the color prior to starting a new group.
IMAGE CAPTURE
Taking a snapshot in the TARGETVISION app is simple; however, it is done differently on iOS and Android.
iOS: Tap the camera icon to take a snapshot. A prompt will appear after tapping the icon confirming that the image has been captured Android: Tap the TV icon at the bottom center of the screen. The snapshot will open in another window for your review with a prompt to save or dismiss the snapshot.
All snapshots will be stored within the app’s gallery. To move the image to the gallery on your device, you must go into the gallery and export the image from the sharing menu.
VIDEO CAPTURE
Capturing video in the TARGETVISION app is simple; however, it is done
differently on iOS and Android
- iOS: Simply tap the video camera icon to start and stop recording. While recording, a timer will appear at the bottom of the screen showing the duration of the recording.
- Android: Simply tap and hold the TV icon at the bottom center of the screen until it turns orange. To stop recording, just tap the icon again. After you stop the recording, a prompt will appear asking if you
want to save or dismiss the recording.
All recordings will be stored within the app’s gallery. To move the video to the gallery on your device, you must go into the gallery and export the image from the sharing menu.
*When you record video on iOS, it is just a video recording without audio; on android, it is a video recording but the app also records audio via your device’s microphone.
SESSIONS
Sessions are used to store pictures, video, and data about a particular shooting session together in an album. After starting a new session, all snapshots and recordings made will be stored together in an album within the gallery. After ending a session, new snapshots and recordings will no longer be associated with an album and will be stored in their respective locations within the gallery.
GALLERY
The Gallery can be found within the main menu of the app. The Gallery organizes images and videos under separate tabs and you can store images and videos in an album if you prefer. If you took pictures or recorded video after creating a new session, those images and video can be found in an album with the session name that you created.
LIVE GROUP
The Live Group feature actively calculates your group size with each new shot marker that you place. For the feature to work correctly, you must know the distance between two set points on your target and input that information into the app when you turn live group mode on. It is recommended that you use two corners of your target as reference points for this measurement and input. After inputting a reference distance, the app will begin to calculate the distance between your two furthest shots from each group
ZERO MODE
Zero Mode helps you to zero your optic by calculating the correction needed to move your point of impact to your point of aim. For this feature to work correctly, you must provide the app with a reference distance (just like in Live Group mode), your point of aim, caliber, and distance to the target. After the initial setup, as you mark your impacts, the app can tell you what correction to make in MOA, Mils, or inches, depending on which Display option you have selected in the main menu.
ADDITIONAL RESOURCES
Additional details on features along with detailed screenshots and videos can be found under the support tab on our website, www.longshotcameras.com.
