Products:
- Kahles K16i 1-6×24
- Kahles K1050 10-50×56
- Kahles K312i 3-12×50
- Kahles K1050i FT 10-50×56
- Kahles K4i 4×30
- Kahles K624i 6-24×56
- Kahles K624i 6-24×56 MOAK
- Kahles K1050 10-50×56 MOAK
- Kahles K318i 3.5-18×50
- Kahles K525i 5-25×56
- Kahles K18i 1-8×24 SFP
- Kahles K525i 5-25×56 DLR
DEAR CUSTOMER!
Congratulation and thank you for purchasing this professional competition K product from KAHLES! Before using it for the first time, please read this
information carefully.
All specific technical data and reticle drawings of the KAHLES K products are available online at www.kahles.at.
If you have any further questions, please contact your authorized KAHLES dealer, gunsmith or contact our support team directly.
Your KAHLES team
CONTENT
1 OPERATING ADJUSTMENTS
2 USE AND MOUNTING
3 SAFETY INSTRUCTIONS
4 MECHANICAL CENTER
5 DIOPTER AND PARALLAX ADJUSTMENT
6 SIGHTING IN THE RIFLE SCOPE
6.1 Zeroing on K16i and K18i
6.2 Zeroing the elevation dial on K312i, K318i, K525i, K624i and K1050 MOAK
6.2a Zeroing the windage dial on K312i, K318i, K525i, K624i and K1050 MOAK
6.2b Reset to factory conditions (full elevation) on K312i, K318i, K525i, K624i and K1050 MOAK
6.3 Zeroing the elevation dial on K1050/K1050i FT
6.3a Zeroing the windage dial on K1050/K1050i FT
7 ELEVATION AND WINDAGE ADJUSTMENT
8 ROTATION INDICATOR PIN
9 ANTI-ROTATION PROTECTION “TWIST GUARD”
10 ILLUMINATION
10.1 MAX LIGHT Function K18i
11 REPLACING THE BATTERY
12 STANDARD TOOL FOR K318i AND K525i
13 MOUNTING OF K18i THROW LEVER
14 CLEANING
15 STORAGE
16 CONFORMITY
1 OPERATING ADJUSTMENTS

2 USE AND MOUNTING
KAHLES rifle scopes are waterproof and extremely durable. Nevertheless, careful handling is advised, especially around the turrets. Please protect your rifle scope against excessive impact and abuse.
To ensure proper function and performance use a professional gunsmith to mount your KAHLES rifle scope. Ensure maximum eye relief is achieved. Please read all safety instructions before use.
3 SAFETY INSTRUCTIONS
- Never look directly into the sun or any other intense light through your rifle scope
- Please protect your rifle scope from excessive solar radiation and heat
- Please note the eye relief distance specified for properly mounting the rifle scope
- All repairs must be performed by KAHLES
- The rifle scope must be mounted by professional gunsmith
- Attention – the screws of mounts shall in no case be tightened stronger than max. 240 Ncm / 21 in lbs
- Always check carefully and be certain that your firearm is unloaded before undertaking any work upon it.
4 MECHANICAL CENTER
The reticle has been factory-set to optical center. If you need to reset it anyhow, follow these steps:
1. Turn the elevation or windage adjustment until it stops (do not force).
2. Now turn the adjustment in the opposite direction while counting the total number of clicks until it stops.
3. Half of this total number of clicks is the optical center.
4. Repeat this procedure for the second adjustment turret.
Pay attention, never use any strong force when you do any adjustments on the turrets.
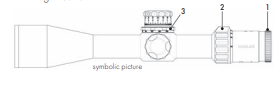
5 DIOPTER AND PARALLAX ADJUSTMENT
- Turn the diopter compensation ring (1) until you get a sharp reticle image
- Turn the parallax adjustment wheel (3) until you achieve a sharp image and the reticle does not move on the target due to head placement.
- Magnification ring (2) turn to increase or decrease magnification
6 SIGHTING IN THE RIFLE SCOPE
After the rifle scope has been properly mounted and bore sighted by a professional gunsmith you will need to sight in your rifle and rifle scope. Attention – the screws of mounts shall in no case be tightened stronger than max. 240 Ncm / 21 in lbs!
Sight in the rifle scope (on the shooting range) to your specific distance and desired point of impact by turning the elevation and windage adjustments to move the bullet impact to your desired point of impact. The direction of bullet impact is engraved on each adjustment. Once you have established the preferred point of impact on the target you will need to zero the elevation and windage adjustments. An arrow with “Up” at the elevation turret and an arrow with “R” on the side adjustment turret mark the direction of rotation for a meeting point shift up (“Up”) or rightwards (“R”). Expert mounting is required to ensure optimum performance.
6.1 Zeroing on K16i and K18i
Once you have aligned the scope to the rifle, you can retain this basic setting. The scale for this is located on the index disc of the elevation/windage adjustment turret.
1. Hold the turret with your fingers
2. Use a coin or an empty cartridge case and turn the locking screw (1) in counter clockwise direction
3. Loosen the locking screw till you get a free moving index disc (3)
4. Turn the index disc/ring (3) until the zero point of the scale is aligned with the index point on the scope
5. Hold the index disc/ring (3) and the turret disc (2) turn the locking screw clock wise in right direction. While performing this process you should hear no mechanical click.
6. Your adjustment is now zeroed to your point of impact.

Pay attention, never use any strong force when you do any adjustments on the turrets.
6.2 Zeroing the elevation dial on K312i, K318i, K525i, K624i and K1050 MOAK
Using the supplied allen key, loosen the two set screws on the turret 1– 3 turns (do not remove the set screws completely) until you have a free moving turret without clicks. With the set screws loosened turn the elevation turret in the down direction (the direction of bullet impact is engraved on the adjustment) until it stops. This will be 3 or 4 marks below the zero mark on the dial. Turn the turret so that the zero on the dial lines up with the indicator mark on the body tube. Align the marks and using the short end of the supplied allen key tighten again the two set screws to approximately 1 Nm or 8 inch pounds. Your elevation is now zeroed.
The zero stop is sited 3 or 4 clicks below the Zero indicator. This feature facitilitates the user finding the Zero indicator quickly and intuitively even in poor light conditions and adapting the turret to special conditions such as for example very high temperatures or closer targets.
Pay attention, never use any strong force when you do any adjustments on the turrets.
6.2a Zeroing the windage dial on K312i, K318i, K525i, K624i and K1050 MOAK
With the rifle and scope sighted in to the desired point of impact loosen the two set screws on the windage adjustment dial 1– 3 turns (do not remove the set screws
completely) and move the dial to align the zero mark to the indicator mark on the body tube.
Using the short end of the supplied allen key, tight the two set screws to approximately 1 Nm or 8 inch pounds. Your windage is now zeroed.

Pay attention, never use any strong force when you do any adjustments on the turrets.
6.2b Reset to factory conditions (full elevation of the vertical adjustment) on K312i, K318i, K525i, K624i and K1050 MOAK
1. Turn the elevation turret (5) in the up direction until you reach the mechanical stop.
2. Use the supplied allen key to loosen the two set screws 1– 3 turns (do not remove the set screws completely) until you have a free moving turret without clicks.
3. Now turn the elevation turret in the up direction until you reach the mechanical stop.
4. Use the short end of the supplied allen key to tighten the two set screws to approximately 1 Nm or 8 inch pounds.
5. Turn the elevation turret in the down direction until you reach the mechanical stop.
6. Use the supplied allen key to loosen the two set screws 1– 3 turns (do not remove the set screws completely) until you have a free moving turret without clicks.
7. Now turn the elevation turret in the down direction until you reach the mechanical stop.
8. Use the short end of the supplied allen key to tighten the two set screws to approximately 1 Nm or 8 inch pounds.
9. You have now deactivated the zero stop feature. Your rifle scope will now have full adjustment travel.
NOTE: The mechanical (physical) stop will be about 3 or 4 clicks below zero. This allows adjustments slightly below zero for special conditions as increased temperature or closer targets.
Pay attention, never use any strong force when you do any adjustments on the turrets.
6.3 Zeroing the elevation dial on K1050/K1050i FT
Using the supplied allen key loosen the two set screws on the turret 1– 3 turns (do not remove the set screws completely) until you have a free moving turret without any clicks. With the set screws loosened turn the elevation turret in the down direction (the direction of bullet impact is engraved on the adjustment) so that the zero on the dial lines up with the indicator mark on the body tube. Align the marks and use the short end of the supplied allen key to tighten the two set screws to approximately 1 Nm or 8 inch pounds. Your elevation is now zeroed.
Pay attention, never use any strong force when you do any adjustments on the turrets.
6.3a Zeroing the windage dial on K1050/K1050i FT
With the rifle and scope sighted in to the desired point of impact loosen the two set screws on the windage adjustment dial 1– 3 turns (do not remove the set screws completely) and move the dial to align the zero mark to the indicator mark on the body tube. Using the short end of the supplied allen key, tighten the two set screws to approximately 1 Nm or 8 inch pounds. Your windage is now zeroed.

Pay attention, never use any strong force when you do any adjustments on the turrets.
7 ELEVATION AND WINDAGE ADJUSTMENT
KAHLES riflescopes have adjustable elevation and windage dials with mechanical and audible clicks. On the K4i this is only possible with a coin or cartridge case. Each click moves the point of impact towards the direction which is engraved on the turrets.
Pay attention, never use any strong force when you do any adjustments on the turrets.
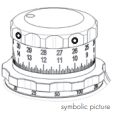
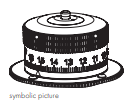
8 ROTATION INDICATOR PIN
Double turn turret
There are two rows of numbers (X) on the elevation adjustment. If the indicator pin (7) is flush to the top of the adjustment you are using the bottom row of numbers (first rotation). If the indicator pin is raised up, you are using the upper row of numbers (second rotation).
At the K318i the pin’s lifting is shown graphically by a raising post.

Triple turn turret
There are three rows of numbers (X) on the elevation adjustment. If the indicator pin (7) is flush to the top of the adjustment you are using the bottom row of numbers (first rotation). If the indicator pin is raised up about 1 mm (red), you are using the middle row of numbers (second rotation). If the indicator pin is raised up about 2 mm off the housing (white and red), the highest row of numbers (third rotation) is in use.

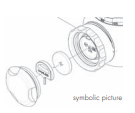
9 ANTI-ROTATION PROTECTION “TWIST GUARD”
The K318i and the K525i offer you the innovative and patented antitwist device “Twist Guard” on the windage turret. A free rotating disc protects the windage from unintended twisting.

10 ILLUMINATION
Most KAHLES rifle scopes are equipped with illuminated reticles. To switch on the reticle illumination turn the illumination switch towards clockwise direction. The illumination intensity will get brighter or lower by turning the adjustment switch more or less. The adjustment can be turned in direction to the off point or to the desired intensity setting. The illumination is switched off when the indicator on the illumination adjustment is aligned with the off marking on the tube. All of our K-models have the automatic-off function of the reticle illumination integrated. If there will be no brightness adjustment over a period of about 2 hours, the reticle illumination automatically switches off. To restart the reticle illumination after the automatic-off is activated, you have to switch it completely off and on again. In any case to prevent depletion of the battery, turn off the reticle illumination when not in use.

10.1 MAX LIGHT Function K18i
The reticle illumination of the K18i is offering an additional “MAX LIGHT Function”, to guaranty the needed illumination intensity even at worse backlight situations. The brighter reticle illumination in the “MAX LIGHT Function” is achieved due to higher battery voltage and will reduce the lifetime of the battery.

11 REPLACING THE BATTERY
The battery is stored in the illumination adjustment.
To change the battery:
1. Turn off the reticle illumi – nation
2. Screw the battery cover (Depending on the model by hand or with a coin) counter clockwise until the cover is unscrewed.
3. Change the battery (CR2032) positive + side facing out
4. Reinstall the battery cover securely
Attention! Use only type CR 2032 batteries. The K16i and K18i contains a spare battery inside the windage turret cap.
Disposal of used batteries
Batteries must not be disposed of as household waste and you are legally obliged to return used batteries. Local facilities exist for returning used batteries free of charge (e.g. in retail outlets or at communal collection points). Batteries are labelled with a crossed-out wheeled bin and the chemical symbol of the harmful substance they contain: “Cd” for cadmium, “Hg” for mercury and “Pb” for lead. Please help us to protect the environment.
12 STANDARD TOOL FOR K318i AND K525i
An Allen-key is stored in the cap of the K318i and K525i illumination unit. It can be used to screw and unscrew the turret’s screws.
13 MOUNTING OF K18i THROW LEVER
The K18i includes two different throw levers. These can be easily changed and also the position of throw levers could be changed stepless, due to the individual needs. Therefore just open the screw with the torx wrench till the throw lever can easily be pulled off. Then the other throw lever have to be pulled on and fixed with the screw at the position which is needed. The screw should just be tightend hand-screwed.

14 CLEANING
We have designed all elements and surfaces to require very little care.
KAHLES lens coatings makes cleaning objective lenses and eyepiece lenses easy, especially when cleaning dried-on mineral deposits (e.g. water marks from condensation). To ensure the long-lasting optical quality of your rifle scope, you should keep the glass surfaces free from dirt, oil and grease. When cleaning the lenses, first remove larger particles with an optical lens brush. For subsequent thorough cleaning, breathe lightly on the lens and clean with the cleaning cloth. The metal parts are best cleaned with a soft, lenscleaning cloth.
Standard Accessory
The special KAHLES Lens-Cleaning cloth can be used to clean even the most sensitive glass surfaces. It is suitable for the objective and eyepiece lens. Please keep the microfiber cloth clean as dirt particles can damage the lens surface. If the cloth is dirty, it may be washed in lukewarm soapy water and allowed to dry naturally. Please use it exclusively for cleaning lens surfaces.
15 STORAGE
We recommend to store the rifle scope in a dry place without excessive solar radiation and heat. If the rifle scope is wet it must be dried prior to storage.
16 CONFORMITY
The devices comply with EU directives 2011/65/EU, 2012/19/EU und 2014/30/EU.


