WARNING: NEVER LOOK AT THE SUN THROUGH THE RIFLESCOPE (OR ANY OTHER OPTICAL INSTRUMENT). IT MAY PERMANENTLY DAMAGE EYES. MAKE SURE FIREARMS ARE UNLOADED & POINTED TO THE SAFE DIRECTION.
The red dot sight is intended for use on pistol slides that possess provisions for subminiature optics. It adopts an industry-standard mounting interface and is compatible with the footprint that meets the criteria shown above. The red dot sight can also accept a picatinny or dovetail mount with a compatible footprint. Don’t exceed 16 inches/pounds of torque on the mount’s screws.

Screw may come with the sight:

ZEROING
The sight features elevation and windage adjustments. Referring to the point of impact you will need to adjust both windage and elevation screws. The elevation is the vertical (up and down) adjustment, usually on the top of the scope. Windage is the horizontal (left-to-right) adjustment, usually on the right of the sight. With the sight is mounted aim at a target 100 yards away. Slowly shoot a small 3 to 5 round test group onto your target. Adjust windage & elevation screws in the direction you want to move the bullet impact. Should your impacts be below your point of aim, dial UP to reach zero. Should your impacts be left to your point of aim, dial R (right) to reach zero. Each adjustment moves the point of impact. Shoot another 3 to 5 round test group. Repeat until you are satisfied with the point of aim.
TURNING ON & ILLUMINATION ADJUSTMENT
The sight is activated by using the digital on/off switch placed on the left of the sight. The sight has 8 levels of visible dot & 2 NV dots. Press and hold the “+” switch for 1 second to turn the unit on. Subsequently press the switch will increase the dot intensity. Press the “-” switch will decrease the dot intensity. Press and hold the “-” switch for more than 3 seconds to turn the sight off.
Automatic Light Sensor (AUT) : Some sights have AUT suffix which means Automatic Light Sensor mode. When the sight is on, press and hold the “+” switch for more than 4 seconds to switch from manual control to automatic light sense mode. The dot brightness is adjusted automatically based on ambient light conditions. If the sight doesn’t have a separate illumination switch to turn on or off. With a battery installed the sight will power on and adjust the brightness automatically based on ambient light conditions. When the protective cap is covered, the sight with intelligent
power management will maximize the battery life. The battery life may vary according to the use, ambient conditions, and reticle intensity. Always install the protective cap on the sight for maximum battery life.
Motion Sensor Ilumination (MOS): If the sight comes with this system, it will power on when it senses any motion and power down when it is at rest after 3 minutes.
BATTERY EXCHANGE
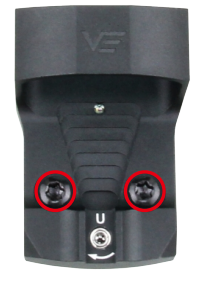
Your red dot sight is powered by 1 piece of the CR2032 button battery. Should the dot grows dim or not turn on, you will need to exchange the battery. To exchange the CR2032 battery use the supplied hex key to loosen the two screws. Remove the sight from the mount. Take out the used battery, exchange it with a new one and then assemble the sight again.
If the sight is battery side loaded, release the two screws on the battery compartment tray. Pry the tray out, put or replace a new CR1632 battery with positive ‘+’ side facing upwards. Push back the tray and fasten the screws.

MAINTENANCE
Your red dot sight, though amazingly tough, is a precision instrument that deserves reasonable
cautious care.
- When cleaning the lens, first blow away any dirt and dust, or use a soft lens brush. Fingerprints and lubricants can be wiped off with lens tissue, or a soft clean cotton cloth, moistened with lens cleaning fluid.
- All moving parts of the red dot sight are permanently lubricated. Do not try to lubricate them.
- No maintenance is needed on the red dot sight’s outer surface, except to occasionally wipe off dirt or fingerprints with a soft cloth.
- Use lens covers whenever convenient.
STORAGE
Avoid storing the red dot sight in hot places, such as the passenger compartments of vehicles on hot days. The high temperatures could adversely affect the lubricants and sealants. A vehicle’s trunk, a gun cabinet or a closet is preferable. Never leave the red dot sight where direct sunlight can enter either the objective lens. Damage may result from the concentration (burning glass effect) of the sun’s rays.
- KEEP BATTERY AWAY FROM CHILDREN.
- IF BATTERY IS SWALLOWED OR ENTERS THE BODY, SEEK IMMEDIATE MEDICAL ATTENTION.
- BATTERY MISUE OR ABUSE MAY RESULT IN LEAKAGE, FIRE OR EXPLOSION.
- DISPOSE OF USED BATTERIES IMMEDIATELY
RETICLE PATTERN

PRESS THE ‘+’ BUTTON FOR MORE THAN 3 SECONDS TO SWITCH THE RETICLE.
VECTOR OPTICS TAILED VIP LIFETIME WARRANTY
Your VectorOptics Paragon line products are covered by our T-VIP lifetime warranty. We will, at our option, either repair or replace your Vector Optics product without any cost if it is damaged or defective. If we can’t repair your damaged product, we will replace it with a brand new one in perfect condition. We proudly stand behind our products. You have our word that we will do what it takes to retain your business as a satisfied customer. You can count on our T-VIP lifetime warranty.
– Unlimited full lifetime warranty.
– Reply to you in 1 working day.
– Free repair or replacement.
– Fully transferable.
– No invoice or receipt is needed.
– No question asked, however, we do appreciate your feedback.
– We pay for shipping back to you.
This warranty does not cover product loss, theft, deliberate damage, abuse, misapplication, or modification. This warranty does not apply to electronic components or batteries. For warranty service please contact our Customer Service Department online at [email protected] for return instructions. If you need to return the product, please ensure the shipment and keep the tracking records. We can not be responsible for your product until it has been received by our Customer Service Department. For products not directly purchased from us, please contact the local dealer for applicable warranty info.


