Product:
M18 4-18×44 Specification
| M18 4-18X44 FFP | |
| Magnification range | 4-18x |
| Field of view @ 100 y | 27.0 – 7.0ft |
| Eye relief @ 18x | 85 mm |
| Total elevation adjustment range | 24.0 MRAD |
| Adjustment value per click | 0.1 MRAD |
| Adjustment per turn | 10.0 MRAD |
| Reticle choices | EMD2 (Enchanced Mil Dot Reticle 2), B20 (Mil Line Reticle) |
| Reticle install | First Focal |
| Total length | 353 mm |
| Weight | 740 g |
| Tube diameter | 30 mm / 1.18 in |
| Construction | 1 Piece Tube / Saddle / Objective |
| Objective lens diameter | 44 mm |
| Outer objective diameter | 51 mm |
| Outer ocular diameter | 43 mm |
| Additional sunshades | 2 Supplied |
| Flip up lens covers | Yes, Supplied |
| Configurations and order codes | M18EMD2 – Enchanced Mil Dot 2 Reticle with 0.1 MRAD Adjustment |
| M18B – B20 Reticle with 0.1 MRAD Adjustment |
Falcon M18
Medium to high power variable magnification Rifle Scopes, designed to aid in the rapid engagement of multiple targets at varying and often unknown ranges.

What’s Included?
Flip up lens covers x 1 set
Lens cleaning cloth x 1
Hex key for windage/elevation turret caps x 1
Threaded sunshade x 2
Objective thread cover (already installed) x 1
Basics
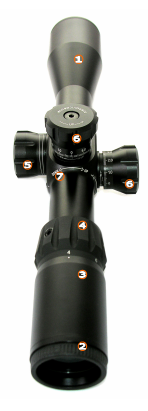
1 – Objective end. Contains the objective lens assembly and objective lens hood. Both the sunshade and objective cover thread into the objective hood.
2 – Ocular end. Contains the ocular lens assembly. This is threaded for adjustment, sometimes referred to diopter correction or ‘European style fast focus eyepiece’.
3 – Eyepiece section.
4 – Magnification ring. This rotates to adjust the magnification setting.
5 – Side parallax adjustment turret. Sometimes referred to as ’side focus’ or ’SF’. This turret is used to dial out parallax, it adjusts back and forth.
6 – Elevation and Windage turrets. These are used to adjust the position of the reticle and ’zero in’.
7 – Saddle section. This houses the elevation, windage and side parallax turrets. To the front and rear of the saddle section is the 30mm main tube.
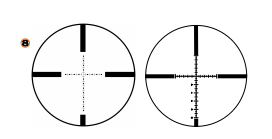
8 – Reticle. A Millradian based reticle located in the first focal plane.
Guidance For Use
Fast Focus Ocular Lens / Diopter Adjustment
- It’s important that the reticle appears sharp and is correctly set to your eye.
- Use the fast focus eyepiece to adjust the sharpness of the reticle to suit your eyesight, by pointing the scope at a featureless bright area such as a wall or open sky. Do not look at the sun!
- Turn the fast focus eyepiece clockwise and anticlockwise until the reticle appears as sharp and defined as possible.
- If the above is not carried out correctly then parallax error may become a problem. Do this first, before the scope is even mounted.
- Once the eyepiece is set then don’t adjust it.
Mounting the riflescope
CAUTION : Ensure the firearm is not loaded when mounting the riflescope.
- All Falcon models are built around a 30mm tube/saddle section of one-piece construction.
- Always use good quality mounts/rings. Poor quality mounts/rings may damage your scope and will almost certainly hinder performance.
- Be careful not to crush the scope tube by over tightening the mounts/rings. Refer to literature supplied with the mounts/rings to ensure the correct torque settings are used on both the top screws and base screws. Each set of mounts/rings and supplied screws should be built to a specific tolerance that will determine the correct torque setting. Typically this will be measured in inch/lbs.
Windage / Elevation Turret Adjustment
- M18 models have an adjustment value of 0.1MRAD per click. This equates to 0.36” @ 100 Yards and 1.0cm @ 100 Metres.
- Its important to remember that the MRAD based adjustment system matches the MRAD nature of the reticle, no MOA or inch conversion is required. 1.0MRAD as displayed by the reticle is equal to 10 clicks of adjustment.
- M18 models offer 10.0MRAD worth of adjustment per turret revolution. (100 clicks)
- Each scope will be preset to mechanical centre (midway point of adjustment range) out of the box. Try and keep both the windage and elevation turrets as close to mechanical centre as possible when zeroing. Optical standard and adjustment consistency may suffer at the extremes of any scopes adjustment range. Sometimes a tapered rail/base or adjustable mounts/rings may be required.
- You will feel a positive resistance ‘stop’ once the scope reaches the extreme of its elevation or windage adjustment. Don’t be tempted to force the turret any further as this will damage the mechanism.
- M18 models feature elevation and windage turret caps that are secured using a single top mounted holding screw. The turret caps can be repositioned as required, normally to display ‘0’. To do this then slacken off the screw using the key provided in the box. Then disengage the turret cap by easing it off the internal shaft. A little force may be required to break the O-ring seal. Reposition the turret cap as desired, and then re-tighten the screw to secure.

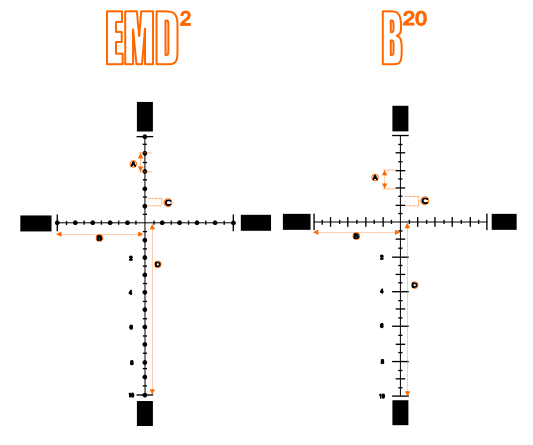
- M18 models use either a B20 Mil Line reticle or Enhanced Mil Dot 2 (EMD2) reticle installed in the first focal plane, calibrated for 1.0 millradian accuracy at any magnification.
- 1.0MRAD = 10cm @ 100m. 1.0MRAD = 3.6” @ 100y. 1.0MRAD = 3.438MOA.
– A = 1.0MRAD
– B = 5.0MRAD
– C = 0.5MRAD
– D = 10.0MRAD - Reticle line thickness = 0.06MRAD
- EMD Reticle Dot size = 0.22MRAD
- For reticle diagrams in greater detail please visit www.falconoptics.com/resources.php where higher resolution pdf versions can be downloaded. Diagrams not to scale.
- Its important to remember that the MRAD based adjustment system matches the MRAD nature of the reticle, no MOA or inch conversion is required. 1.0MRAD as displayed by the reticle is equal to 10 clicks of adjustment.
Sunshade
M18 models are supplied with an additional sunshade. When shooting in low winter sun, or very sunny days then you may find this to be useful. To install then simply remove the thread cover from the objective lens hood and replace with the sunshade. The thread protector can then be added to the end of the sunshade if you wish.
Side Parallax Adjustment
- ’The third turret’ will appear to bring targets in and out of focus.
- On M18 models this is not to be used as an accurate range-finding method. The optical system is not designed to give a shallow enough depth of field and the top end magnification is simply not high enough.
- Use the turret to dial out parallax, bringing both the target and the reticle into sharp focus.
- Generally speaking, the higher the magnification setting then the easier it will be dial out parallax.
Magnification Adjustment
- To adjust the magnification simply rotate the ring by hand to the desired setting.
- CAUTION : Do not tamper with the hex screw on the magnification ring, this does not adjust the ring tension.
- The zeroed point of impact (POI) should remain unchanged across the entire magnification range.
- Additional aim points that may be used for holdover/under and windage will also remain unchanged across the entire magnification range. This is because the reticle is installed in the first focal plane (FFP).
- The size of the reticle and size of the target will shrink and grow in unison as you adjust the magnification setting.
- The reticle thickness does not alter in relation to the target, it is not dependant on magnification. Reticle thickness is exactly the same at 4x as it is a 18x for example.
Care and Maintenance
- With the exception of repositioning the turret caps along with adding/removing sunshades and the thread protector then do not attempt to disassemble the scope.
- Do not tamper with the hex screw on the magnification ring, nor the nitrogen port screw on the base of the saddle.
- Do not tamper with the coil spring cover which is situated underneath the side parallax turret on the scope saddle.

- Do not attempt to ‘re-parallax’ the scope by adjusting the position of the front lens assembly. In doing so you run the risk nitrogen loss and moisture ingress over time.
- You will feel a positive stop at the end of the travel ranges for the windage and elevation turrets, focus eyepiece and side parallax adjustment turret. Don’t be tempted to apply more force once you reach the stop.
- When mounting the scope always be sure to check the torque settings for the mounts/rings that you plan to use.
- The external lens surfaces can we wiped clean with the lens cloth provided. Remove any noticeable particles of dirt or sand in advance using a lens blower or a very soft brush. Take care in doing this to ensure the outer lens coatings do not get scratched.
- Store the scope in a moisture free environment.
- Don’t leave the scope in direct sunlight whereby the suns rays can enter either the objective or ocular ends.
- Avoid storing the scope in areas that will reach very high temperatures.
- CAUTION : Never use the scope to look at the sun!
Troubleshooting
Can’t zero the scope, running out of windage and/or elevation adjustment
- Rule out common alignment issues such as: barrel alignment and shift, barrel threaded at an angle, rail/receiver install, rail alignment, mount/rings install and alignment.
- It might be that a tapered (inclined) rail is necessary in order to gain the desired elevation adjustment.
- Adjustable mount/rings are also available, often these are windage and elevation adjustable.
I’m seeing a dark shadow around the image edges, it seems to disappear at higher magnification but return at lower magnification
- Windage and/or elevation turrets are dialled to far from mechanical centre. Return them closer to mechanical centre and the shadow will ease.
- If your having to dial in that much windage/elevation in order to zero then we would recommend the use of a tapered rail or adjustable mounts/rings.
My group size has opened up after shooting well in the past / Shift in point of impact
- Recent change of ammunition?
- Silencer/moderator alignment?
- Inconsistent head position?
- Barrel shift?
- Warped stock fouling barrel?
- Change to focus eyepiece setting?
- Scope appear to be shifting in the mount/rings? Have ring/base screws worked loose?
- Play/movement between the rings/rail/receiver?
- Parallax being dialled out correctly?
- Windage and/or elevation turrets are dialled to far from mechanical centre? Loss of tension on erector spring. Return closer to mechanical centre.
Side parallax turret difficult to turn after mounting the scope or suddenly develops stiffness / Difficulty in dialling out parallax
- Torque setting on the mount/ring screws could be too high. Drop the level of torque applied with particular concern to the front mount/ring.
- Mount/ring could just be out of tolerance, applying uneven force to the tube and putting strain on the side parallax mechanism.
- Try shifting the front mount/ring further forward, closer to the objective end.
- If after removing the mount/rings altogether and the side parallax turret still feels stiff to rotate then contact Falcon Optics
Optical standard suddenly seems noticeably poorer
- Recent changes to zero and elevation/windage setting? Optical standard may suffer at the extremes of any scopes adjustment range.
- Check for changes to focus eyepiece setting and that parallax is being correctly dialled out.
- Head alignment consistent?
- Shooting in low sun? Use the sunshade.
- Check for any obstructions on exterior lens surfaces such as dust, dirt and condensation. See care and maintenance section.
Troubleshooting continued…
- Mirage on a hot day? Only way to combat this is to drop the magnification setting.
- Any debris visible within the scope? Any signs of moisture ingress? If so then contact Falcon Optics.
Scope does not seem to track and shift the point of impact as it should
- If you dialling for elevation then check the position of the windage turret. If the windage turret is too far from mechanical centre then this will impact on the consistency of the elevation adjustment and vice versa. In this scenario it will even limit the total elevation adjustment range available to you.
- If you are dialling adjustment and the scope is reaching the end of its adjustment range then you may notice a dropoff in the accuracy of each click.
Windage and Elevation turrets feel mushy and don’t give much of a ‘click’
Remove the offending turret cap and you will notice an O-ring on the lower portion of the turret internal. Its this Oring that is providing the friction and hindering the feel and ‘click’. You can try re-lubricating the O-ring with a silicone based grease or spray and you should notice an improvement.
Warranty
Your new Rifle Scope has a 10 year warranty that covers defects in materials and or workmanship.
The warranty does not cover instances of abuse, user error, improper use or should the scope be dismantled by anyone other than Falcon Optics or its representatives.
The warranty is limited to the original person that purchased the scope and is non transferable.
The original proof of purchase is required in the event of a warranty claim. No guarantee can be given if a dated proof of purchase can not be provided.
If you are concerned that the Rifle Scope has developed a fault or defect then either contact Falcon Optics directly or contact the Falcon Optics representative from which the scope was purchased.
In cases where the Rifle Scope does need to be returned then details of where to return to will be given at the time of contact. Do not send the scope without contacting either Falcon Optics or its representative in advance and obtaining return authorisation.
The original proof of purchase must be sent with the scope being returned, along with full name, address and contact details. A letter with as much information on the fault as possible should also be included. The scope should be well packaged, pre-paid and fully insured against damage or loss.
After returning, the unit will be inspected then repaired or replaced at the option of the guarantor.
For more details on the returns procedure please consult the resources section of the Falcon Optics website – www.falconoptics.com or contact Falcon Optics directly. The returns procedure will differ if you are outside of the United Kingdom.
The terms and conditions above set out the minimum that we will provide and are in addition to your statutory rights.
Export Notice
This Rifle Scope is classified as a Strategic Military Item ML1d. It can’t leave the United Kingdom without a valid export license.
Do not attempt to export this scope from the UK without written permission from the Export Control Organisation of BIS (Department for Business, Innovation and Skills).
If you are outside the UK then similar rules may apply, consult with your Export Control equivalent before taking/ sending the scope abroad.
