Table of Content:
1. Mounting Your Athlon Riflescope
a) Scope Dimensions
b) Focusing the Scope
c) Adjustment for Maximum Eye Relief
d) Bore Sighting
e) Zeroing the Scope and setting zero stop
f) Base adjustment and shimming
2. Reticles
3. Maintaining Your Riflescope
4. Trouble Shooting Tips
Congratulations on purchasing an Athlon Riflescope. Athlon is the ancient Greek word for “Prize” or “Medal.” We think that with the purchase of your Athlon product you have won the best “prize” on the market today. Great Quality while still being a great value.
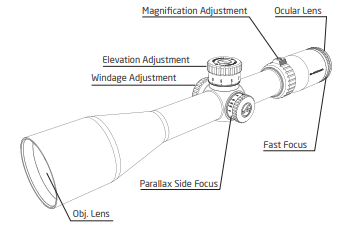
1. Mounting Your Athlon Riflescope
CAUTION: BEFORE MOUNTING A RIFLESCOPE BE SURE THAT THE FIREARM IS NOT LOADED, HAS ACTION OPEN AND THE MUZZLE POINTING IN A SAFE DIRECTION. SAFE FIREARM HANDLING PROCEDURES NEED TO BE PRACTICED AT ALL TIMES.
To achieve the best performance from your rifle and your Athlon Scope, your scope must be mounted properly. If you are unfamiliar with proper procedures to mount a scope, we highly recommend to have the scope mounted by a qualified gunsmith.
Athlon recommends you use high quality, appropriately sized rings and bases matched to your rifle when mounting your scope on the rifle. Please note that most ballistic charts use 1.5” as the standard mounting height for scopes when publishing ammunition information. Higher mounting height will have an effect on the impact point of the bullet. Mount your scope as low as you can without it touching the rifle or impeding the operation of the
action of the gun. Attach bases and the bottom of the rings to your rifle. Be sure to follow the manufacturer instructions supplied with the rings and mounting base.
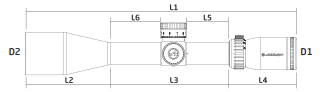
| Riflescope Model | L1 | L2 | L3 | L4 | L5 | L6 | D1 | D2 |
| 4-16×44 FFP | 14.2 | 4.3 | 6.3 | 3.6 | 2.5 | 2.6 | 1.71 | 2.0 |
| 6-24×50 FFP | 14.6 | 4.5 | 6.3 | 3.8 | 2.2 | 2.6 | 1.71 | 2.25 |
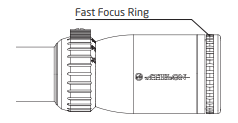
b) Focusing the Scope
The purpose of the Fast Focus eyepiece is to focus the reticle in the scope to your eyes. For a fast focus eyepiece, just simply rotate the fast focus ring at the end of the eyepiece in either direction to get a perfect clear reticle while looking through the scope pointing at a flat plane surface. This is important to do prior to mounting.
c) Adjust for Maximum Eye Relief
i. You need to adjust the scope for maximum eye relief before tightening of the scope rings, to avoid injury from recoil.
ii. With the scope on lowest magnification, move the scope forward as far as possible in the rings.
iii. With the rifle in normal shooting position, look through the scope and slowly slide the scope back towards you. When you finally see the full field of view with sharp and clear edges, stop. Make sure the scope has not rotated so the reticle is tilted.
iv. Rotate the scope until the elevation dial is at the top of the scope and the vertical crosshair of the reticle matches the vertical axis of the rifle. This will be easier if you find a vertical reference such as the straight edge of a building or a telephone pole. Make sure the scope has not moved forward or backward while doing this.
v. Tighten the rings per the manufacturer’s instructions.
d) Bore Sighting
Bore sighting is a preliminary procedure to achieve proper alignment of the scope with the rifle’s bore.
i. The initial bore sighting of the scope can be at short range of 50 yards. This is easier than trying to bore sight at 100 yards and will get you on the paper at that distance, so to save time and money at the shooting range. We highly recommend using a bore sighter, but make sure to follow the manufacturer’s instructions.
ii. This can also be done by removing the bolt and sighting through the barrel on a bolt action rifle. Make sure the rifle is placed solidly on a bench and the bolt is removed. You can then sight through the bore and center the target inside the barrel (Note: Many ring and base sets have some kind of windage adjustments. Use these external adjustments first before using the scopes internal windage adjustments). With target centered in the bore, make windage and elevation adjustments until the reticle crosshair is also centered over the bulls eye.
e) Zeroing the Scope
IF A LASER BORE SIGHTING OR ANY OTHER SIMILAR DEVICE INSIDE THE BORE WAS USED, IT MUST BE REMOVED BEFORE FIRING. AN OBSTRUCTED BORE CAN CAUSE SERIOUS DAMAGE TO THE GUN AND POSSIBLE INJURY TO THE SHOOTER.
i. Set parallax side focus knob to the 100 yard position and variable-power scopes to highest power. Ideally set the rifle on a two or three holding point gun rest, and then fire three rounds at a target 100 yards away. Observe the bullet holes on the target and calculate how far those bullet holes are off the center of the target, and then adjust windage and elevation knobs to move the center of the reticle up, down, left or right.
Fire another three rounds, then observe and adjust. Repeat this step as necessary until the three round bullet holes are perfectly aligned with the center of the target.
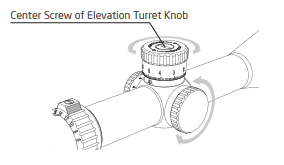
ii. Setting Windage and Elevation and locking your zero stop Athlon Midas TAC scopes have removable locking screws of elevation turret knob and capped windage knob. Once a rifle has been zeroed in, simply remove the screw and take out the turret knob. After you removed the elevation knob, you will see a 1/8 inches thick black plate inside. Just simply tighten three side screws of the plate while making sure the T side of the plate touches the stopping screw on the base so the plate will not turn any further clockwise (down direction), and then put the elevation turret knob back on with zero line aligned with
the vertical mark below the turning knob, and last tighten the screw to lock the knob in. To set zero on the windage knob first take off the turret cap and unscrew the top screw on the
inner knob. Then pull out the knob and put it back with zero mark aligned with the horizontal mark below the turning knob.

Finally tighten the screw to lock the knob in and then put the cap on. There is no zero stop function for windage knob.
By zeroing the rifle at 100 yards, the shooter can calculate how many clicks of adjustment are needed for different distances or wind conditions. After shooting, the shooter can
quickly turn the elevation knob clockwise (down direction) and go back to the zero position once the knob cannot be turned any further. DO NOT OVERTURN THE ELEVATION KNOB ONCE IT STOPPED.
Athlon scopes have several options available, 1/4 MOA and 1/10 MIL for the click values of elevation and windage adjustment depending on different configurations of scopes and reticle selections. MOA, a unit of angular measurement, is defined as a minute of angle, a minute is 1/60th of one degree and 1/21600th of a circle. One MOA equals 1.047-inch (rounded down to one inch) at 100 yards, two inches at 200 yards and to ten inches at 1000 yards. 1/4 MOA per click takes four clicks to move point of impact one inch at 100 yards. MIL, which is short.
for Milliradian and another unit of angular measurement, is defined as 1/1000th of a radian (6.2832 radians in a circle) and 1 MIL equals to 3.438moas and 3.6 inches at 100 yards, 7.2 inches at 200 yards, and to 36 inches at 1000 yards. 1/10 MIL per click takes 10 clicks to move point of impact 3.6 inches at 100 yards. Knowing the click value and the number of clicks needed for different distance is critical to dial in elevation and windage adjustments based on the rifle ballistics and wind velocity.
f) Base Adjustment and Shimming
Athlon riflescope reticle comes centered from the factory. If you need to make additional adjustments when initially sighting in your scope, many ring and base setups allow you to adjust windage at the base mount. If possible, use these adjustments for initial windage change. Though not usually necessary, you can correct the elevation adjustments using shims under the base mount. Assuming typical ring spacing of 3.25 inches, a shim of .001 inch will yield one inch at 100 yards, two inches at 200 yards, and so on. Shim under the front base for more down adjustability and under the rear base (nearest shooter) for. You
may use shims under the front base to achieve more downward adjustability or place under the rear base (nearest shooter) to achieve more upward adjustability.
2. Reticles
The reticles in your Midas TAC riflescope are first focal plane (FFP) reticles that are located in front of the image erecting and magnifying lenses. With the reticle in this position, the reticle is magnified along with the viewing image. The advantage of this type of reticle is the size of the reticle stays the same size in relationship to the size of the target. This allows for any subtentions on the reticle to be the same at any power. Please see the following reticle subtensions and find more details from reticle instruction manual to fully utilize the features and maximize the performance of the reticle design. You can download the reticle instruction manual from the product specifications tag of the product page on www.athlonoptics.com
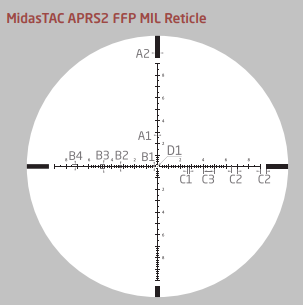
| 4-16×44 model | A1 | A2 | B1 | B2 | B3 |
| SUBTENSIONS IN MIL | 0,04 | 0,4 | 0,1 | 0,18 | 0,4 |
| B4 | C1 | C2 | C3 | D1 | |
| * 6-24×50 model: A1 = 0.03 | 0,15 | 0,2 | 0,5 | 1 | 0,04 |
3. Maintaining Your Riflescope:
Disassembling or cleaning the scope internally will void the warranty. If the scope requires repairs, please refer to the warranty section for complete instructions.
The external optical surfaces should occasionally be wiped clean. Use the lens cloth provided or an optical quality lens paper to wipe out dust or dirt on the external lens surface. If large sand particles or heavy dirt contamination is observed, remove using soft brush or by blowing them away. Apply lens cleaning liquid before wiping off. Always keep the protective lens covers in place when the scope is not in use to avoid dust collecting on the surface of the lenses. Store the unit in a low-humidity environment.
4. Trouble Shooting Tips – Inaccuracy Issues
i. Check scope mounting and make sure there is no movement when pulling the scope by hands. Tighten the mounts if there is any movement observed.
ii. Use a bench rest or sandbag to support the barrel and stock when making windage and elevation adjustments. This will help eliminate movement.
iii. It is recommended using the same type of ammunition with same weight.
iv. Check your rifle stock, as a loose stock changes the point of impact.
v. Make sure your rifle chamber and barrel are clean
vi. Make sure rifling of the barrel is not damaged and no excessive grease inside the barrel
vii. For any technical related questions, please contact Athlon Optics at [email protected] or call toll free 1-855-913-5678
THE ATHLON GOLD MEDAL LIFETIME WARRANTY*
Your Athlon product is not only warranted to be free of defects in materials and workmanship for the lifetime of the product. Athlon will also repair or replace, at no charge to you, your product if you should damage it through normal use. No receipt is needed, no
registration is required. This is a commitment that Athlon Optics will be the best product you can buy for your money.
*This warranty does not cover damages caused by deliberate damage, misuse, theft or maintenance provided by someone other than the Athlon Authorized Service Department.


