Product: Aimpoint 3XMag
1. PRESENTATION
The Aimpoint 3XMag Magnifying Module can be used in conjunction with most Aimpoint sights for long-range aiming, alternatively whenever the situation needs closer or more detailed aiming capability. The 3XMag can also be used as a hand-held 3X observation device.
The 3XMag has no reticle itself but uses the red dot in the Aimpoint sight as the aiming reticle, thus eliminating the need for re-zeroing when shifting from non-magnified to magnified aiming and vice versa.
The 3XMag is rubber covered for increased protection from shock as well as an ergonomic grip when used as a monocular. For quick attachment and release, we recommend the use of the Aimpoint TwistMount.
2. SPECIFICATIONS
Optical System
Magnification: 3X
Objective diameter: 20 mm
Field of view (FOV): 7°
Exit pupil diameter: 7 mm
Eye relief at: 5° FOV 40–90 mm
at full FOV: 60–65 mm
Dioptric adjustment Fixed: -1.0 D
Photopic, integral transmission: >80%
Spectral transmission: >60% (700–1000 nm)
Resolution (lp/mrad): >12
Parallax at 200 meters: <0.2 mrad
Physical Specifications
Dimensions (LxWxH): 110 mm x 44 mm x 41 mm (4.3” x 1.7” x 1.6”)
Weight: 200 grams (7.1 ounces) including rubber cover
Material housing: Anodized aluminum, dark grey, rubber covered black
Environmental Specifications
Temperature range: -45° C to + 70° C in operation and storage
Humidity: 0–100 % condensing or non-condensing
Immersion: 20 meters (67 ft)
Mechanical interface
The 3XMag is provided with a 30 mm diameter tube (for mounting) and with 4 screw holes in the bottom surface for other mounting alternatives.
3. Operation under normal use
WARNING: Ensure that the weapon is unloaded, the safety selector is in the “safe” position, and the weapon is pointed in a safe direction before attempting to install, remove or perform maintenance on the 3XMag – other than attaching and detaching it under normal use.
3.1 Preparation for use
The 3XMag can be mounted on the rail of the weapon in three different ways:
- PRIMARY: by means of a ring attached to the front 30 mm diameter tube, for example the Aimpoint TwistMount (see picture under chapter 3.2)
- OPTION 1: use the rear 30 mm diameter tube in conjunction with the front tube
- OPTION 2: use the four M3 screw holes on the bottom surface for custom mounting hardware
In order to use the 30 mm diameter tube(s), the rubber covering that surface must first be removed. Remove rubber from the front tube as shown in fig. 2 below when TwistMount or one ring is used (most common). Remove rubber from both tubes as shown in fig. 3 when both tubes are used. Use a sharp knife and carefully cut through the rubber along the circumferential groove making sure not to cut into the metal body

If the lower four screw holes are used for mounting, the rubber doesn’t need to be removed.
3.2 Installing the 3XMag on the weapon
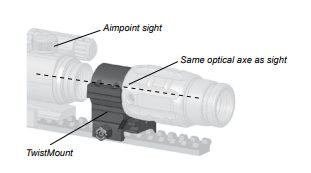
For quick attachment and release of the 3XMag, we recommend the use of the Aimpoint TwistMount (see pict. below). The height of the 3XMag mount should be such that the optical (center) axes of the 3XMag and of the Aimpoint sight coincide (see pict. below). Select a suitable position of the 3XMag on the weapon base, so that the eye relief will be correct and comfortable.
Assemble the 3XMag to the mount chosen and install it on the weapon. The 3XMag should be mounted with the flat metal surface facing downwards (Aimpoint logo on top).
Carefully tighten the mount to the weapon base and retighten after a few rounds.
3.3 Operation procedures
The 3XMag does not need to be zeroed. However, the Aimpoint sight used together with the 3XMag must be zeroed so that the red dot of the sight creates the correct point of impact.
Additionally, the 3XMag has two Allen screws which allow the user to center the red dot of the Aimpoint sight when viewed through the 3XMag.
Centering the dot inside the 3XMag is not necessary, but creates a more natural feel.
NOTE: Any adjustment of the 3XMag does not affect the point of impact. Do not continue to adjust the screws if you encounter resistance.
The Aimpoint 3XMag, Magnifying Module is now ready to be used.
4. Operation under extreme conditions
Use in extreme heat or cold, salt air, sea spray, water, mud and snow, dust and sand storms or high altitudes doesn’t require any special procedures.
CAUTION: The lenses shall never be cleaned with fingers but with a lens paper/cloth. If no lens paper/cloth is available, simply blow away the dirt or fog up the lenses and dry them with a clean and soft piece of cloth.
5. Maintenance
The 3XMag does not require any particular maintenance while used under normal conditions.


